Quirks of SoftEther VPN Server that came with DD-WRT

DD-WRT came with SoftEther VPN and it looked pretty scary because it shows no user interface and a box for you to enter a config file!

Turns out SoftEther VPN’s Remote Admin interface is basically a tool that takes all user settings, generate a config file and upload it to the server behind the scenes!

Concepts to know

vpn_server.config is the core file the defines the server.

SoftEther VPN Server Manager (The remote admin program) is basically a tool to generate the config text string from the UI and pass it to the server’s memory (not file yet until the server stops and flushes its config state out)

Default location of the config file

SoftEther by default reads and writes the vpn_server.config file which controls everything in a JFFS folder. So you are better off identifying it by doing a path search because they move around from version to version of dd-wrt:

find /jffs -name vpn_server.config

So for my case the core file path is

/jffs/var/softethervpn/vpn_server.config

Config file’s file access/update mechanism

SoftEther’s explicitly stated that their config file (vpn_server.config) handling mechanism does not flush the current state in use to the file until the server stops. So it has the following behavioral implications:

  • Changes made by the admin program is reflected immediately despite no file is updated
  • If you change the config file while the server is running, the changes will be lost/overwritten as the server flushes the data on RAM to disk
  • If you abruptly power off the server, the changes made while the server is running (through the remote admin program) is lost as it doesn’t have a chance to flush the updated state out.
  • If you read the config file while the server is running, you are not getting the changes that are currently done through the Manager (Remote Admin) program.
  • In summary the config file is stale while the server is running.
  • When loading the config file to the server by any means (command or GUI), the server parses the entire file and immediately scan and act on the new state defined by the config file (eager execution), not waiting for the next turn the specific state is accessed (lazy execution).

Softether on DD-WRT has no memory out of the box!

Disable this WebUI section entirely and script it yourself!

Out of the box the DD-WRT did not specify which config file to tie to (or open with by default) so the config received from the Server Manager only stays in memory and is not written anywhere! WTF!

So every time I reboot, the settings are totally lost and I have to re-enter it from scratch. Linux mentality again! People did the hardest fun work showing off how smart they are yet their software doesn’t gain the mainstream adoption because nobody ties up the loose ends so the 95% excellent work got sabotaged by the 5% loose ends that are not tied!

Turns out Softether, if enabled in DD-WRT‘s web UI, will always boot with a blank config which makes it useless!

The stuff in the Web UI in general loads BEFORE the startup (user custom) scripts! This means you are opening the router up for a few seconds of confused state before your startup scripts loads your custom config file to Softether on the fly!

This few seconds of sloppy logistics has more sinister effects than the designer expected (I bet he thought loading a config on the fly later is good enough)! When we connect to the Softether server admin tool while it’s on a blank config, it will ask the user to create a new password then write it as a new config! If you finished initializing a blank config (creating a new password) before your startup scripts kick in with the old config file you meant to load, you just nuked your intended config file by overwriting it with a blank you just initialized with your new password!

This means the whole Web UI on Softether is a disastrous TRAP! Disable it!

Softether is pre-installed and you must enable Softether solely from startup scripts to avoid this undesirable behavior that you might accidentally overwrite your config file with a blank!

Luckily by reading the source code, I realized that the pre-installed Softether won’t be neutered if we don’t enable it in the Web UI. The Web UI primiarly calls vpnserver start to start the Softether service, which we can do it ourselves LATER in our custom startup scripts. This means we can safely just disable the Web UI’s garbage Softether section.

Script it yourself

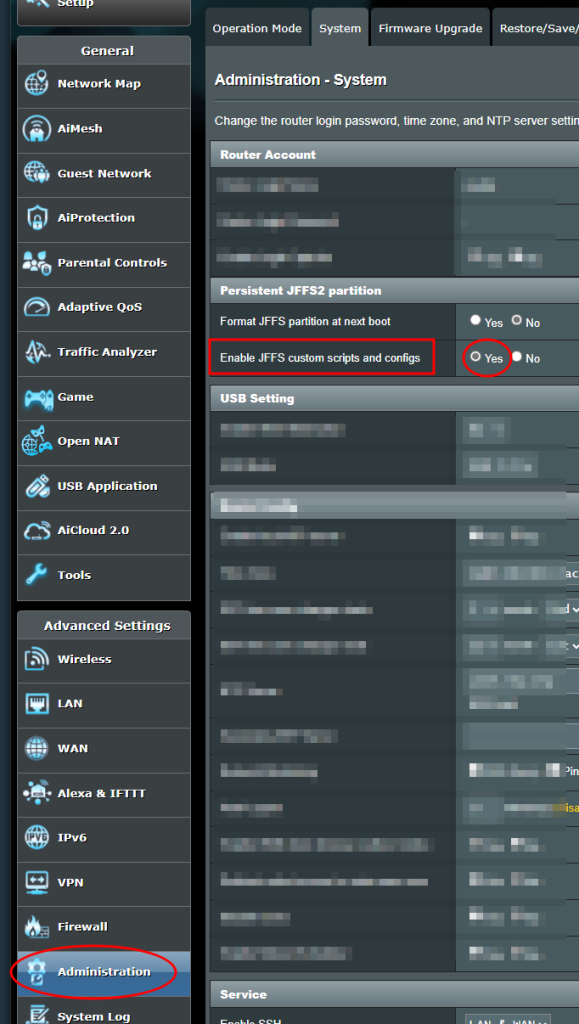
You need to start by enabling JFFS (if not already done so) so you can put in your own startup scripts and saved config file.

Step 1: Load the config file into the running server’s memory on start

The key idea came from this forum post DD-WRT :: View topic – SoftEther Working after reboots *Special Way with JFFS2*. There’s a programatically way to load a config file at any point:

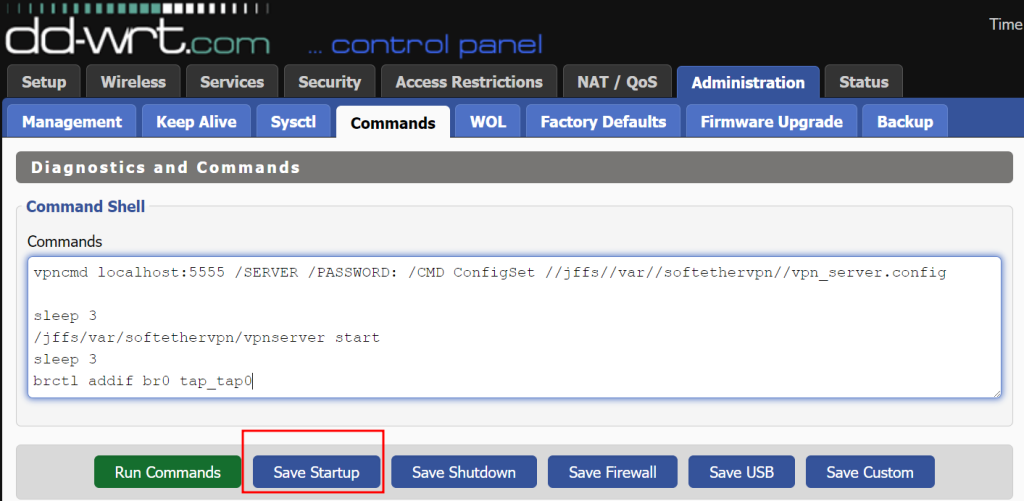
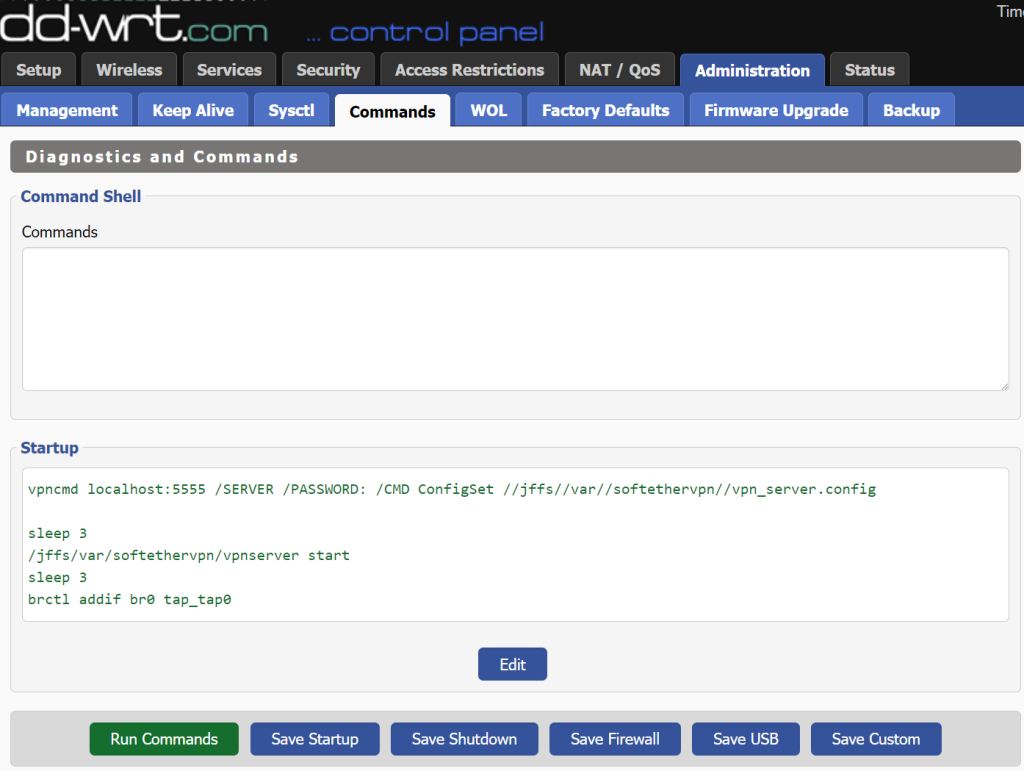
vpncmd localhost:5555 /SERVER /PASSWORD: /CMD ConfigSet //jffs//var//softethervpn//vpn_server.config

vpncmd is a prompt based command line user interface like diskpart, but there’s a shortcut to log into the server and execute a command like ConfigSet in one line instead of starting vpncmd first then type the syntax, which is the /CMD switch:

Note that the program uses ‘//’ for the path names to prevent the ‘/’ symbol from being misinterpreted as a command switch.

Technically you can load any config file anywhere, but if you want to read the config file SoftEther VPN server flushes out (the most updated state after your changes through the Remote Admin interface), stick with loading the default path. This is likely what most people wanted (closes to live edit).

/SERVER merely means the remote admin interface is going to administer a SoftEther VPN Server/Bridge, not Client, or VPN tools mode. Yes, you can puppeteer the Client setup managing connections from elsewhere with the all-in-one vpncmd tool, so the distinction is necessary.

/PASSWORD: should be left empty as the SoftEther VPN server ALWAYS start in a blank state (with a blank password) until you explicitly tells the server program to load a config file into its memory. The server starts blank is the reason we had to go through this drivel in the first place. If you had a set password, you already had a config file loaded.

Step 2: Enabling the server after the configuration file is loaded

I typically give it around 3 seconds for the changes to reflect after loading the config file before doing anything else with it. Wait 3 seconds then start the server

sleep 3
/jffs/var/softethervpn/vpnserver start

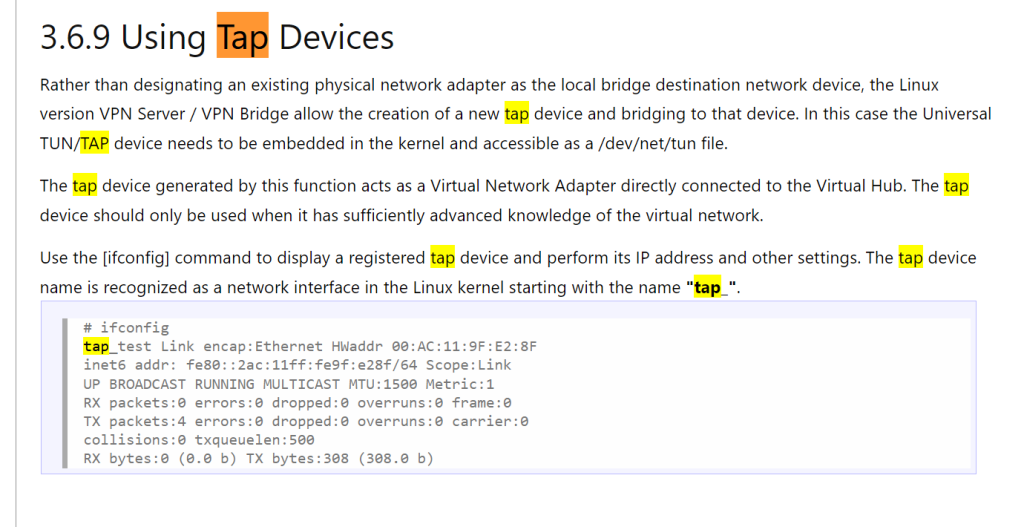
The server must be started BEFORE briding TAP interface in the next step because Softether programmed it robustly: the TAP inteface has the same lifetime as when the Softether server is active. It doesn’t exist if the Softether service (vpnserver) didn’t start, and the TAP interface is gone after the service stops.

Step 3: Add the TAP adapter to the LAN Bridge

This part is described in my other article for a different router firmware platform (Merlin WRT), but the same idea translates here: you need a TAP adapter to put SoftEther VPN Server on a Router, despite SoftEther UI has the option to create the TAP adapter, it doesn’t have the feature to add that newly created TAP adapter to the LAN bridge and therefore renders the feature useless out of the box the way it came with DD-WRT!

The good part about DD-WRT is that the tun kernel module is already loaded so SoftEther VPN server can freely make the TAP adapter (for Merlin you need to modprobe tun first).

Since the TAP adapter only appears when SoftEther’s VPN is running WITH with config file that defines the TAP adapter, you have to make sure give enough time for the TAP adapter to finish building before attempting to bridge it or it’d fail!

If you call your TAP adapter tap0 in SoftEther’s config, it’s called tap_tap0 in Linux when it exist. Most often the LAN bridge is called br0, so if you have these common default names, the command to add the TAP interface to the LAN bridge is

sleep 3
brctl addif br0 tap_tap0

Of course replace the names accordingly. You can check the names by ifconfig or ip link show, or use whichever tool you know that lists all network device and adapters.

Summary


SIDE panel: DD-WRT’s text entry box for config string (useless)

The text box in DD-WRT’s UI for SoftEther VPN is hardwired to /tmp/vpn_server.config (EDIT: it’s broken now as of 2024-05-11. The text box now loads and writes directly onto the nvram variable called sether_config, which doesn’t even interpret a file path anymore.), which is freaking used by nowhere unless the user points to it. WTF?! This is very unpolished and wastes people a lot more time than it saves. At least drop people a hint with a text note saying this is not done yet and the rail connects to nowhere!
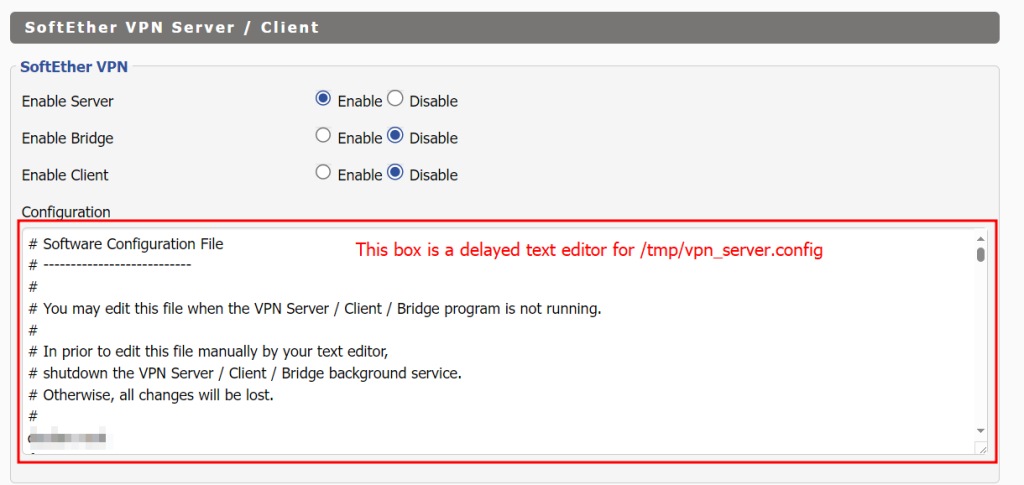
As said above, we should disable the entire “SoftEther VPN Server/Client” section in the WebUI anyway so you won’t even get to use this worthless ‘Configuration’ textbox. I’ve wasted so much time on this nonsense and wished this WebUI section didn’t exist in the first place. It’s just irresponsible to leave something this broken out there that ended up being a deadly trap/time-sink.

Loading

Installing SoftEther VPN Server in Asus Merlin WRT

I’m experimenting with SoftEther as the user experience/interface is a lot more polished than WireGuard and OpenVPN and it has wide platform coverages. The Windows administration interfaces are sensibly designed (organized conceptually), unlike the Linux software culture that basically pretend to have a user interface yet it’s just a step away from editing the raw config file. SoftEther’s documentation also has nice graphical illustrations and it’s use cases oriented. The best part of the docs is that they are short and to the point.

Here I have a use case that’s not as quite as common for SoftEther’s users, so I might as well do a quick write up so if I run into this again in the future, I don’t have to do the research again.

Use case: router doubling as VPN server

I made a diagram based on my current understanding of how ethernet router works, and what needs to be done to have the router dual as SoftEther VPN server.

No guarantee that it’s the correct model and the lingo, and I’d appreciate comments to help me improve as I’m still learning (I was in algorithms and non-networking software development, more on the DSP side + light embedded systems, so this area is new to me).

  • The part shaded in blue is the new part we are building.
  • Installing SoftEther from Entware is just the square block.
  • You need to modprobe tun to let the SoftEther Server Admin software create the TAP port (made up Ethernet card).
  • At the same time the TAP port is created, say tap0, what SoftEther ‘bridges‘ is NOT the LAN, but the orange link in the diagram that goes to the virtual hub (which belongs to a VPN server instance). This lingo confusion wasted me days.
  • The ‘bridge’ on SoftEther’s side tells the incoming VPN connection which ‘Ethernet card’ (turns out to the the TAP interface) on the host computer should act on its behalf.
  • I felt like something is odd that SoftEther did not ask me what local network should the TAP interface go into so I suspect the TAP is just sitting there not talking to anybody, and it turned out to be the reason why my incoming VPN connection succeed but I’m not getting DHCP assignments.
  • I bit the bullet and understand how a Linux router work as if it were a computer with 5 Ethernet cards and one important piece of the puzzle is that the 4 LAN ports aren’t directly talking to the the WAN, but instead they form a bridge (software switch) which the bridge represents them and talk to the processed WAN traffic.
  • So the missing link is the double-line on the diagram where I add the TAP interface to the LAN bridge, namely brctl addif br0 tap_tap0. Linux adds a tap_ prefix to tap interfaces so it’s tap_tap0 for tap0 in SoftEther.
  • One more non-obvious thing here is that you also need to register the brctl a few seconds (using sleep delay) right after the SoftEther VPN Server service starts and nowhere else. The TAP has to exist before you put it on the LAN bridge and the TAP is programmed correctly to be as short-lived as needed, which is very responsible.

What to watch out for this use case

SoftEther’s interface does support creating a TAP adapter, but it provides scary warnings as this is an unusual settings.

TAP depends on the TUN module being loaded first, but Merlin-WRT’s firmware do not load this out of the box.

Some other websites tells you to install packages ip-full (for ip command) and OpenVPN (for the TAP) adapter, but it’s not necessary in some newer releases of Merlin-WRT. It’s all there, just waiting for you to modprobe tun (load TUN/TAP kernel drivers) before you can create TAP adapters.

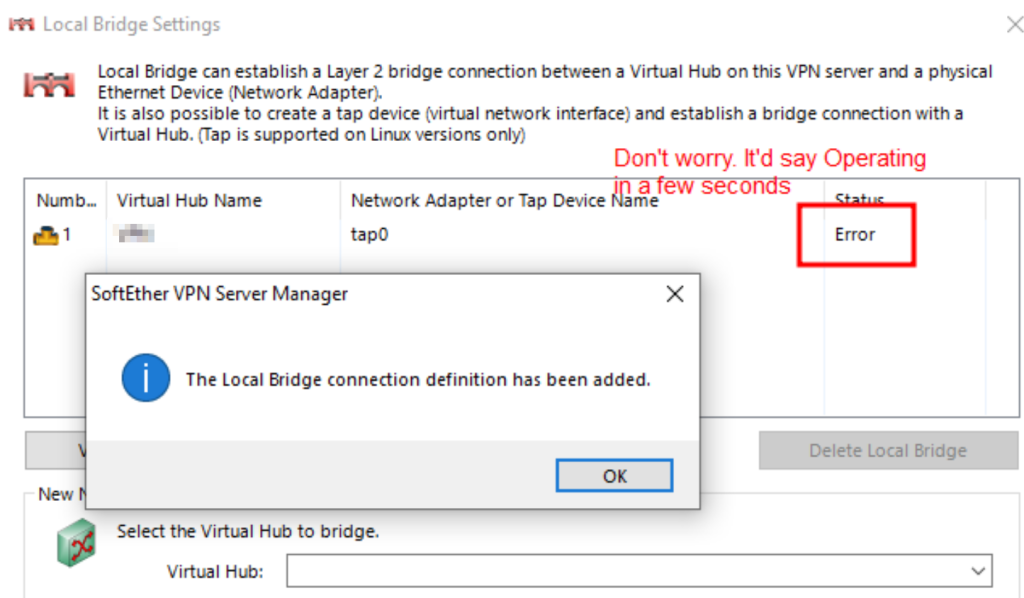
If you don’t have the TUN module loaded first, the newly created bridge will show ‘Error’ with no explanation, which is confusing.

I figured out this is the missing part that causes the Error status by learning how TAP interface are created on Linux and speculated the Windows remote server admin interface (Server Manager) calls this under the hood:

ip tuntap add dev {YOUR TAP DEVICE NAME GOES HERE} mode tap

and tried to imitate the call and researched the error messages.

The next hard part is that the TAP adapter created by SoftEther’s is not tied to anything in the router when freshly created by “Local Bridge Setting”! It’s like you just freshly added an extra network card into a computer with the drivers set up, it doesn’t interact with anything on your network before you plug a cable in the right port!

As the last step you will need to SSH into the router to put in brctl addif br0 tap_tap0.

Obvious preparations

  1. Prepare USB storage (format it with amtm) to host Entware if not already done
  2. install Entware (amtm has an installer for it)
  3. install softethervpn5-server through Entware (opkg install softethervpn5-server)

Enable TUN/TAP drivers

By default TUN/TAP kernel module is by default not loaded, so we somehow need to add modprobe tun to startup scripts.

Out of the box the router is read-only so you cannot get it to remember the startup scripts unless you turn on /jffs, a small (like 64MB) onboard non-volatile memory to store user data such as startup scripts.

After you turn on /jffs, you will see tapping points to the startup process provided by executable files located in /jffs/scripts:

If you haven’t installed anything that has written to services-start (the earliest point), you can install spdmerlin (from amtm), a tool that provides a customized router admin page that creates a dashboard with all admin goodies and it will create services-start and make it executable if it’s not already there for you to tap in the modprobe tun line.

If you want to do this yourself, make sure you spell ‘services’ with the plural ‘s’ (the pre-existing ‘service-event’ which the ‘service’ is singular might tempt you to imitate it, which is incorrect) and chmod +x services-start to make the script executable.

I use nano to sneak modprobe tun into /jffs/scripts/services-start (I also tried init-start and it works too since modprobe is very early kernel stuff). Do whatever that’s convenient for you as long as you can sneak modprobe tun in:

I recommend rebooting right away then run lsmod | grep tun to make sure the module is indeed loaded. If you can’t spare a reboot (which is like 5 minutes), you can simply run modprobe tun at the terminal right away and hope the startup script remembers to do it on the next reboot

Use SoftEther Server Manager to remotely configure the softethervpn5-server installed on the router

The server program on the router did not ask for a password, yet SoftEther asks for it. This UI design is actually a little confusing. Turns out you enter an empty password on the first access/run and the user interface will ask you to create a proper password (just like some routers’ admin pages do).

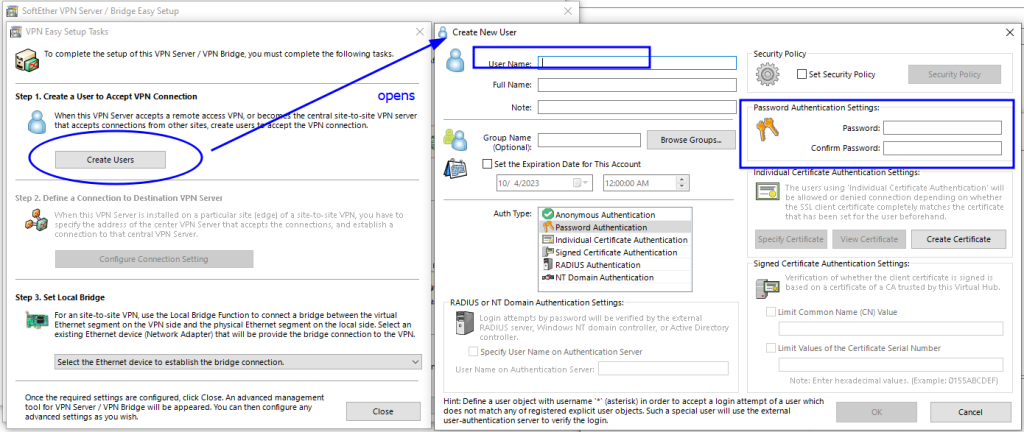
The first time you set it up, you will be greeted by a Wizard which I cannot find again. This wizard is equivalent to ‘Create a Virtual Hub’ -> [‘Manage Virtual Hub’ -> Add Users] -> Local Bridge Setting. However, you want to skip the last step (create bridge) in the wizard because the wizard version caters basic users and they don’t offer the option to make a TAP adapter for the bridge.

By exiting the wizard at the bridge creation step, you’ve created the ‘Virtual Hub’ (which SoftEther sees ‘Virtual Hub’ as an instance of VPN server which you can run in parallel. Confusing lingo for beginners, but it might be sensible with the logic of the architecture). Click on the ‘Local Bridge Setting’ to finish the step that was not done by the Wizard

Bridging is a matter of hardware, so it’s universal across all Virtual Hub (or VPN server instances). This is why it’s at the top level outside your VPN server instance (Virtual Hub) configs.

Softether is trying to be helpful but we know what we doing something unusual here (using the router itself as a computer that plugs into the router). Don’t get scared by the warning and just click Yes to continue

If you remember to start the TUN kernel module, the Status should turn from Error to Operating in a split second. If it stays in the Error, go back and check if you have TUN running properly.

Oversimplified view of LAN bridges

From an end-user perspective, a bridge can be thought of in terms of switches despite the order of evolution is the other way round.

You can think of a bridge as a switch where the computer that hosts it gets a free ride on the switch without the extra physical switch NIC port, physical ethernet cable, and physical device/computer NIC port. I called it ‘implied’ in the diagram on top of this post.

Say for example with 1 ethernet adapter computer A connects to the upstream (say Internet and home network managed by a router above) and let’s call it NIC-A. Then we install an extra network card/interface called NIC-B that’s for serving other devices.

By creating a bridge BR0 formed by NIC-A and NIC-B, you created an illusion of NIC-A behaving as two network cards NIC-A and NIC-B with 2 cables connected to the upstream LAN directly despite only 1 card (NIC-A) is physically there. So what NIC-A did in the bridge BR0 is it act as a software switch which it gets a free ride (implied) and the downstream Computer B rides on the switch that’s served by Computer A.

Add the TAP interface to the existing LAN bridge

brctl is the command line interface for managing bridges

addif adds an interface to the bridge. Here’s the manual page for the syntax:

In this forum post user miscell reversed the order and typed the interface first, which you’ll get a ioctl error complaining that you’re trying to write to an unwritable file.

However, since we are in a router, these changes won’t stick on reboot so we need to put this somewhere. Turns out it’s a colossal pain in the butt to figure this out because the tap0 adapter is correctly programmed to exist only when the SoftEther VPN server service is running and disappear when the service stops. In other words, the TAP adapters created and managed by SoftEther is ephemeral.

Since the TAP does not exist before the SoftEther VPN Server service (S05vpnserver) starts and vanished when the service stops, the ONLY place you should attach the bridging operation is within the start) section of /opt/etc/init.d/S05vpnserver, right after the core service completely finished starting so the TAP is fully created. I monitored the output of ifconfig and realize I need a few seconds of delay before adding the TAP interface to the bridge because the TAP bridge has to exist first. Add the highlighted line to the right place

with the chunk repeated here if your LAN bridge is called br0 and the TAP is called tap0 in SoftEther:

sleep 3
brctl addif br0 tap_tap0

I also tested it and it seems like the bridge association is removed when the TAP adapter was cleaned up when the service is stopped, so I didn’t bother to add the brctl delif in the stop) section.

/opt is actually points to your entware folder (I choose not to show the raw path because it contains my usb partition label which you’ll have to substitute your own) so the data is not volatile and it’s living in your USB entware storage. Basically the SoftEther VPN server registry lives in Entware’s /init.d as S05vpnserver.

Double check the naming on your router with say ifconfig instead of trusting the tap_ prefix which might not be universal across routers. Also check if your router’s LAN bridge is indeed named br0 and replace the interface names accordingly. You can also adapt this to other routers as long as you know where to sneak in the startup scripts


Bonus: Firewall instructions

The firewall rules in MerlinWRT just quit working so the table I entered doesn’t do anything when I turn the firewall on. It doesn’t seem like it’s placing firewall exceptions the way I intended.

There’s also another weird behavior that if the port is firewall blocked, the server admin program intermittently still connect but it connects to a blank state server (blank config). WTF!

You won’t run into these problems if the firewall is turned off, but if you want to keep the firewall on, here’s the SoftEther VPN Server Firewall instructions.

Suggestion to SoftEther: Add a LAN bridging UI to the TAP option

Since this is an unusual concept, I copied the diagram from 3.6 Local Bridges – SoftEther VPN Project and overlay it to illustrated the ‘Local (VPN) Bridge’ has nothing to do with your LAN bridge which is necessary for the TAP adapter to do anything useful.

Right now there’s too little help on this topic which SoftEther considers it as advanced. Turns out putting SoftEther on a router isn’t too uncommon of a thing to ask for once people find out that it’s not impossible.

It’d save us who want to put SoftEther on a Linux router a lot of grief if SoftEther has an extra UI section in the dialog with a pulldown menu that states what bridge it can optionally join:

This is better done inside SoftEther instead of outside it because the users do not have to anticipate the names of the TAP adapters administrators create in the UI. Don’t worry about this extra option of adding it to a LAN bridge could confuse new users, as the lack of such option is way more confusing because there’s a TAP adapter created just to not connect to anything and it shoves new users to a dead end!

In the worst case you can throw a dialog box when users choose a non-blank item from the bridge list saying that this is for advanced users and make sure you know what you are doing (it’d be helpful to remind this could be used for installing SoftEther server on a Linux router).

Extras (feel free to skip it): First-time Wizard

Under no circumstance you should pick one of the LAN ports like /eth0 to bridge. This made no sense (btw /eth0 is usually the WAN interface) and I tried it just out of curiosity and it bricked the router by boot loop (luckily there’s self-recovery to fresh state after a few crashes).

The wizard isn’t that useful as soon as you notice the so called ‘VPN server (instance)’ is called ‘Virtual Hub’ and the buttons on the screen make intuitive sense that requires little explanation.

Loading

Intro to Proxmox (KVM/Qemu)

Among the common virtual machine solutions (Hyper-V, VirtualBox, Xen (Cirtix), VMware, KVM/Qemu), KVM/Qemu has the reputation of being lean and mean. However, it’s not easy to set up and use.

Microsoft’s Hyper-V has an interesting approach: if you disable Hyper-V, Windows runs as raw Windows. When you enable Hyper-V, your host Windows is a VM session in disguise running locally and have the first dibs on the hardware, which the overhead is unavoidable even if you launches no VM.

I tried the QEmu port on Windows and it was faster than Hyper-V even when there’s no KVM (used HAXM). However QEmu’s Windows port is clearly not polished. It retains a lot of the KVM lingo which made no sense, and it’s messy to get TAP (VMs having direct access to my own network without any translation as if they have their own network card plugged to my router) and it bluescreens my Windows.

So the next attempt is to try QEmu/KVM on linux. QEmu/KVM pretty much operate as a simple executable with a gazillion command line switches. Anything you can find that are a little user friendly are just a wrapper that passes the correct command line switches.

Most of the UIs, do not polish the UI to organize the available features into intuitively arranged common use cases like HP/Agilent/Keysight/Windows does. Most of the time it takes as much effort understanding the man pages spit out by –help switch as using their interface, and there’s a lot of common use scenarios overlooked that the user will end up having to look up the switches or enter the commands in the shell themselves.

Libvrt is simply an XML tree that’s a near-direct translation of the command line arguments so you feel the entry looked more professional than saving the command line text is a shell script or batch file. I’m not impressed as it’s just more fluff as the structure do not help the users avoid studying the command line switches’ manual pages.

QtEmu had promise (the interface looked like a half-developed version of VirtualBox’s Manager) but the project was not maintained anymore and Qemu’s command line switches’ evolution has escaped them so a lot of the functions are broken or missing.

virt-manager do not have a compiled Windows binaries port. They have a virt-viewer for connecting to the sessions in Windows but it’s command line like SPICE. This is beyond frustrating. If you want something polished like a Hyper-V manager on Windows to manage Proxmox or linux QEmu clusters, forget about it.

Proxmox is very incomplete when compared with Microsoft’s offerings, but it’s still better than nothing. At least it has a web interface that VNCs the screen back to you.

You still cannot avoid actually understanding the long list of Qemu command switches as the UI only translates a few basic use cases into raw command switches which they show the raw string to you with the expectation that you’d figure out what to fix if they accidentally generated invalid combinations.

There are quite a lot of features (like setting up TAP) that still require shell command line entries, which they provided the interface so you don’t have to SSH separately into the Linux

Remember whatever Proxmox provided, it’s largely a pass through of the command line (switches) interface. Don’t get your hopes up assuming all the things a normal user would expect are there. You are expected to fill in the gaps by a lot of Googling. The UI is useful only if you know what you are looking for.

There are a few things Proxmox did right but overall it’s not an experience comparable to Microsoft’s management interface.

USB mapping

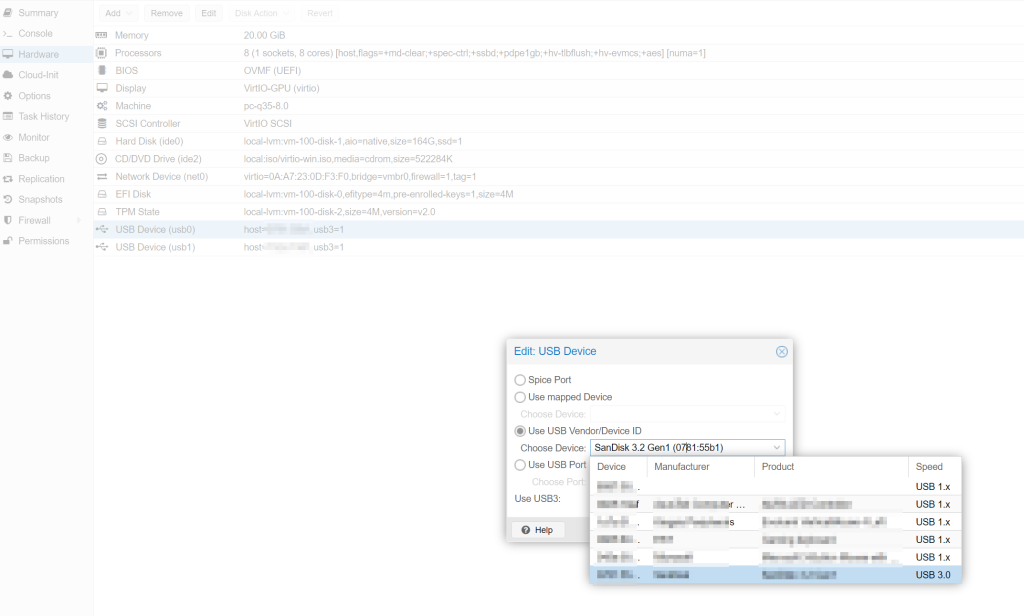
I have to give Proxmox credit for implementing PCI and USB passthrough/mapping, which is often a pain in the butt to get the unique string from command line and hack together the right reference to mount the hardware.

VNC over WebUI is horrendous

I often hate people for squeezing all the UIs in a browsers when they shouldn’t. VNC is one of them. The reason is that when you are remote controlling another computer, you need to make sure most keystrokes goes to the VM, not the host, unless released. You cannot do this from within in a browser as the Alt-F4 closes the client’s browser, not the guest VM’s Windows!

Loading

Set up and Usage notes for Proxmox (KVM/Qemu)

Bump 1: Dick move from Proxmox

The first thing that trips me from Proxmox is the downloadable, despite it said it’s free if you don’t use their enterprise repository, is Enterprise (paid) version out of the box, with no option to download the free version that’s configured as free/community edition.

It’s a dick move to greet ALL new users with this, hoping to scare them to consider a subscription:

I don’t think frustrating people who are trying to learn/explore the software will make them want to pay for a subscription. The best this dick move can do is to scare new users away as the user might think they did something wrong getting things they don’t expect. I certainly thought of throwing out Proxmox had there be better options out there when I run into this, as I’m still evaluating whether I should go with Qemu or Hyper-V.

First of all. This scary message doesn’t actually block you from using Proxmox. It’s just that you don’t get updates until you either pay for their enterprise repositories or change to the free repositories. At least you can still use the interface to gain shell access which we’ll need to fix it (or you can go to the physical computer and enter the same thing in the text terminal display locally)

The difference between enterprise and free is just which servers the update repositories points to. Getting the latest and greatest is not necessarily a plus for enterprise users so they let free users take the risks first and provide feedback so they can polish their software. Fair enough. Great model.


There are two parts to fixing this ordeal:

  • Configuring the update repositories to the free no-subscription repositories (Functional issue, and it’s per node, including slave nodes)
  • Removing the nag screen (Cosmetic, and it’s the overall Proxmox, aka the main node hosting the Proxmox management interface)

Fix Subscription Scare Part 1: Updating repositories locations

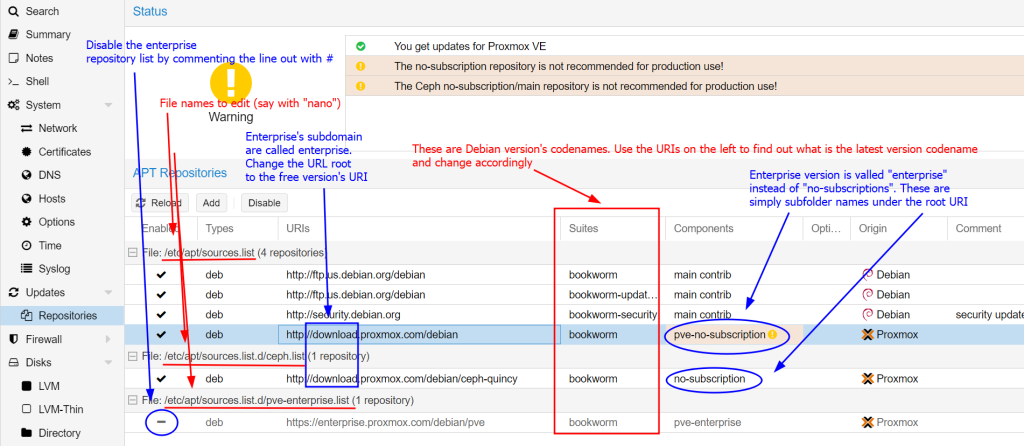
Basically, what you’ll need to do is to notice edit the lines file names show below (underlined in red) corresponding to the repository URL path you want to change:

/etc/apt/sources.list.d/pve-enterprise.list is not necessary for free users, so you can simply comment all the lines out (there’s only one line)

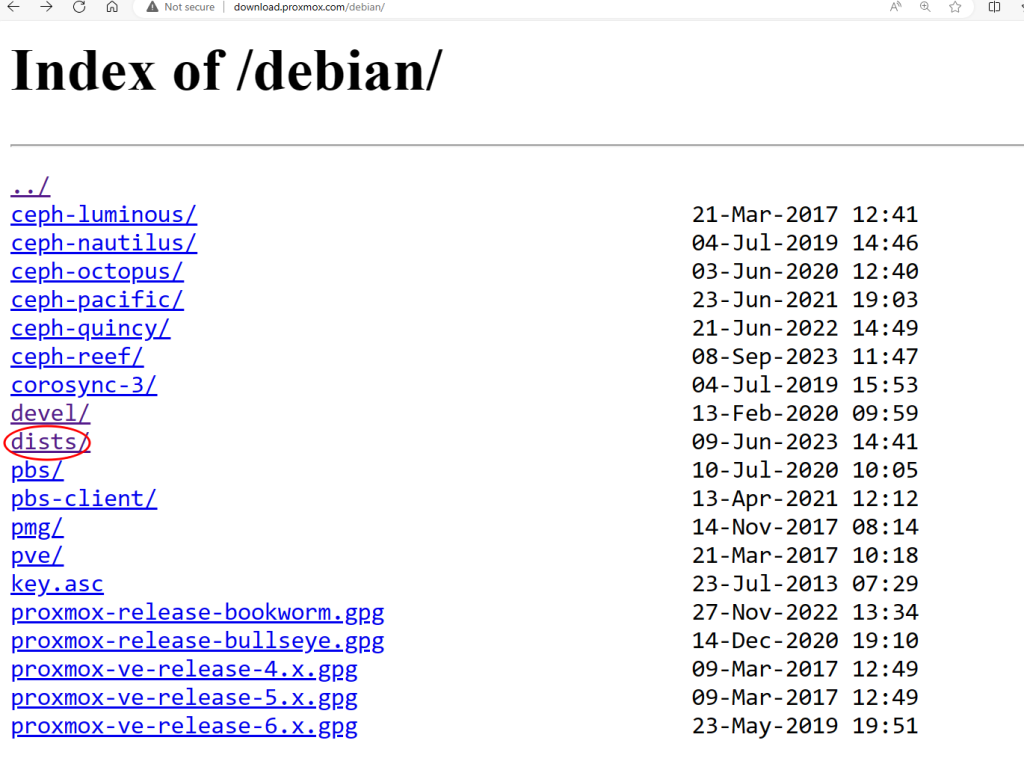
/etc/apt/soruces.list is the link to the core repository for Proxmox updates. Instead of blindly following exact instructions which can go stale as version progresses, open the URL http://download.proxmox.com/debian/ and see what’s out there. What’s not spelled out in the web admin interface is the intermediate folder called ‘dist

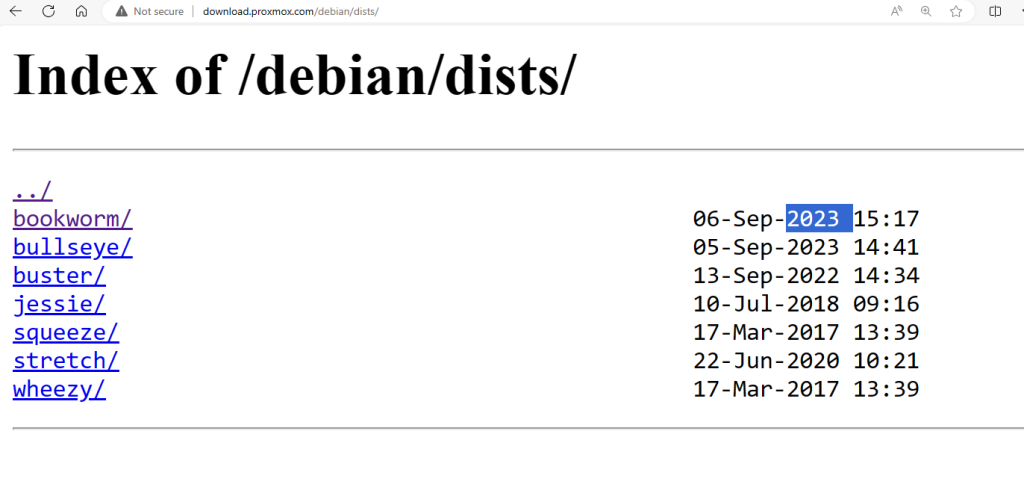
bookworm is the latest Debian version’s code name at the time of writing

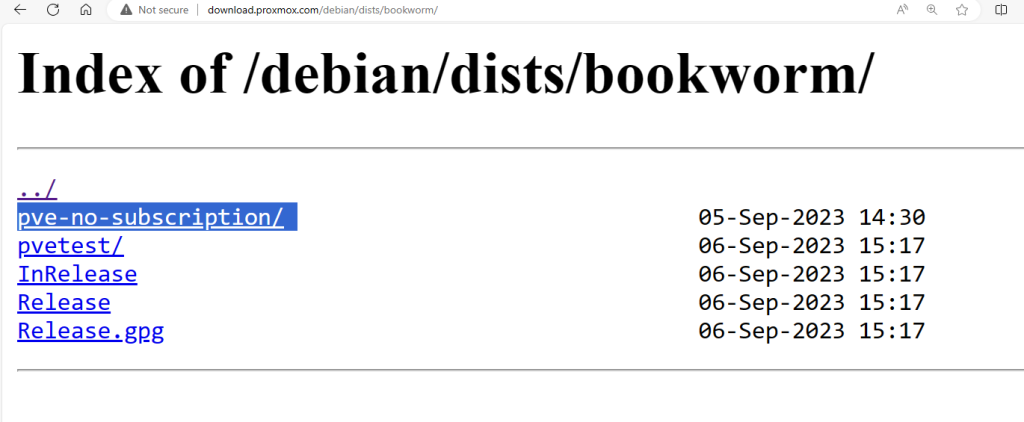
and obviously we pick the branch/sub-folder that says no-subscription (there’s no enterprise here since it belongs to a different root URL), but you still have to get the name right for the ‘Components’

You can open it with a text editor like nano:

nano /etc/apt/sources.list

and edit this proxmox’s repository line (remember to skip the ‘dists‘ intermediate folder). Every space after a word that is just a subfolder you see from the folder structure. If Debian released a new version/codename, you might also want to update the first 3 lines of debian repositories as well to match the name code name (and folder structure if they rearranged it).

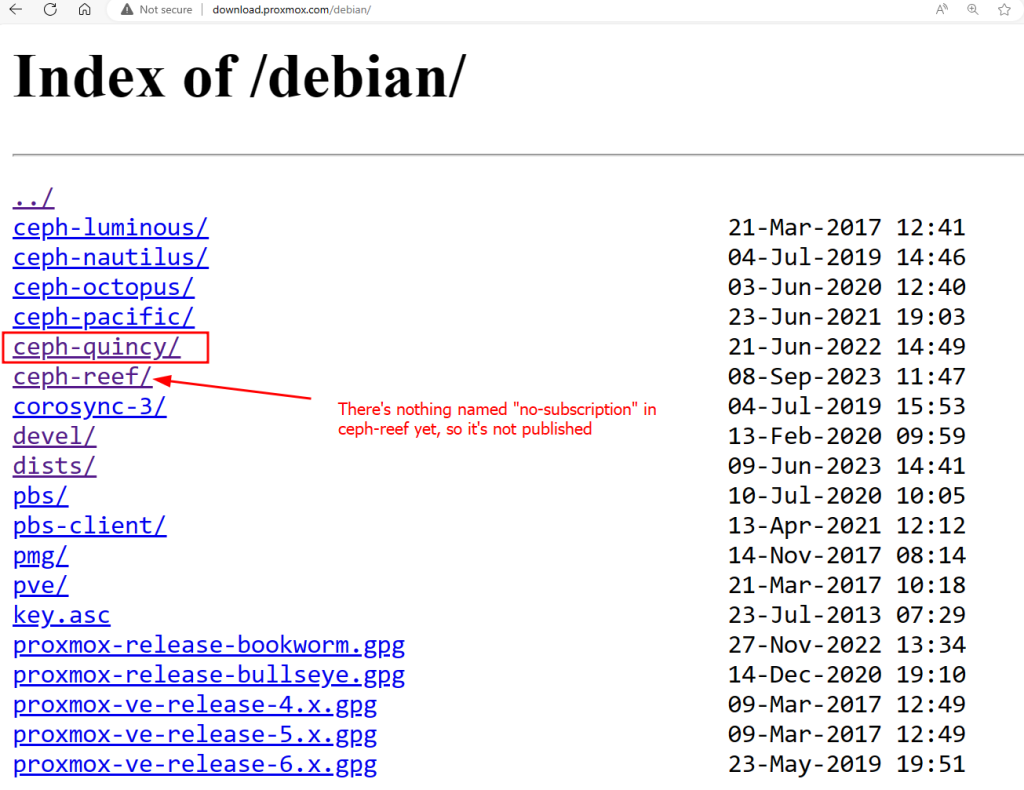
Ceph is an optional feature (not installed) yet it’s configured to be enterprise as well, so for consistency, we might want to change it to the no-subscription (free) version as well. The latest codename for ceph that was published at the time of writing is “quincy” (there’s nothing in the “reef” folder), so we click on it.

Again the ‘dists’ is boilerplate and not spelled out (so we don’t enter it) in the entries of the repository sources file.

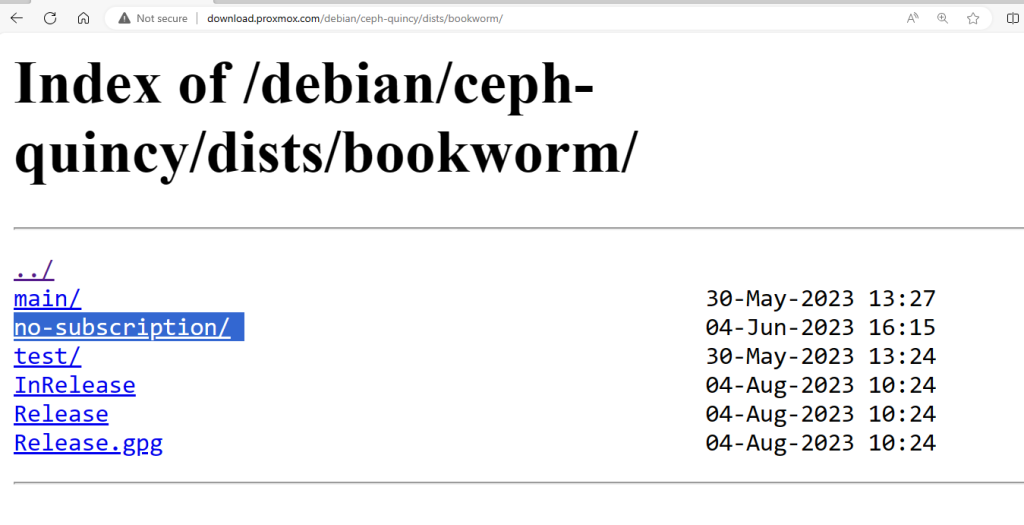
bookworm is the current Debian version for that

and we see a “no-subscription” folder which is the one we want obviously. We can just guess by sensible names you’d choose if you were the developer.

You can again open a text editor like nano to edit the repository location file as shown in the web admin UI

nano /etc/apt/source.list.d/ceph.list

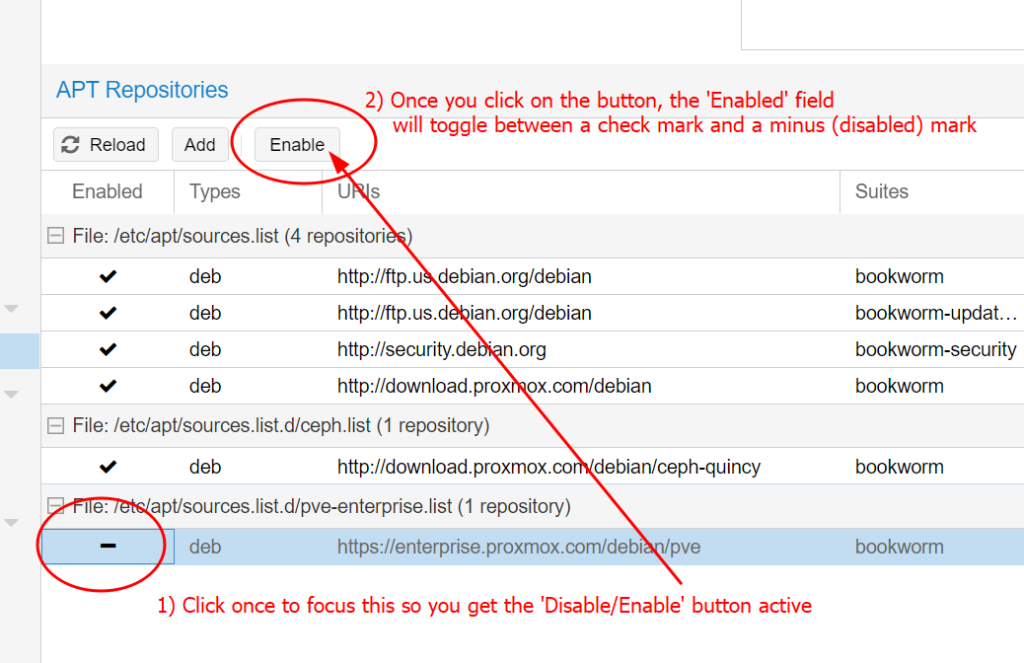
And finally, disable /etc/apt/source.list.d/pve-enterprise.list

Under the hood, it’s basically Proxmox adding a # (comment sign) to disable the line in /etc/apt/source.list.d/pve-enterprise.list with the similar procedures we did:

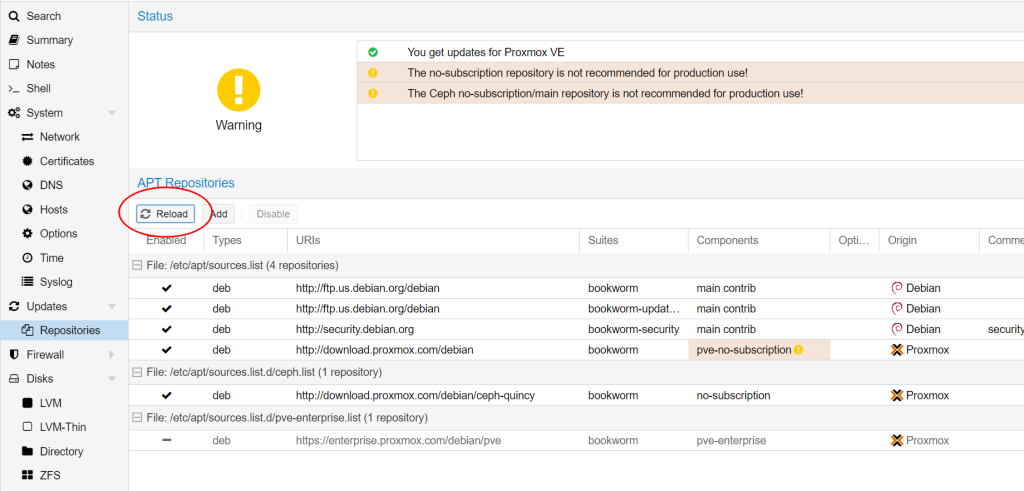
Hit Reload and you are done with this subscription scare tactic.

Actually out of consistency, you can build your own pve-no-subscription.list to repace pve-enterprise.list and replace ‘enterprise‘ in the root URL with ‘download‘, update the Debian codename (at the time of writing it’s ‘bookworm‘), and the change the components folder from ‘pve-enterprise‘ to ‘pve-no-subscription‘, which translates to crawling this repository path: http://download.proxmox.com/debian/pve/dists/bookworm/pve-no-subscription/

There’s nothing fancy and hard-coded about these names. It’s basically the URL of where the update files are stored with an intermediate folder ‘dists‘ sandwiched between the root URL and the tokens (separated by spaces) which are basically subfolder names. All it does is to attach a ‘/dists/‘ after the root URL and replace the rest of the ‘/‘ with spaces.

It simply looked like the developers for the web admin UI didn’t have the time to get to making the table entries clickable and editable yet and they merely got to make the enable/disable button to comment out the lines in the file. You’ll see similar UI deficiencies in a lot of places later which you’d have to go to the shell to do it yourself after researching the concepts.

Fix Subscription Scare Part 2: Removing the nag screen

Even after you fixed the repository locations, it’s only per node, yet the nag screen is at the top admin UI level. The Updates/Repositories interface won’t show error messages (undownloadable repositories) anymore, but the nag screen still needs to be addressed.

Luckily somebody wrote a script to deal with it, hosted on Github:

# Download script
wget https://raw.githubusercontent.com/foundObjects/pve-nag-buster/master/install.sh
# Good practice to read ANY unknown script to make sure there's no shenanigans 1st

# Then run the script with sudo
sudo bash install.sh

This blog shows the mechanisms in case if some changes broke the script above.

TAP Networking not in the Web UI

TAP interface is necessary for the ethernet card on the VM directly interact with the router connected to the physical hardware (PHY/NIC) but with a different identity, which puts it at equal level as other physical computers on your network. This is often useful when you want to host servers.

I’ve adapted the instructions from Extremecoders on Github here as the default ethernet device names are different

  • Debian doesn’t use the /eth0 naming scheme anymore. It’s /enp4s0
  • /br0 now has a prefix “vm” in front of it since it’s a virtual bridge. Proxmox created this by default. The ‘bridge’ in this case is not in the ethernet bridge we understand in Windows (which bridges two interface together as one), but instead it’s just a virtual ethernet switch. Once I know this twist, I understand how to set TAP up

Since we are using the /vmbr0 which is already set up, we can skip the bridge creation and adding the physical network card /enp4s0 to the /vmbr0 ‘bridge’ (virtual switch).

The core step is to create a TAP interface. Let’s call it /tap0

tunctl -t tap0

You don’t need the “-u (username)” part unless you want to assign ownership of this specific TAP interface to a specific user.

Then you need to add this TAP (/tap0 in this example) to the ‘bridge’ (/vmbr0 in this example). ‘addif’ means ‘add interface’. ‘brctl’ means ‘bridge control

brctl addif vmbr0 tap0

Make sure all the physical card (/enp4s0), the TAP interface (/tap0) and the ‘bridge’ (/vmbr0) is up. Then assign IP to the ‘bridge’ /vmbr0. If using acquiring new IP address from DHCP, use DHCP client (dhclient):

dhclient -v vmbr0

Pools for resources

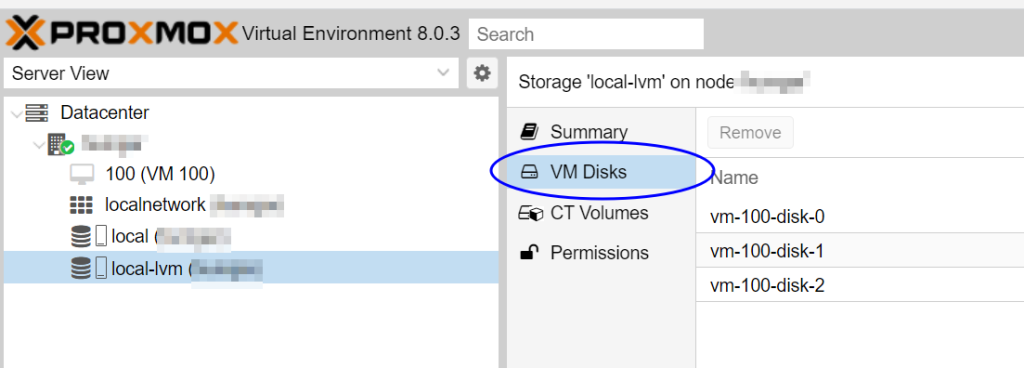
You can directly create the virtual hard disks directly from where you are configuring your VM, but you can only delete it from a Pool viewer. This is the same as VirtualBox. ‘local-lvm’ is a bunch of virtual hard drive images that you need to mount to act like a hard disk drive. Your VM images lives in /dev/pve

It’s a little more rigid than VirtualBox where you can directly point to the CD image. In Proxmox you have to upload the CD image to a pool before referring them in the VM’s settings. ‘local’ is just a folder of files (specifically /var/lib/vz), and the CD images goes to /var/lib/vz/template/iso.

Actually local and local-lvm are all defined at the root level called ‘Datacenter’

Default CPU

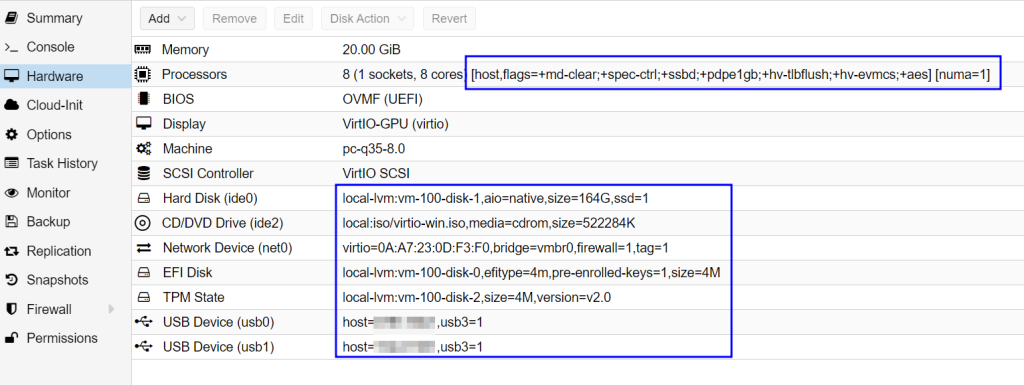
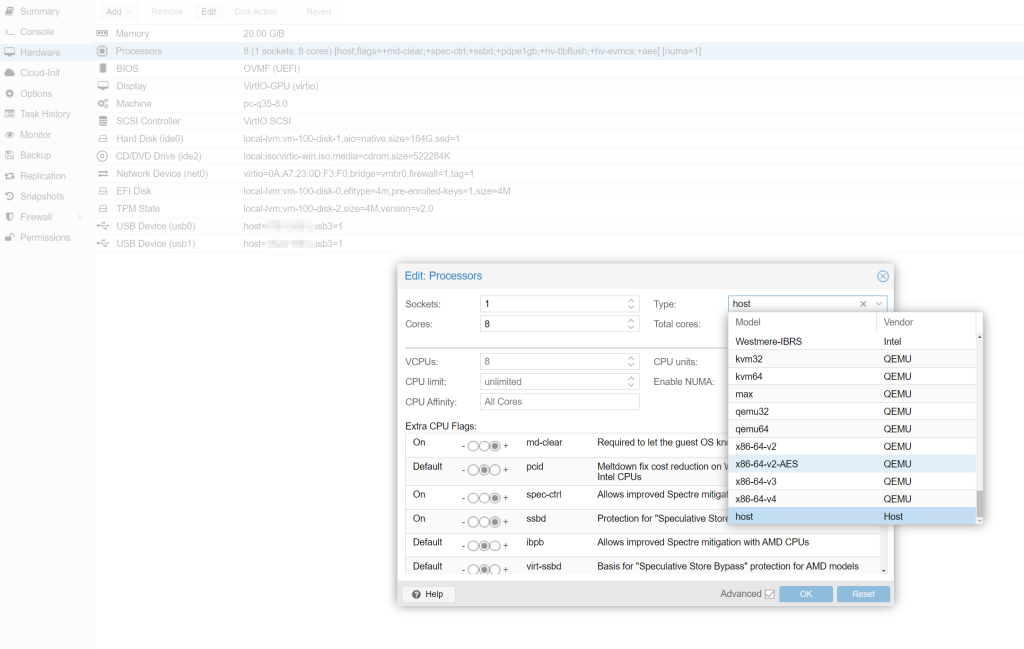
By default Proxmox choose x86-64-v2-AES for you, which might have better compatibility. I had trouble with the Windows port of Qemu not supporting hosts because my CPU is too new for it, but the Linux Qemu-Kvm have no trouble recognizing my new CPU under ‘hosts’ type. Look into the extra CPU flags to match whether you are using an AMD or Intel CPU.

Loading