Namecheap Dynamic DNS Update Client for Windows

Namecheap provides a free Dynamic DNS client for Windows but unfortunately the client cannot be run as a service. To manage remote computers, the dynamic DNS update should at least run before any user is logged or we’ll run into a chick-and-egg problem: you want to log in remotely but the IP of the remote computer is not known (mapped/updated) until you logged in.

I initially tried to use sc.exe to create a Windows service but the program lacks a ServiceMain() implementation so the service won’t start:
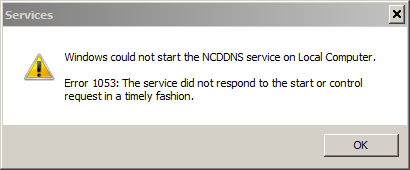
Turns out there is a way to wrap a Windows executable not designed to be used as a service (without ServiceMain() implementation) and make it run as a service. Use a tool called NSSM – the Non-Sucking Service Manager!

Note that the default setting for “Log on as” is “Local System Account”, which will not work with this free Namecheap Dynamic DNS client. You must set it to “Log on as” an Administrator account.

To start the newly created service without rebooting, do nssm start <servicename>, where <servicename> is replaced by the name you choose for the service.

Note that the ‘Path to executable’ for the newly created service is nssm.exe itself, not directly the DNS update client program (like what it’d be if you create the service through sc.exe instead of nssm.exe). The reason is that nssm.exe is the wrapper that calls the underlying executable.

Loading

Namecheap Dynamic DNS Update Service

If you have a domain registered under Namecheap, you dynamically update the IP address to a remote computer at no extra costs. If you use no-ip.com, you have to pay $29.95/yr to use your own domain name.

However, the process is not entirely trivial because Namecheap only offers the dynamic update through its BasicDNS nameserver, which has a few implications

  • BasicDNS nameserver means you configure the DNS records directly Advanced DNS tab when you manage your domain name. DNS records in the Zone Editor in cPanel is not active with BasicDNS nameserver.
  • Subdomains in cPanel enters DNS record in the Zone Editor, so once you use the BasicDNS nameserver, you must add the A record for the subdomain AFTER creating it in cPanel (cPanel only manages the file the subdomain physically points to, you are on your own with DNS setup)
  • If you use the domain name with Namecheap hosting services, you can no longer have everything configured for you (managed in cPanel’s Zone Editor) by choosing Namecheap Web Hosting nameserver. You have to transfer the DNS record in Zone Editor (cPanel) manually to Advanced DNS tab (Namecheap). At minimum, get the IP address of the HTTP server and enter it as the ‘A Record’ for the main/sub-domain.
  • Setting up subdomain name or root domain name to be used with Dynamic DNS update service is simply entering ‘A Record’ with an any IP address as seed ‘Value’ (subdomains entered as ‘Host’). The value (IP address) will be overwritten by the update service/client.

Namecheap also offer an eye candy called ‘A + Dynamic DNS Record’ which is exactly the same thing but makes it easier for you to remind yourself that the ‘A Record’ is specifically used for dynamic DNS update.

It’s a daunting task if you haven’t done the work to understand how DNS record works since there are lots of new terms to learn.

However, it’s not that hard after you understand what ‘A Record’ does: map the domain name (or its subdomains) to an IP address. All Namecheap did is providing a web server (using REST API that accepts user inputs with certain syntax in the URL) that updates your ‘A Record’ (domain to IP address map).

Loading