Image Remote Disks with Norton Ghost

Symantec Ghost has been my favorite tool since high school as the user interface is minimalistic (runs fast) yet intuitive. It pretty much has every single feature (use case) you can imagine organized in a sensible way (unlike the fucking linux man pages that drown you with 4 dozens of command switches not logically organized so you have to skim through the entire thing to find out what is relevant).

The software is well made in general so we can get a lot mileage out of old versions. I recently had to clone a drive over the network yet I don’t want to share the image file. My initial plan is to have the remote computer I plan to image the disk attached to it run as slave (in Master-Slave mode Peer-To_Peer over TCP mode), but there are a few hurdles:

  • The documentation didn’t say which port is used. I have to use TCPview to figure it out. It’s Port 6668.
  • Turns out slave mode does not support restoring from a image file located from the (puppet-)master. In other words, the when you connect to the slave session, the file dialog box of “From Image” only shows the files on the slave side! WTF!

It’s strange that you can clone a raw drive / partition from master session to slave session, but you cannot choose image file as a source in place of the source drive. I tried the command line before and no avail. After some web searching I realized that I’m not insane. It was the way Ghost is:

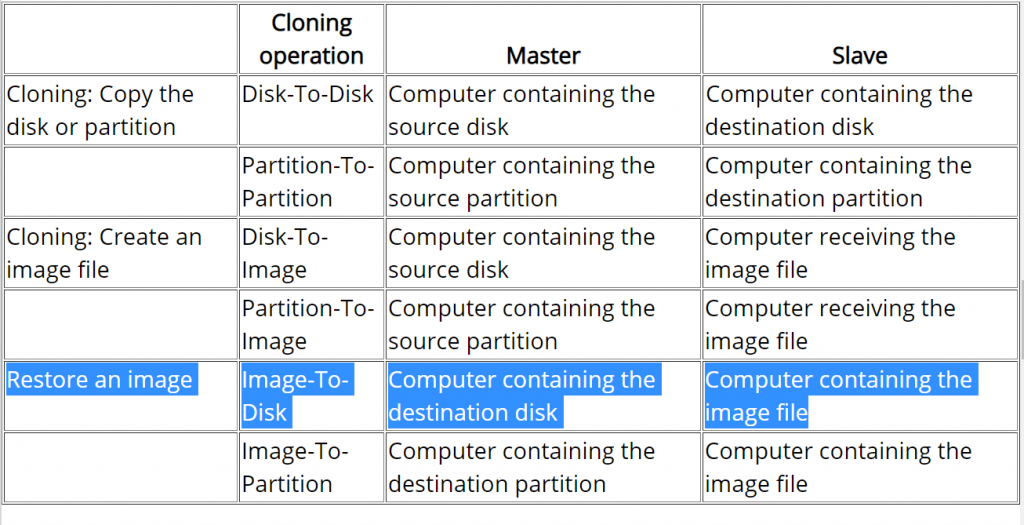
The rules inferred from this table means:

  • image files ALWAYS stay at the slave session
  • direct drive/partition copies is always master pushing data to slave.
  • slave drives are never cloned (read)
  • master cannot read its own files to find image files
  • master can only select remote (slave) image files

First of all, direct drive-to-drive copy are bidirectional. The above list is not entirely accurate, so I stroke through the conclusion derived from the incorrect assumptions above. Y:

The rules for image files do not make much sense to me. Just can’t come up with a good excuse for it. The session have full access to both storage from both sides, and ghost command line’s logic is to make image files fungible with direct drives/partitions. It doesn’t discourage accidental overwrites or prevent one side’s data from being siphoned. All they did is to tease the user by not allowing them to read files/images from the master computer where the user interaction is.


The first instinct is to restore the GHO image I want to push to the server onto a disk and do the direct clone. This is logically fungible with creating a VHD, mount it, restore the GHO image to the mounted drive, then use direct ‘virtual disk’-to-disk clone to restore the remote (slave) disk. Luckily, newer Ghost has tools to simplify these steps. We’ll need this 3 pieces of clues to figure it out:

  1. Virtual machine disk image files such as VHD can be used as source or destination
  2. There’s a command switch to mount virtual machine disk image files internally WITHIN the ghost session (no side effects: windows won’t see it. Won’t persist between ghost sessions)
  3. GHO files are not directly mountable as a virtual disk even internally within ghost session

So the complicated process can be shorten to converting GHO to VHD and then internally mount the VHD as a direct drive through command switch launching Ghost. Use DEMO.gho as an example:

REM Convert DEMO.gho to DEMO.vhd
ghost -clone,mode=restore,src=DEMO.gho,dst=DEMO.vhd

REM Launch Ghost with DEMO.vhd internally mapped as a (direct) logical drive
ghost -ad=DEMO.vhd

I ran into some obscure error messages like “ABORT: 11030, Invalid destination drive” when trying to specify the full absolute path. So instead of fussing with the syntax that breaks the code, I added ghost to my Windows %PATH% environmental variable and run ghost directly at the folder where the files are. I suspect it can be fixed with /translate command switch to make sure the drive letter is not ambigious whether it’s local or remote, but that’s something for later if I have a project that require scripting this reliably.


My cliff notes here.

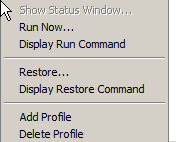
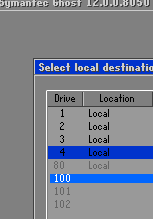
Run Ghost as slave mode

ghost -tcps

Do this at Ghost master computer

REM Convert DEMO.gho to DEMO.vhd
ghost -clone,mode=restore,src=DEMO.gho,dst=DEMO.vhd

REM Launch Ghost with DEMO.vhd internally mapped as a (direct) logical drive
ghost -ad=DEMO.vhd -tcpm:{IP address of the slave computer}

Remember to open port 6668 at the Ghost slave computer.


Appendix

Technically, it’s possible to restore from an image file located AT THE SLAVE side, but it’d be a stupid idea. Initially I thought Ghost would be smart enough to directly use the image file locally on the slave session to clone the drive locally. However, given the speed and my observation with TCPview, this is not the case. It’s doing the stupid thing of crawling the contents of image file from the slave machine in chunks and send it back to the slave!

Loading

rsync/Deltacopy gotchas (especially Windows transfers)

Deltacopy is a GUI wrapper around rsync, a feature-packed tool to copy files locally AND remotely, AND differentially (automatically figure out the parts that are different and resend. Excellent for repair) through hash comparisons. For non-programmers, hash is a unique ID computed for a chunk of data that are expected to change wildly even at the slightest data/file change/corruption).

Deltacopy is very useful if you just want to do the basic stuff and not know the rsync syntax and switch combinations off the top of your head. It also provides a windows port of rsync based on Cygwin (a tiny Linux runtime environment for windows). This is the only free alternative to cwRsync, a paid Windows port of rsync.

rsync is a Swiss Army Knife that can also work from one local path to another. Deltacopy is intended for remote file transfer.

Deltacopy server is basically this:

rsync --daemon 

However in Windows, since it’s cygwin, it’s looking for linux’s /etc/rsyncd.conf by default if you do not specify the config file through --config switch.

Deltacopy client basically help you generate the command to transfer files. Most of the features are done through right-click (context) menu, not toolbar or pull-down menus, which might confuse some people. You set up your tasks as Profile, which can be scheduled (the bottom panel) or executed immediately by right clicking on the profile:

Run is pushing file to the server, Restore is pulling files from the server. Run Now and Restore are for executing the command (aka task) immediately. You can peek into what it generated by right-clicking on the profile and choose “Display Run/Restore Command”. First time users might not be able to find it since the only place to access it is through context menus.

There are some tricky parts (gotchas) for specifying the files/folders to copy. First of all, even though you use Add Folder/Add Files button for entries

Basically you can make a (source, destination) pair by modifying the selection and target path. It’s just passed onto rsync command verbatim. The target path is relative to the virtual directory set on he server (see Deltacopy Server’s directory)

The destination path which is endowed with the branch folder name (one-level). In other words, if your source is C:/foo/bar, Deltacopy by default set the destination to /bar instead of /. This is probably to avoid the temptation of lumping all contents in the same remote destination root. If you just want to simply lay the files at the root virtual folder at the destination (my most common use case), you’ll have to edit and clear out the (relative) destination path.

As for the source, the author of rsync chose to do it the logical (more conservative) way but not intuitive way: by default it reconstruct the source folder’s FULL path structure at the destination! For example if you intend to copy everything under C:\foo over, the destination will create {destination root}\foo in the process and put everything under it instead of directly at {destination root}. The design choice was supposed to prevent accidental overwrites as multiple source subfolders try to write over each other with the same names at the destination.

Luckily, there’s a way around it! See man pages for -R –relative: Put a dot (.) at the place where the relative path starts! For example, the source is C:\foo\bar\baz and you do not want /foo to be created at the destination and want it to start with /bar instead. You should enter C:\foo\.\bar\baz as source. Everything the left of the dot (refers to self-folder) are stripped from the destination path structure.


ACL support for Windows sucks because rsync lives on cygwin, which has POSIX (unix/linux) type of permissions/ACL.

https://unix.stackexchange.com/questions/547275/how-do-i-use-rsync-to-reliably-transfer-permissions-acls-when-copying-from-ntf

In my opinion, the best way to go about it is to not transfer ACLs from the source and follow the preexisting ACLs at the destination. I’d also leave the groups and owners alone (inherit at destination) as well I might not be on the same active directory (or workgroup user management) as the destination computer so accounts with the same name might not be actually the same accounts.

--no-p --no-g --no-o

–no-{command} is the complement prefix that does the opposite of the -{command}, so the above means skipping -p (perms/permissions), -g (group), -o (owner) and make sure it has full permissions for everybody.


Sometimes a remote path can be mistaken as a relative local path with the hostname/IP address as the folder name if there’s no username. Start it with rsync:// as the URL scheme and the syntax is like ftp:// as far as username is concerned.

Deltacopy protects the source and destination paths with double quotes (“). It’s a good practice that we should do it even with direct rsync calls.

Loading

Tomato OpenVPN client assigned for specific computers

Setting Redirect Internet traffic to “Policy Rules” opens a table where you can specify which computer goes through VPN and which ones uses direct connection. Leave the destination IP unspecified and it’ll pick the 0.0.0.0 as intended

However, there’s a logical trap when you blindly follow instructions setting “Accept DNS configuration” to “Exclusive” as given by most instructions assuming all computers go on the network through VPN. Setting it as “Exclusive” means even the computer not intending to use VPN will still need to go through your VPN provider’s DNS! For slow VPN connection, this will be painfully slow for ALL computers! Set it to “Relaxed” instead.

Loading

Not missing Windows after trying Ubuntu Cinnamon Remix

Given that I grew up as a power DOS/Windows user, I often have gripes about how frustrating Linux is and they were almost never ready for people who just want to get common things done by intuitively guessing where the feature is (therefore having to RTFM or search the web for answers).

I deal with HP/Agilent/Keysight instruments a lot and appreciated their effort put on user experience (UX) design. It’s not that user who’s stupid if they have to dig through 5+ levels of menu buttons to measure a Vpp (peak to peak voltage) and the software aren’t smart enough to default to the only channel in use. That’s what Tektronix did to their nasty user interface and raised a generation of Stockholm Syndrome patients who keep buying Tek because they are traumatized by the steep learning curve and would rather walk on broken glass than having to learn a new interface from another vendor (that’s called vendor lock in).

I certainly appreciate Cinnamon desktop environment (came with Linux mint) designers willing to not insist on the ‘right way of doing things’ and follow a path that’s most intuitive for users coming from a Windows background.

The last time I used Linux Mint was 19. There’s still quite a lot of rough edges. Some services got stuck (time-outs) right out of the box and systemd went through slowly. It’s just not fast and responsive. When I tried it again when Mint 20.1 was released, my old i3 computer boots to the GUI in 5 seconds and I was hell of impressed. The icons and menus are also now sized balanced proportions like Windows (can’t stand the big and thick default menu-item fonts like Ubuntu).

However, there’s one big impeding factor for me to make Linux Mint my primary computer: the packages repositories are one generation behind Ubuntu (the most widely supported distro)! Software often have bugs that the developers solved, living with old, ‘proven’ software slows down the iterative process.

I’ve been through hell trying to access Bitlocker volume with Linux Mint 20.1 as not only it doesn’t work right of the box like Windows, I’m stuck with a command line dislocker that doesn’t integrated with the file manager (like Nemo). The zuluCrypt available with Mint 20.1 is too old to support Bitlocker properly. Trying to upgrade it to 6.0 has Qt dependencies which is unsolvable. I was able to download the unsanctioned old revision in debian package but there’s more unsolvable dependencies.

The alternative option of compiling from the source is met with more dependencies fuckery and now the restrictive Mint repository might not have the exact version of the compiler required by the source code package. Aargh!

I was about to give up Linux Mint and install Ubuntu and try to hold my nose changing the desktop to Cinnamon. Luckily I’ve found somebody who read my mind: there’s Ubuntu Cinnamon Remix!

Not only Ubuntu Cinnamon Remix supported Bitlocker right out of the box (no need to fuck with zuluCrypt which doesn’t integrate with the file explorer anyway)! Most of the defaults make sense, buttons are often where I expect them to be. Even Win+P key works identically! The names/lingo are close to Windows whenever possible, and honestly the default Yari theme is visually slightly more pleasing than Windows as it makes very good use of the visual spaces!

Here’s a few transition tips

Windows Ubuntu/Cinnamon
WallpaperBackground
Device Manager(No equivalent) Install hardinfo for System Information
Task ManagerSystem monitor
Windows KeySuper Key
ShortcutLauncher
Lingo
Windows Linux
Foobar2000deadbeef
Notepad++notepadqq
Greenshotksnip
Apps and its near equivalents

I use Winsplit-Revolution in Windows (old version is freeware) that uses the numeric keypad to lock the window to the 9 squares grid using Ctrl+Alt+{Numpad 1-9}. Save the keyboard shortcuts in case if you want to install it again on another computer:

dconf dump /org/cinnamon/desktop/keybindings/ > dconf-settings.conf
dconf load /org/cinnamon/desktop/keybindings/ < dconf-settings.conf

There’s no Ctrl+Shift-Esc key which I often use to call Task Manager (called System monitor). I had to make the shortcut as well to feel at home.

WindowsLinux
(Explorer) Alt-D for address bar(Nemo) Ctrl+L

Loading

HP 54502A Datasheet typo about AC coupling

The cutoff frequency of 10Hz on the datasheet is a typo. Better scopes at the time claims 90Hz. 10Hz is just too good to be true.

Found the specs from the service manual:

Don’t be fooled by the -3dB cutoff and ignore how wide the transition band can be (depends on the filter type and the order). Turns out this model has a very primitive filter that AC couple mode still messes square waves below 3kHz up despite the specs says the -3dB is at 90Hz. You better have a 30+ fold guard band for old scopes!

Remember square wave pulse train in time domain is basically a sinc pulse centered at every impulse of the impulse train in frequency domain superimposed. Unless you have a tiny duty cycle (which is not the case for uniform square waves, they are 50%), the left hand side of the sinc function at 1kHz fundamental still have sub-1kHz components that can be truncated by the AC coupling (high pass filter).

Loading