Image Remote Disks with Norton Ghost

Symantec Ghost has been my favorite tool since high school as the user interface is minimalistic (runs fast) yet intuitive. It pretty much has every single feature (use case) you can imagine organized in a sensible way (unlike the fucking linux man pages that drown you with 4 dozens of command switches not logically organized so you have to skim through the entire thing to find out what is relevant).

The software is well made in general so we can get a lot mileage out of old versions. I recently had to clone a drive over the network yet I don’t want to share the image file. My initial plan is to have the remote computer I plan to image the disk attached to it run as slave (in Master-Slave mode Peer-To_Peer over TCP mode), but there are a few hurdles:

  • The documentation didn’t say which port is used. I have to use TCPview to figure it out. It’s Port 6668.
  • Turns out slave mode does not support restoring from a image file located from the (puppet-)master. In other words, the when you connect to the slave session, the file dialog box of “From Image” only shows the files on the slave side! WTF!

It’s strange that you can clone a raw drive / partition from master session to slave session, but you cannot choose image file as a source in place of the source drive. I tried the command line before and no avail. After some web searching I realized that I’m not insane. It was the way Ghost is:
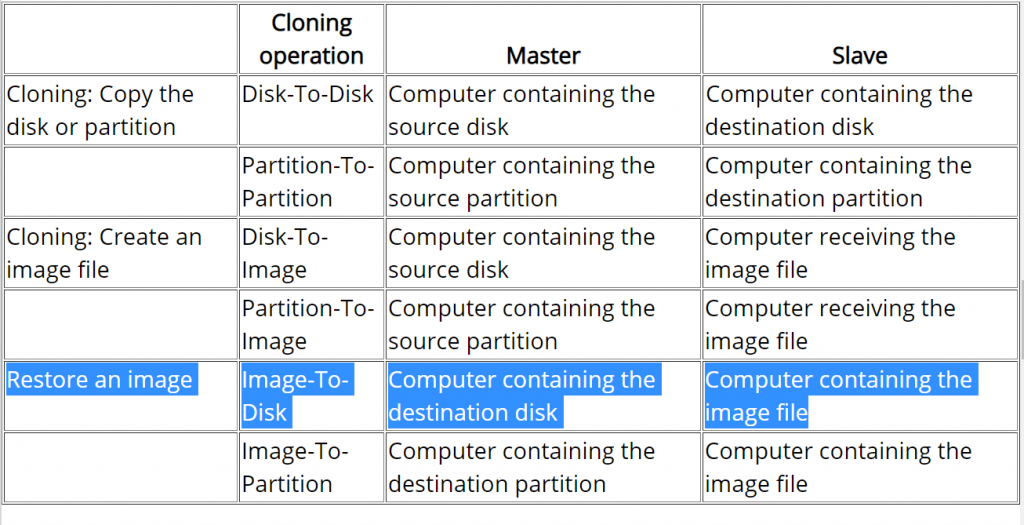
The rules inferred from this table means:

  • image files ALWAYS stay at the slave session
  • direct drive/partition copies is always master pushing data to slave.
  • slave drives are never cloned (read)
  • master cannot read its own files to find image files
  • master can only select remote (slave) image files

First of all, direct drive-to-drive copy are bidirectional. The above list is not entirely accurate, so I stroke through the conclusion derived from the incorrect assumptions above. Y:

The rules for image files do not make much sense to me. Just can’t come up with a good excuse for it. The session have full access to both storage from both sides, and ghost command line’s logic is to make image files fungible with direct drives/partitions. It doesn’t discourage accidental overwrites or prevent one side’s data from being siphoned. All they did is to tease the user by not allowing them to read files/images from the master computer where the user interaction is.


The first instinct is to restore the GHO image I want to push to the server onto a disk and do the direct clone. This is logically fungible with creating a VHD, mount it, restore the GHO image to the mounted drive, then use direct ‘virtual disk’-to-disk clone to restore the remote (slave) disk. Luckily, newer Ghost has tools to simplify these steps. We’ll need this 3 pieces of clues to figure it out:

  1. Virtual machine disk image files such as VHD can be used as source or destination
  2. There’s a command switch to mount virtual machine disk image files internally WITHIN the ghost session (no side effects: windows won’t see it. Won’t persist between ghost sessions)
  3. GHO files are not directly mountable as a virtual disk even internally within ghost session

So the complicated process can be shorten to converting GHO to VHD and then internally mount the VHD as a direct drive through command switch launching Ghost. Use DEMO.gho as an example:

REM Convert DEMO.gho to DEMO.vhd
ghost -clone,mode=restore,src=DEMO.gho,dst=DEMO.vhd

REM Launch Ghost with DEMO.vhd internally mapped as a (direct) logical drive
ghost -ad=DEMO.vhd

I ran into some obscure error messages like “ABORT: 11030, Invalid destination drive” when trying to specify the full absolute path. So instead of fussing with the syntax that breaks the code, I added ghost to my Windows %PATH% environmental variable and run ghost directly at the folder where the files are. I suspect it can be fixed with /translate command switch to make sure the drive letter is not ambigious whether it’s local or remote, but that’s something for later if I have a project that require scripting this reliably.


My cliff notes here.

Run Ghost as slave mode

ghost -tcps

Do this at Ghost master computer

REM Convert DEMO.gho to DEMO.vhd
ghost -clone,mode=restore,src=DEMO.gho,dst=DEMO.vhd

REM Launch Ghost with DEMO.vhd internally mapped as a (direct) logical drive
ghost -ad=DEMO.vhd -tcpm:{IP address of the slave computer}

Remember to open port 6668 at the Ghost slave computer.


Appendix

Technically, it’s possible to restore from an image file located AT THE SLAVE side, but it’d be a stupid idea. Initially I thought Ghost would be smart enough to directly use the image file locally on the slave session to clone the drive locally. However, given the speed and my observation with TCPview, this is not the case. It’s doing the stupid thing of crawling the contents of image file from the slave machine in chunks and send it back to the slave!

 162 total views

Linux setup notes – hostname to communicate with Windows computer

In Debian, the hostname is located in /etc/hostname. The name won’t show up on my router (linux firmware) until I’ve got the right hosts order:

# /etc/nsswitch.conf
hosts:          files dns wins

However, Windows doesn’t recognize the hostname since it uses NetBIOS, which means I need nmbd in sambapackage:

apt-get install samba

Install it and I can ping right away and use the SMB shares!

 182 total views

Foobar2000 alternatives for Linux

I am a big fan of foobar2000 because it’s one of the most terse yet flexible package for playing music. I tried using RhythmBox that came with Linux Mint, but it’s annoying as hell. When you double click an audio file, it’ll adds to a default playlist and after it finished playing, it’ll go and play other songs you’ve previously clicked (because they were accumulated on the playlist).

Out of frustration, I tried to stick with my favorite, I found foobar2000 has a wine port available on Snap package manager. Downloaded it and realized it has a lot of work to do to make it work on linux:

  • Fonts do not scale. It’s always that tiny and not all the UI controls looks odd
  • The paths assumed windows drive letters. Sometimes if I drag and drop files from a bitlocker drive (mounted with dislocker), it’ll assume the file came from some complicated path under Z:\. WTF

Ended up downloading Clementine. It at least let me remove songs from the playlist by pressing “Del” button. But I’m not happy that it doesn’t have CDDB.

Turns out there are better options the Clementine. I found this StackExchange while searching for FreeDB options:

https://askubuntu.com/questions/541977/a-music-player-with-cd-ripping-and-cddb-lookup

Turns out DeaDBeeF (a hex pun) looks like a watered down version of foobar2000. So, Clementine, Foobar2000-Wine and RhythmBox is out.

EDIT: DeadBeef v1.82 offered on Ubuntu (Cinnamon Remix) 20.04’s repository mishandled files on an encrypted volume that’s unlocked. I went to Deadbeef’s website and downloaded DeaDBeeF 1.8.7 universal deb package amd64, installed it with dpkg -i and it worked!.

 1,516 total views

Modifying mutable (like bytearray) arguments’ data in Python functions Use slice assignment x[:] = ... to replace the entire contents. Dynamically typed language lets you shadow input arguments with a local variable!

I’d like to write a function to selectively modify lines read from a file handle and write it back. By default, lines are read as byte()  objects that are immutable, so I converted it to bytearray() instead so it can be modified because only a few lines meeting certain criteria needs to be changed.

When I try to refactor similar operation into a function, I was hoping to pass the mutable bytearray() as an argument and directly modify the caller’s content like in C++, given Python variables works LIKE reference binding.

I know bytearray.replace() does not modify the data in place, but instead outputs the modified line to a new variable. Normally, I can simply do this:

line = line.replace(b'\tCLASS', b'')

and the code will work. However, it doesn’t do anything when I try to pass it as an argument to a Python function (unless I return line as output). Although I am well aware that Python variables assignments to existing variables means orphaning the old data and re-purposing the label, the variable assignment behavior in Python requires careful thought when used in non-idiomatic situation.

In other words, I want this function to have side effects on the variable ‘line‘, but I wasn’t doing it right. This is a tempting mistake for people with a C/C++ background: in C/C++, it is not possible to shadow an input parameter even if we were to explicitly declare it, so the innocent assignment I did above has to modify the object in the caller (passed as a reference to the function) in C/C++, as if I did this directly in the caller.

However, in Python, variables do not need to be declared (aka, dynamically typed). This opens up the possibility of unwittingly shadowing the input parameters, which is what happened here. Mutable arguments on the stack still can be modified through the function, but when you assign a variable using ‘=’ operator, a new local variable with the name on the LHS is created, which shadows the input parameter.

This means the connection to the caller objects is lost during shadowing.

The correct way to do this is use slice assignment (which the logic/concept is very different despite the syntax is similar) to replace all the contents of the input variable with the output of bytearray.replace():

def remove_from_header_token_CLASS(tokens, line):
     # line is expected to be byte array (mutable)    
    try:
        column_CLASS = tokens.index(b'CLASS')
    except:
        column_CLASS = None
    else:
        line[:] = line.replace(b'\tCLASS', b'')  
                
    return column_CLASS

Since Python has a clear distinct concept of parameter variable (from local variable), trying to apply nonlocal keyword over it (in hopes to broaden the scope) will not parse/compile.


This is actually the same behavior as in MATLAB (dynamic typing) for the same reason that variables does not have to be declared like in C/C++ (static typing). In MATLAB, if you choose to have a handle object (which works like references), you can shadow the input argument by creating a local variable of the same name:

classdef DemoHandleClass < handle
    properties
        x = 3;
    end
end

function demo_shadowing()
    C = DemoHandleClass();
    f(C);
    
    disp(C.x)
end

function f(C)
    C = DemoHandleClass();  // Shadowing
    C.x = 14;
end

The above MATLAB program will display 14 without shadowing and 3 with shadowing (C became a new local variable that has nothing to do with the input argument C). MATLAB users rarely run into this because the language design heavily discourage side-effects: we are supposed to return the changed local variable to the caller. The only way to do side-effects in MATLAB is through handles (which you need to establish a class, which is clumsy). Technically you can write the data to external resources (e.g. file) and read it back. But guess what? Resources are accessed through handles, so there’s no escape.


Of course, there’s a better way to do so (MATLAB’s preferred way): return the modified object back to the caller as if they are immutable:

def remove_from_header_token_CLASS(tokens, line):
     # line DOES NOT HAVE TO BE MUTABLE    
    try:
        column_CLASS = tokens.index(b'CLASS')
    except:
        column_CLASS = None
    else:
        line = line.replace(b'\tCLASS', b'')  
                
    return column_CLASS, line

This is what I ultimately used (so I ended up not converting the byte lines to bytearray), given that Python’s tuple syntax make it easy to return multiple outputs like MATLAB. The call ended up looking like this:

column_SPL_CLASS, line = remove_from_header_token_CLASS(tokens, line)                

Nonetheless, I think there’s an important lesson to be learned for doing side-effects in dynamically typed languages. Maybe I’ll need this one day if I get an excuse to do something more complicated that genuinely requires side-effects.


In summary, variable assignments in most dynamically typed languages will shadow the input argument with a newly generated local variable instead of modifying the data in the original input argument. This implies that there function side-effects cannot be carried out through variable assignment.

The most common implication is: do not (equality) assign to a input variable to modify its contents in a dynamically typed language.

 528 total views

Samsung Galaxy Note 3 Charge and USB-OTG simultaneously

I’d like to charge my phone and use USB devices at the same time, but it seems like it requires a 64.9kOhm resistor from sensor ID pin (micro USB) to ground. Instead of melting a USB-OTG cable, I bought this adapter (schematics here)

micro USB3.0 Type B Male to USB3.0 Type A Female adapter

so that I can have direct access to the ID pin. This is a USB 3.0 give that I have a Galaxy Note 3. The same principles apply to the USB 2.0 versions for Galaxy Note 4.


According to this website, fsa9480_i2c.h has the table for the resistor ID values. Turns out 64.9kOhm is the one for both charging (slowly) and using USB devices (like mouse, network adapter, etc.).

RID_USB_OTG_MODE,	/* 0 0 0 0 0 	GND

USB OTG Mode

              */
RID_AUD_SEND_END_BTN,	/* 0 0 0 0 1 	2K		Audio Send_End Button*/
RID_AUD_REMOTE_S1_BTN,	/* 0 0 0 1 0 	2.604K		Audio Remote S1 Button */
RID_AUD_REMOTE_S2_BTN,	/* 0 0 0 1 1 	3.208K		Audio Remote S2 Button                         */
RID_AUD_REMOTE_S3_BTN,	/* 0 0 1 0 0 	4.014K		Audio Remote S3 Button */
RID_AUD_REMOTE_S4_BTN,	/* 0 0 1 0 1 	4.82K		Audio Remote S4 Button */
RID_AUD_REMOTE_S5_BTN,	/* 0 0 1 1 0 	6.03K		Audio Remote S5 Button */
RID_AUD_REMOTE_S6_BTN,	/* 0 0 1 1 1 	8.03K		Audio Remote S6 Button */
RID_AUD_REMOTE_S7_BTN,	/* 0 1 0 0 0 	10.03K		Audio Remote S7 Button */
RID_AUD_REMOTE_S8_BTN,	/* 0 1 0 0 1 	12.03K		Audio Remote S8 Button */
RID_AUD_REMOTE_S9_BTN,	/* 0 1 0 1 0 	14.46K		Audio Remote S9 Button */
RID_AUD_REMOTE_S10_BTN,	/* 0 1 0 1 1 	17.26K		Audio Remote S10 Button */
RID_AUD_REMOTE_S11_BTN,	/* 0 1 1 0 0 	20.5K		Audio Remote S11 Button */
RID_AUD_REMOTE_S12_BTN,	/* 0 1 1 0 1 	24.07K		Audio Remote S12 Button */
RID_RESERVED_1,		/* 0 1 1 1 0 	28.7K		Reserved Accessory #1 */
RID_RESERVED_2,		/* 0 1 1 1 1 	34K 		Reserved Accessory #2 */
RID_RESERVED_3,		/* 1 0 0 0 0 	40.2K		Reserved Accessory #3 */
RID_RESERVED_4,		/* 1 0 0 0 1 	49.9K		Reserved Accessory #4 */
RID_RESERVED_5,		/* 1 0 0 1 0 	64.9K		Reserved Accessory #5 */
RID_AUD_DEV_TY_2,	/* 1 0 0 1 1 	80.07K		Audio Device Type 2 */
RID_PHONE_PWD_DEV,	/* 1 0 1 0 0 	102K		Phone Powered Device */
RID_TTY_CONVERTER,	/* 1 0 1 0 1 	121K		TTY Converter */
RID_UART_CABLE,		/* 1 0 1 1 0 	150K		UART Cable */
RID_CEA936A_TY_1,	/* 1 0 1 1 1 	200K		CEA936A Type-1 Charger(1) */
RID_FM_BOOT_OFF_USB,	/* 1 1 0 0 0 	255K		Factory Mode Boot OFF-USB */
RID_FM_BOOT_ON_USB,	/* 1 1 0 0 1 	301K		Factory Mode Boot ON-USB */
RID_AUD_VDO_CABLE,	/* 1 1 0 1 0 	365K		Audio/Video Cable */
RID_CEA936A_TY_2,	/* 1 1 0 1 1 	442K		CEA936A Type-2 Charger(1) */
RID_FM_BOOT_OFF_UART,	/* 1 1 1 0 0 	523K		Factory Mode Boot OFF-UART */
RID_FM_BOOT_ON_UART,	/* 1 1 1 0 1 	619K		Factory Mode Boot ON-UART */
RID_AUD_DEV_TY_1_REMOTE,	/* 1 1 1 1 0 	1000.07K	Audio Device Type 1 with Remote(1) */
RID_AUD_DEV_TY_1_SEND = RID_AUD_DEV_TY_1_REMOTE ,		/* 1 1 1 1 0 	1002K		Audio Device Type 1 / Only Send-End(2) */
RID_USB_MODE,		/* 1 1 1 1 1 	Open		USB Mode, Dedicated Charger or Accessory Detach */


 916 total views

Windows path length limit

Windows has a path length limit that are typically at the order of 250 (260 for Windows 10) that’s a pain in the butt when moving files. Despite you can override it, it’s no fun when you copy a jillion files just to find out a few can’t make it because the path is too long and you have to find out which ones are not copied!

There’s a short command to check if the path exceed certain number of characters, which I recommend testing for 240 character so you can at least have a 10+ character folder on the root folder to put the files in:

powershell: cmd /c dir /s /b |? {$_.length -gt 240}

 427 total views

Dual-booting: Linux and Windows fight for the system clock

Turns out it’s a common problem when dual-booting Windows and Linux, they keep changing the hardware system clock on each other (unless you live in GMT+0 zone) because Windows assume the system time is the one at the set timezone while Linux think the system time is the UTC+0 time (and offset it afterwards).

Linux updates the time through NTP server blindly while Windows 7 check if the current time is within 1hr from the NTP server to avoid unintended time changes (I have to give Microsoft credit for that). EDIT: Windows 10 blindly updates the time like Linux too.

The easy solution is to have Linux follow Windows’ suit:

timedatectl set-local-rtc 1 --adjust-system-clock

 665 total views

X11VNC for Linux setup notes

x11vnc is a relatively smooth experience, but there are quite a few common use cases that would have been automated away if it’s a Windows program, namely have it start as a service on boot (before logging in)

It’s from babelmonk’s solution on StackExchange. Paraphrased here to make it easier to understand:

After installation, create the password file with -storepasswd switch AND specify the where you want the password saved as an optional argument, and I prefer /etc/x11vnc.pass:

sudo x11vnc -storepasswd {your password goes here} /etc/x11vnc.pass

which will be read by -rfbauth switch for the x11vnc program.


Build your own (systemctl) service by creating /etc/systemd/system/x11vnc.service:

[Unit]
Description="x11vnc"
Requires=display-manager.service
After=display-manager.service

[Service]
ExecStart=/usr/bin/x11vnc -xkb -noxrecord -noxfixes -noxdamage -display :0 -auth guess -rfbauth /etc/x11vnc.pass
ExecStop=/usr/bin/killall x11vnc
Restart=on-failure
Restart-sec=2

[Install]
WantedBy=multi-user.target

Then, start with:

sudo systemctl daemon-reload
sudo systemctl start x11vnc

Enable the service (if not already done by previous commands) so it will start on boot

sudo systemctl enable x11vnc

 728 total views

Acrobat reader on Linux

Adobe gave up supporting Acrobat reader for Linux long time ago, so it’s stuck at the old 32-bit version (9.5.5):

http://ardownload.adobe.com/pub/adobe/reader/unix/9.x/9.5.5/enu/AdbeRdr9.5.5-1_i386linux_enu.deb

ftp://ftp.adobe.com/pub/adobe/reader/unix/9.x/9.5.5/enu/AdbeRdr9.5.5-1_i386linux_enu.deb

The tutorial websites tells you to use wget, but sometimes you might run into authentication problems. You can simply use the links above and double-click the .deb file to install.

Nonetheless, it doesn’t work right out of the box in modern 64-bit Linux. You’ll run into a missing library

libxml2

on run because you didn’t install the 32-bit version of it. Enable i386 (x86 or 32-bit) packages first then get the 32-bit library:

dpkg --add-architecture i386
apt-get install libxml2:i386 ia32-libs

There are some GTK complaints if you run it on a command line, but it doesn’t affect the uses so you can safely ignore them

 526 total views

[Deprecated] systemd-resolved DNS resolution nightmare

Linux Mint 19 does not resolve local hostsnames (nothing to do with SMB, which does not rely exclusively on DNS) out of the box! Damn. MX Linux does.

systemd-resolve, which act as a local DNS server on 127.0.0.53, despite it points to the DNS server assigned by the router’s DHCP (aka, the router’s IP address itself), managed not to resolve the local hostnames out of the box!

Time to disable this mofo (no need to mess with /etc/nsswitch.conf and install Winbind to use WINS):

Disable and stop the systemd-resolved service:

sudo systemctl disable systemd-resolved.service
sudo systemctl stop systemd-resolved

Then put the following line in the [main] section of your /etc/NetworkManager/NetworkManager.conf:

dns=default

Delete the symlink /etc/resolv.conf

sudo rm /etc/resolv.conf

Restart NetworkManager

sudo systemctl restart NetworkManager

I know it has good reasons to exist (like breaking VPN ties), but if Linux Mint decide to have it on as out-of-the-box defaults, at least tell the users that local network DNS resolution won’t work by default!

This is a choice that caters the 5% elite at the expense of frustrating 95% of the target audience!

There’s a new way to do it. See this blog post.

 1,149 total views