Here’s the notes for moving from one namecheap hosting to another space yourself while keeping the same domain/settings.
Full backup on cPanel is a lie
A perfect full migration of shared host can only done by namecheap’s customer service. They told you in the doc that you can do a partial migration yourself but it’s not the full picture! Not only the self-service option is more tedious as you have to move the fragments instead processing one big archive file, there is a piece that’s not accessible from the self-service migration route: Calendars/Tasks/Contacts
This means if that ONLY IF you don’t use CardDAV/CalDAV at all, you can do the migration yourself.
For absolutely privacy, avoid using email (say, talk on Signal instead). Unless it’s inter-server mail in zero-knowledge encrypted providers like ProtonMail that also encrypt the message headers (meta-data, especially who’s sending to who), expect determined people with enough social engineering or authority can see it naked. It’s the same deal as snail mail where people in the post office can see what’s written on the envelope.
For big files like photos and typical cloud storage, which you should self-host these at home anyway. If you are worried about slow internet connection and downtime, you can pay for Zero-Knowledge cloud storage (which the server owners don’t have the master keys to your files) to add redundancy.
The next step down is to self-host your email, contacts, calendar, tasks (productivity suite) which you physically own so nobody can peek into it as long as you guard your home.
Hosting these services from home might be more work and risks (downtime), especially when it’s possible that your ISP’s IP address block is on the spammer’s list or if your ISP blocks the ports needed. The less secure alternative is to pay for extremely cheap shared web hosting services (we are talking about <$4/mo regular price and <$2 for the first year) which
you can make as many email accounts as you wanted
each email account comes with contacts, calendar, tasks as a bundle
use your own domain name
also host your own webpage and wordpress site
With Google, Microsoft, Apple and other big providers, they have big security teams to protect your data from hackers, but because of their centralized nature, it’s much more rewarding for hackers to breach one big provider than going after little accounts spread across different servers and IPs. Unless you are a high profile person or expect to be specifically targeted, you are better off managing your own productivity suite’s hosting/storage.
More importantly, it feels creepy when Google harvest my email and suggest I allow them to automatically register my appointment on my calendar. Random staff might not be reading our emails, but bots are and god knows what else they can do just by updating their code if they someday want to turn on us. They’ve become so powerful that with enough bankroll, they can make our politicians look the other way so there’s no way to stop them if we become dependent on their platforms.
cPanel
The instructions below assumes your shared hosting provider adopted cPanel as the account management interface which you have access to.
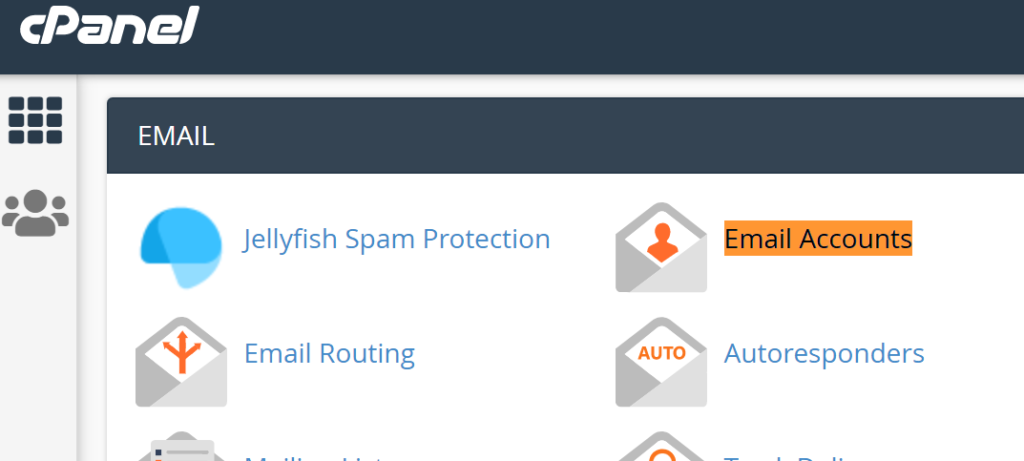
Like Google, your Gmail (email) account is also your account for a variety of productivity services (contacts, calendar, tasks). You can set it up by logging into cPanel, often https://(your server here)/cpanel.
There are a few naming conventions in cPanel that are different from Google’s ecosystem:
Login name is your ENTIRE email address because you can have different domains attached to the same hosting storage so you must enter the domain name after the @ sign for it to tell the accounts apart
Email
In modern times, I’d stick with IMAP for email (which is enabled by default in cPanel). Since Google would like to keep you in their ecosystem as much as possible, IMAP is not enabled by default for Gmail.
Note that due to tougher security settings in shared hosting email server (EXIM Internet Mailer), you might not be able to receive email sent from servers with shady practice (often done by spammers) such as the source address’s server not resolving with DNS (no A or MX records). Skype server might have a typo in their verification email server so I cannot use my shared hosting email address for it.
Webmail
Web email interface (you have a choice between Horde or RoundCube) is at port 2096. You can access it by
https://{name or IP to the shared host server assigned by your provider}:2096

or

https://{name or IP to the shared host server assigned by your provider}/webmail
(which will redirect you to port 2096 above)
In most cases, your domain name attached to the hosting points to the actual underlying shared hosting server assigned by your provider. I’d prefer not to use the underlying server address/IP because it might change when you move between hosting plans.
Also, per security design, WebMail doesn’t warn you when you enter non-existent email addresses (login). I’ll just silently loop you back to the login page again without explanation if you got any part of the login or password wrong.
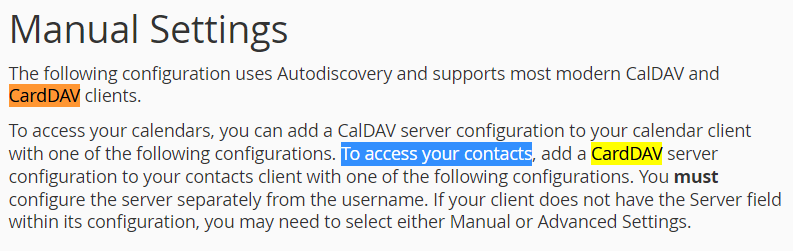
DavX5 for calendar/tasks (CalDAV) and contacts (CardDAV)
In Android, calendar and contacts (also known as address book) are stored in a standard place shared by apps that picks them up from the system (email storage is per app, since POP3 and IMAP itself already does things very differently)
The default Calendar/Contacts app made it look like you have to use Google Calendar/Contacts to set up an online account (by default it came with Device/Local and Google accounts as option), but you can inject CalDAV/CardDAV accounts into the Android’s calendar/contacts system with an app called DAVx5.
The App is FREE if you download it from F-droid but costs $5.99 if you download it from Google Play. It’s not a loophole, but the authors want people to move away from Google Play and use F-droid, a Free-and-Open-Source (FOSS) app store.
DAVx5 works in a little unusual way that accounts are NOT added through calendar/contacts app but instead you register your CalDAV/CardDAV accounts, select the folders to sync, SYNC IT, then each sync’ed FOLDER (you hear me right) will show up as standard Android Accounts (just like Google/Samsung Accounts) which will work with any standard Calendar/Contacts app. All management (add/removal) happens in DAVx5.
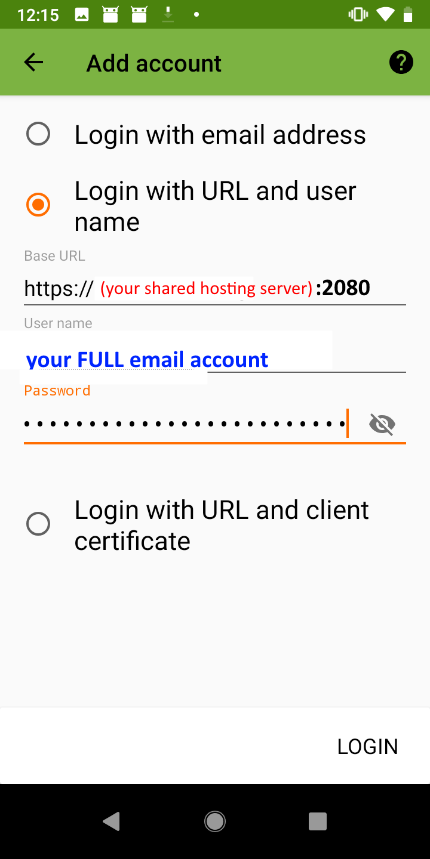
You must enter the URL which points to Port 2080 of the shared hosting server! If you forget to enter the port number, the account will be set up with CalDAV/WebCAL only, without CardDAV! This is buried in cPanel’s instructions:
When you set up an CalDAV/CardDAV account, remember NOT to use the first option “Login with email address” (or else the server URL will be whatever that’s after the @ mark and therefore no port number entered, which means CalDAV only, no CardDAV, and DAVx5 will simply remove the CalDAV tab and won’t warn you about it)!
Basically CardDAV is just a folder storing each contact as VCF (vCARD) file and CalDAV is just a folder storing each event/task as an ICS file. Basically it’s just a primitive HTTP file manager hosted with HTTPS login and apps are supposed to find the folder using a consistent naming scheme.
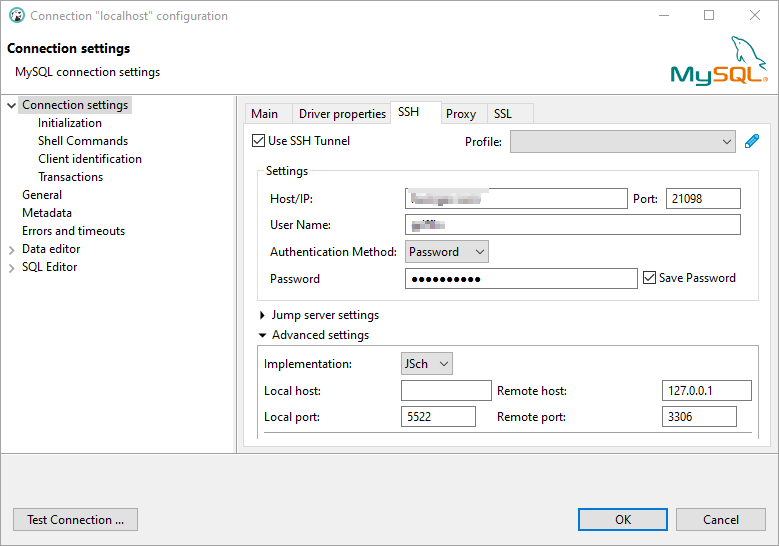
Namecheap already provided instructions to connect MySQL Workbench client for its shared hosting, which involves SSH-tunneling because they disallowed direct MySQL connection out of security concerns.
So here’s basically the logistics:
SSH to your namecheap hostname (can use your domain name) at SSH port 21098
Tunnel listens to Port 5522 and forward it to localhost (the client itself) at MySQL Port 3306
Instead of connecting directly to the {namecheap shared hosting server}:3306, connect to the localhost:3306
It’s a little confusing on how to do it on DBeaver because “Advanced settings” is hidden by default which you will need. The name ‘local client’ (source) vs ‘remote’ (destination) in the dialog box is confusing. It’s actually equivalent to
bind_address can be left blank. If you are paranoid and don’t want other machines to use your current MySQL client machine as a gateway (they tunnel into your machine to use the tunnel you are currently establishing), set (aka bind) it to localhost, or you can bind it to the client’s network adapter’s IP which you want to allow machines on a trusted network to use this MySQL client computer as a gateway.
For some reason (I suspect it’s IPv6), “Remote host” needs to be set to the loopback adapter 127.0.0.1 (cannot use the special hostname ‘localhost‘).
Remember MySQL’s username and password is the special database-only login credentials you created at cPanel.
Aria2 is a convenient command line downloader that works like curl/wget on http/ftp, but it also support many other protocols, and it aria2 natively multipart download!
# Install the base (core) software first
# This example is for entware
opkg install aria2

# Download the package from Github zip to /opt/tmp
wget -c -O /opt/tmp/webui-aria2.zip https://github.com/ziahamza/webui-aria2/archive/master.zip --no-check-certificate

# Make sure you have some web server installed (nginx, httpd, apache, etc.)
# Nginx HTTP server instructions
# https://hqt.ro/nginx-web-server-with-php-support-through-entware/
# Make sure you know what {Webroot} is
# for Nginx, {Webroot} is /opt/share/nginx/html

# Unpack to the zip file at /opt/tmp and clean up the zip
unzip /opt/tmp/webui-aria2.zip -d /opt/tmp/ && rm /opt/tmp/webui-aria2.zip
# Move/rename to desired location
mv /opt/tmp/webui-aria2-master {Webroot}/aria2
Nginx defaults to port 82 (change it to where you set your web server). The WebUI can be accessed at http://your_server_here:82/aria2/docs.
/doc is inconvenient, so I created a redirection by placing this index.html under aria2’s root folder:
The RPC host breaks out of the box because the you’ll need to make a few adjustments to /opt/etc/aria2.conf before you can start the service without crashing it (so the WebUI of course will complain with a lot of cryptic error messages):
# Basic Options
dir={Change it to a viable folder that has enough space if /opt/var/aria2/downloads
 is is not big enough}

# RPC Options
# Unless you want to get a certificate, you'll need to use unsecure mode:
rpc-secure=false
# Change your rpc-secret to be matched in "Connection Settings" in the WebUI
rpc-secret=whatever_passphrase_you_like
After you get the config file correct
# Start the installed aria2 service
$ (the package already have a service wrap over aria2c)
# aria2 seem to assume it's port 81 so the init.d script has a "S81" prefix, but aria2 does not control the port, where you put the WebUI in http. So it's just a cosmetic filename naming convention.
/opt/etc/init.d/S81aria2 start
If the service wouldn’t start (some bad configs might have the service reported as “done” and after you check again in a second with “S81aria2 check“, it’ll report as “dead”. You can debug by looking at what went wrong at /opt/var/log/aria2.log. That’s how I figured I need to turn off “rpc-secure” parameter.
There’s a powerful Gmail web interface replacement for your regular mail hosted anywhere called Mailpile. Think of it as Thunderbird but hosted like a web page. There are a few things I liked about in the process of freeing myself from Gmail:
Free to use any email (storage) services and not tie your client to it
View multiple accounts at the same time (NextCloud won’t do it)
Very clean, concise interface that makes sense (Gmail users will be comfortable with it)
Very security and privacy conscious with attention to details! It even encrypts your local email cache and search index if you want to (performance penalty)
Excellent email setting autodetection. Just type your email account and everything’s set up for you!
The only downside is that the documentation is a little lacking. There are a few concepts that are not explained that’d confuse and scare users away. That’s why I’m explaining it here.
This is a headless service where the interface is webpage you access on a web browser.
It’s originally designed to install and run as a local web server where you access mailpile.
Call mailpile (can create a shortcut) and it’ll try to launch the correct page for the mailpile client.
Mailpile does not maintain a separate user registry: it uses the hosting computer’s native user manager
Log into your mailpile using the user account name of the computer where mailpile is installed!
Advanced concepts
Install multipile instead if you want other computer to access the headless service
You’ll need login to the computer that hosts the headless mailpile and run mailpile AS the user you want to setup once to establish the account before use.
# Currently there's only Debian-like distributions (because it uses apt-get)
# These instructions do not assume direct root account. Use sudo instead

# Install pre-requisite packages: curl apt-transport-https gnupg
sudo apt-get update && sudo apt-get install curl apt-transport-https gnupg

# apt-key add {contents of the package signing key provided by mailpile.is)
curl -s https://packages.mailpile.is/deb/key.asc |sudo apt-key add -

# Register mailpile.is's package server with Debian apt package manager
echo "deb https://packages.mailpile.is/deb release main" |sudo tee /etc/apt/sources.list.d/000-mailp.list
# NOTE: Official instruction says 000-mailp instead of 000-mailp.list
#       You need to have some file extension as apt-get checks

# Multipile (mailpile-apache2) = Mailpile + (allowing access from other computers through apache)
sudo apt-get update && sudo apt-get install mailpile-apache2

# You'll need to run mailpile as the user once to establish your account with mailpile before use
mailpile
# If you are on terminal interface instead of web interface, enter 'setup' at mailpile prompt:
> setup
# Follow the instructions on the web interface for setup if you do not use terminal mailpile client interface