Debian 13’s lightdm does not work out of the box with the default settings when creating a VM in Hyper-V. I got a black screen if I deviated from gdm that only works for GNOME (default), which means no Cinnamon for me.
With the same Hyper-V setup, Cinnamon/Lightdm does not work on Ubuntu 25.10 either.
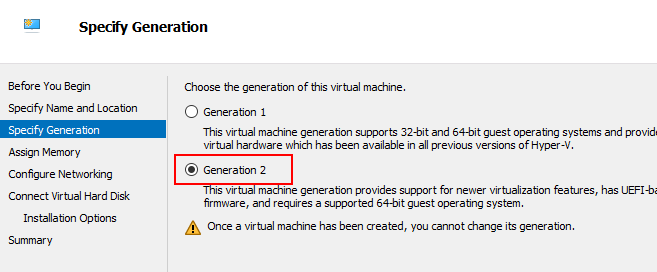
Generation 2 VM is another can of worms. The default secure boot uses the Windows Template. Debian/Ubuntu CD boots with “Microsoft UEFI Certificate Authority” or no Secure Boot (but you’ll still have to make the installed Debian run with Secure Boot later). Windows and “Open Source Shielded VM” templates are no go for Debian/Ubuntu.
If you started the Debian installer CD with Secure Boot disabled, Debian installer will ask if you want to install it as a UEFI enabled OS. You should answer yes and enable secure boot after it finished installing and before rebooting.
The common use case starts the program with Run.bat which is just a wrapper for the powershell script Install.ps1.
Unlike conventional designs, there isn’t really a dedicated installer nor the program runs standalone. The launcher starts the WSA if it’s already ‘installed’ and ‘install’ it if it wasn’t. If a WSA was launched, it’d be closed and restarted (yes, it will interrupt the apps opened). So you basically trust the Install.ps1 script to do the right thing managing everything needed to get WSA up and running.
The Hyper-V virtual machine is really in %LOCALAPPDATA%\Packages\MicrosoftCorporationII.WindowsSubsystemForAndroid_8wekyb3d8bbwe\LocalCache\ and everything is in userdata.*.vhdx so there’s only one file to backup and restore.
Direct Android App icons on Windows Start Menu
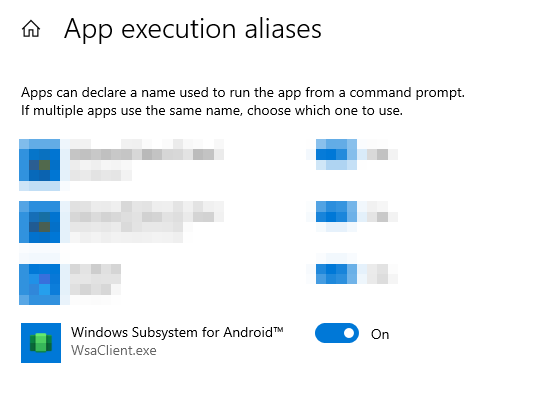
The Windows start menu icons created by installing apps on WSA are launching the stub (App execution alias) to wsaclient.exe located in %localappdata%\Microsoft\WindowsApps\MicrosoftCorporationII.WindowsSubsystemForAndroid_8wekyb3d8bbwe\
Specifically the syntax is wsaclient /launch wsa://{android application ID}.
Annoying windows/apps opened every time WSA (Run.bat) is started
It’d make sense to say if WSA displays nothing after successfully starting in the background, beginners won’t know where to start. It typically starts these
native Windows WSA settings app (Microsoft App, not Android App)
Google Play store (Android app)
Android Settings app (Android app)
If you installed the WSA with KernelSU, a webpage with the docs about KernelSU pops up every single time you start the WSA, which is ridiculous.
Turns out it’s these lines (the Finish block) in Install.ps1‘s design decisions. I simply commented these nusiances out now that I know where and how to launch them when needed
Creating icons to Android apps
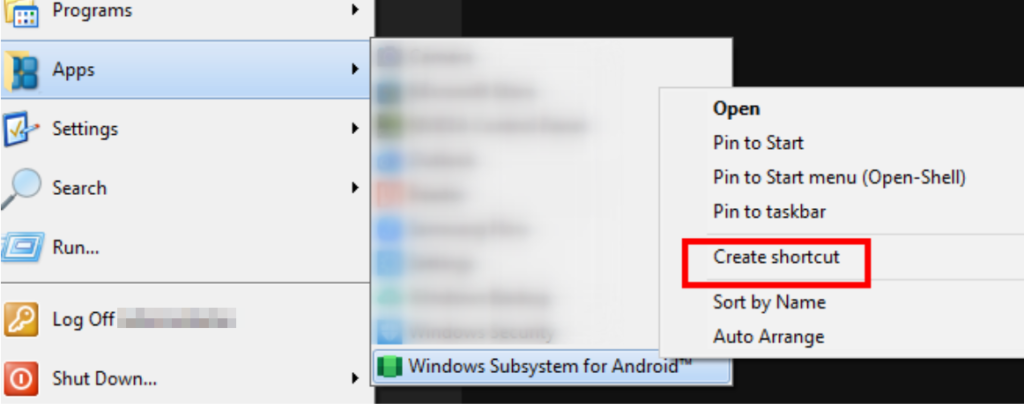
Google Play app is usually created by WSA, but not the Android-Settings Android app and WSA-Settings Windows App. Disabling these above means I’ll have to make the icons to them since they are the starting points to managing the emulated Android system.
If you forget Windows Apps are different from Windows programs like I do, you should right click on the WSA-Settings Windows App and make a shortcut icon out of it to be used on the Windows Desktop or Start Menu.
Android-Settings Android app icon can be created from this command:
Since WSA doesn’t come with many apps. If you don’t want to login to your Google account to use Play store, you can download the APKs (say Apkpure) and sideload it with WSA Sideloader. It’s avaiable
It’s frustrating that there are no simple packages provided by Microsoft or Ubuntu to get something as basic as sound working on Hyper-V. It’s nuts that we still have to deal with these kind of integration bullshit in 2023 when people are claiming that Linux is useable! At the time of writing, there are still way too many rough edges on Linux that are clearly not the users’ fault!
To understand why things are the way they are. We have to first understand that Hyper-V talks to the VM under RDP under the hood which has many advantages that the RDP provides. RDP is way less sluggish for the video and sound quality than the damned X11 server, which people spent little time to provide for Windows. MobaXterm is the only decent free X11 server for Windows in terms of user experience but it’s not the first one that populate search results.
In other words, we’ll need to set up Linux to stream the apps through RDP, not X11 to take advantage of Hyper-V manager’s interface (specifically vmconnect.exe under the hood). In Linux, this area is not maturely developed and the author of xrdp is not keen to make polished packages so most of the time we get pointed to the struggle of compiling the source code.
Given RDP is not native to Linux, xrdp did not rebuild the guts of X11 that maps natively to RDP. Instead it launches a bare minimal RDP session with nothing on it other than a basic client (sesman) that you can use it as a VNC client or X11 client that streams to the bare minimum RDP, so there’s an extra layer of indirection. You are not running RDP natively. That RDP session is for you to call X11.
Since X11 does not natively stream audio, you need to a sound server (over network) system that streams the audio to the bare minimal RDP layer of xrdp, then have the RDP layer stream/relay to RDP with pulseaudio-module-xrdp (which is a kernel package that you need to build from scratch at the time of writing since there’s no packages for it).
By the way, if you get this xrdp+pulseaudio ordeal working, you also get (x)RDP working for the linux even if you don’t use vmconnect to connect to it, because it’s RDP under the hood anyway.
I followed the messy (and often broken) instructions from multiple sources to build and install pulseaudio-module-xrdp, but it turned out this wasn’t enough. There’s no sound and the anticipated sound device didn’t show up in Ubuntu and all I see is a dummy sound driver.
Turns out there are many pieces of the puzzle scattered through different blogs and the blog either has typos, missing a key component, or the URLs changed so it’s broken. Here’s an overview of what you need to do
Replace Pipeware completely with PulseAudio on Ubuntu
RDP Enhanced Session is required for sound. This is true for Windows Guests as well. Linux doesn’t have RDP so you’ll need xrdp first before you even talk about enhanced session. Vsocket is how Enhanced Session talk. On Linux side we configure xrdp to talk on vsocket instead of a raw rdp protocol over Port 3389. On Windows we enable Enhanced Session (if not already) and enable hv-socket (with it the Windows side of vsocket).
Since xrdp ‘cheats’ by redirecting X11 instead of implementing RDP from the core, you’ll need to relay the pulseaudio from the Ubuntu itself to the RDP layer which is done by pulseaudio-module-xrdp. Unfortunately it’s does not come with xrdp and there’s no package so you have to build it yourself the install your compiled product. Remember by default source code repo is disabled so you need to enable it first before following the any build instructions.
Get rid of Pipeware Completely & Install PulseAudio
Griffon’s IT library provided the insight that we need to take out Pipeware (the competitior of PulseAudio) completely and replace it with PulseAudio. After that I got it working. Here’s a path to his tutorial:
His tutorial included the script he made to install a more recent xrdp he built but the link is now broken. So what I did turned out to be necessary after all.
His tutorial basically stop/disabled/masked the hell out of Pipewire so it’s dead and deader and make sure the users cannot install it later and displace PulseAudio. It’s a lot of gymnastics because systemctl disable and mask do not take wildcards so you have to find out each service/daemon named pipewire. I’ll take this shortcut instead:
sudo apt purge pipewire
A tool to check if there’s audio server running (optional) is
pactl info
House keeping and install both pulseaudio and xrdp if not already done. pavucontrol is for controlling the volume which is often needed:
Part 1 [DONE BY DEFAULT NOW]: Change xrdp to receive vsocket instead of raw RDP
TLDR: No actionable item here. Included here for educational purposes only as it was a required step before.
Enhanced Session uses vsocket instead of raw Port 3389 for connection which xrdp.ini defaults to out of the box. Griffon’s IT library gave the instruction to replace the port=3389 to port=vsock://-1:3389 in xrdp.ini. However it’s already taken care of in the new install.sh script for linux-vm-tools:
Part 2: install linux-vm-tools (think of it as vsocket driver)
linux-vm-tools is “Hyper-V Linux Guest VM Enhancements” developed by Microsoft which dropped support for it and picked up (forked) by hinara to support Ubuntu 22.04. Hinara’s version is more updated.
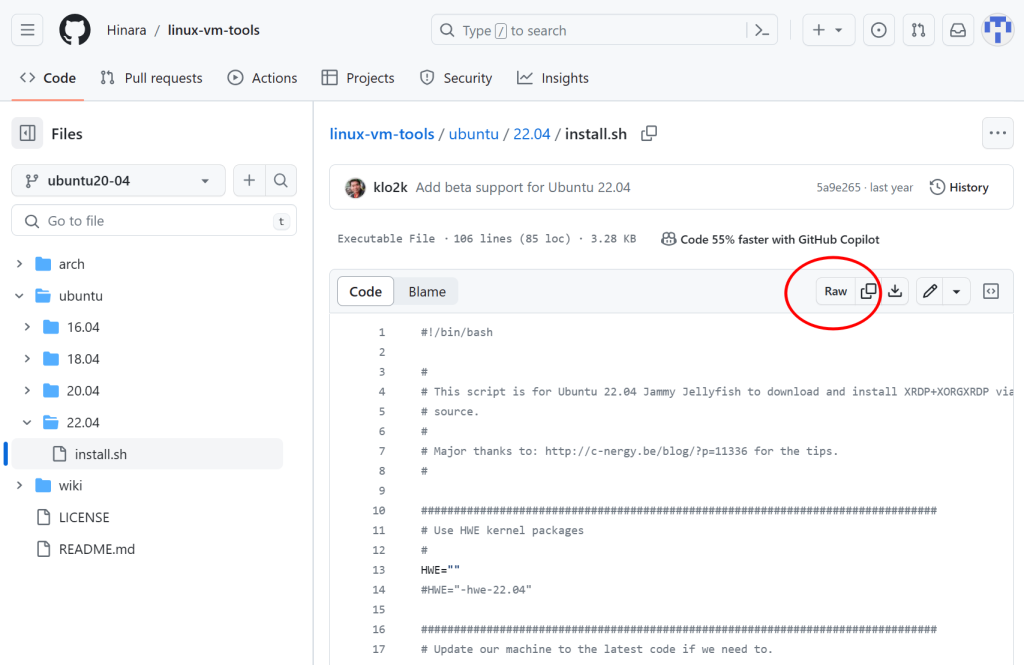
So the first thing you do is to download (can use wget, curl, aria whatever you like as the downloader) the install.sh of the latest/appropriate version (right now it’s Ubuntu 22.04):
Note that the folder name at the top level says 20.04 (branch name) but at the lower level says 22.04 (folder name). So be prepared the path might change in the future if the author figured it’s better to use a consistent branch name later. The safest bet is to go to the Github page and discover the latest version then click raw to get the direct link to use with wget (or any file downloader).
Downloads by default are not executable for your safety, so enable the execute attribute with chmod +x:
sudo chmod +x install.sh
and of course execute the install.sh after you checked it’s all kosher:
sudo ./install.sh
The last 2 lines of the script tells you to RUN IT AGAIN AFTER REBOOT. It’s easy to overlook given the text doesn’t stand out after the user got bombarded with lots of verbose info. Make sure you follow it!
Configure Hyper-V for Enhanced Session (Host)
On Windows side, you’ll need to enable the Windows version of vsocket to communicate with the vsocket. There’s no curly braces when you type in {your VM’s name}:
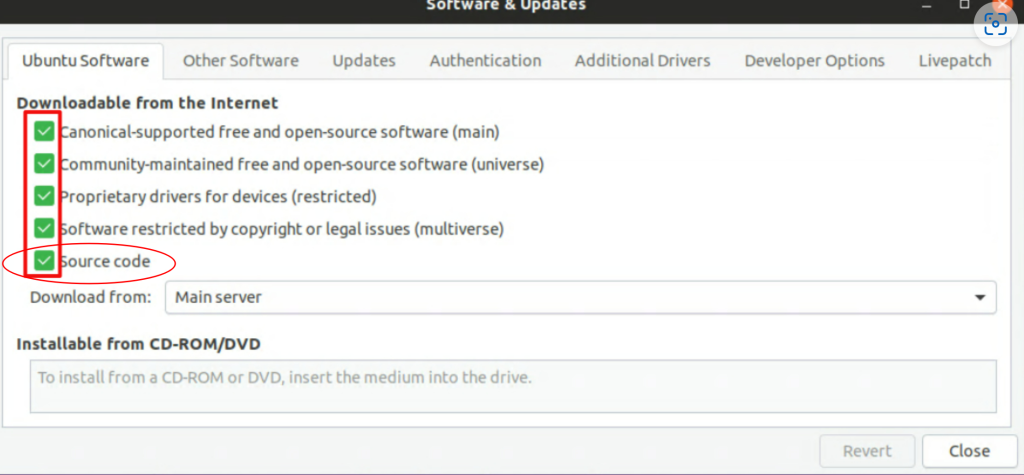
Deploy a Linux VM on Hyper-V with Sound 20.04 Edition – techbloggingfool.com‘s scripts do not use the default folder choices by the build script so the changes in the upstream broke his folder scheme by adding a ‘+dfsg1‘ to the folder name. Instead of fixing it, I followed the official instructions on the github page but take advantage of the one very useful piece he provided: enable source code repo:
He has command line scripts that enables the source code too. Given my confidence about linux developer coordinating with people downstream about the naming schemes changes, I’ll stick with the GUI which gives a consistent interface.
./bootstrap && ./configure PULSE_DIR=$HOME/pulseaudio.src
make
PULSE_DIR=$HOME/pulseaudio.src because this is the default in the wrapper script above if no arguments are specified. Stick with the defaults (working at home folder) as it’s not wise to trust people to coordinate their naming scheme consistently. The defaults are likely tested more thoroughly.
which you can OPTIONALLY check your work to see if the kernel modules are indeed installed:
ls $(pkg-config --variable=modlibexecdir libpulse) | grep xrdp
[Optional Cleanup] If you don’t have anything named pulseaudio that you’d like to keep, you can clean up by removing the files using wildcard and the install.sh
sudo rm -rf ~/pulseaudio*
sudo rm ~/install.sh
Summary
Here’s a consolidated ‘script’ to show the complexity. I do not recommend copying and pasting it as the dependencies might change and it might break.
# Change audio server in Ubuntu
sudo apt -y update
sudo apt -y purge pipewire
sudo apt -y install pulseaudio pavucontrol xrdp
systemctl --user enable --now pulseaudio.service pulseaudio.socket
# [Optional] check if PulseAudio was installed correctly
pactl info
# Build pulseaudio-module-xrdp and install the kernel modules
# Stick with official instructions which assumes home folder
cd ~
sudo apt -y install build-essential dpkg-dev libpulse-dev git autoconf libtool
git clone https://github.com/neutrinolabs/pulseaudio-module-xrdp.git
cd pulseaudio-module-xrdp
./scripts/install_pulseaudio_sources_apt_wrapper.sh
./bootstrap && ./configure PULSE_DIR=$HOME/pulseaudio.src
make
sudo make install
# [Optional] check if pulseaudio-module-xrdp was installed correctly
ls $(pkg-config --variable=modlibexecdir libpulse) | grep xrdp
# Install linux-vm-tools which enables Enhanced Session
# Give linux-vm-tools its own folder to avoid confusion
mkdir -p ~/linux-vm-tools
# Note: "... && cd $_" will
cd ~/linux-vm-tools
wget https://raw.githubusercontent.com/Hinara/linux-vm-tools/ubuntu20-04/ubuntu/22.04/install.sh
sudo chmod +x install.sh
sudo ./install.sh
# The last 2 lines of screen output of install.sh tells you to reboot and run this again
# This is automated below by making a icon in Gnome desktop's autostart folder
# that will self-destruct after first launch
cat > ~/.config/autostart/startonce.desktop <<EOF
[Desktop Entry]
Type=Application
Name=startonce.desktop
Exec=gnome-terminal -- sh -c 'sudo ~/linux-vm-tools/install.sh && rm -rf ~/pulseaudio-module-xrdp ~/pulseaudio.src ~/linux-vm-tools ~/.config/autostart/startonce.desktop && init 0;$SHELL'
EOF
sudo reboot
I also noticed a quirk that the first reboot after everything’s installed might be a little too fast. In this case restart again once more. So instead I just have the desktop shortcut shutdown your VM after it’s done and have you manually start it again so it’d work right the first time.
I’ve created a Github repo for my own convenience, but feel free to use it however way you like, but I’m not responsible for any damages it might cause. Better read through the code with the help of this blog page and understand what it does and decide if you want to try it for your setup. I tried to make it robust, but it’s designed to be installed on freshly install Ubuntu guest VMs.
Among the common virtual machine solutions (Hyper-V, VirtualBox, Xen (Cirtix), VMware, KVM/Qemu), KVM/Qemu has the reputation of being lean and mean. However, it’s not easy to set up and use.
Microsoft’s Hyper-V has an interesting approach: if you disable Hyper-V, Windows runs as raw Windows. When you enable Hyper-V, your host Windows is a VM session in disguise running locally and have the first dibs on the hardware, which the overhead is unavoidable even if you launched no VM.
I tried the QEmu port on Windows and it was faster than Hyper-V even when there’s no KVM (used HAXM). However QEmu’s Windows port is clearly not polished. It retains a lot of the KVM lingo which made no sense, and it’s messy to get TAP (VMs having direct access to my own network without any translation as if they have their own network card plugged to my router) and it bluescreens my Windows.
So the next attempt is to try QEmu/KVM on linux. QEmu/KVM pretty much operate as a simple executable with a gazillion command line switches. Anything you can find that are a little user friendly are just a wrapper that passes the correct command line switches.
Most of the UIs, do not polish the UI to organize the available features into intuitively arranged common use cases like HP/Agilent/Keysight/Windows does. Most of the time it takes as much effort understanding the man pages spit out by –help switch as using their interface, and there’s a lot of common use scenarios overlooked that the user will end up having to look up the switches or enter the commands in the shell themselves.
Libvrt is simply an XML tree that’s a near-direct translation of the command line arguments so you feel the entry looked more professional than saving the command line text is a shell script or batch file. I’m not impressed as it’s just more fluff as the structure do not help the users avoid studying the command line switches’ manual pages.
QtEmu had promise (the interface looked like a half-developed version of VirtualBox’s Manager) but the project was not maintained anymore and Qemu’s command line switches’ evolution has escaped them so a lot of the functions are broken or missing.
virt-manager do not have a compiled Windows binaries port. They have a virt-viewer for connecting to the sessions in Windows but it’s command line like SPICE. This is beyond frustrating. If you want something polished like a Hyper-V manager on Windows to manage Proxmox or linux QEmu clusters, forget about it.
Proxmox is very incomplete when compared with Microsoft’s offerings, but it’s still better than nothing. At least it has a web interface that VNCs the screen back to you.
You still cannot avoid actually understanding the long list of Qemu command switches as the UI only translates a few basic use cases into raw command switches which they show the raw string to you with the expectation that you’d figure out what to fix if they accidentally generated invalid combinations.
There are quite a lot of features (like setting up TAP) that still require shell command line entries, which they provided the interface so you don’t have to SSH separately into the Linux
Remember whatever Proxmox provided, it’s largely a pass through of the command line (switches) interface. Don’t get your hopes up assuming all the things a normal user would expect are there. You are expected to fill in the gaps by a lot of Googling. The UI is useful only if you know what you are looking for.
There are a few things Proxmox did right but overall it’s not an experience comparable to Microsoft’s management interface.
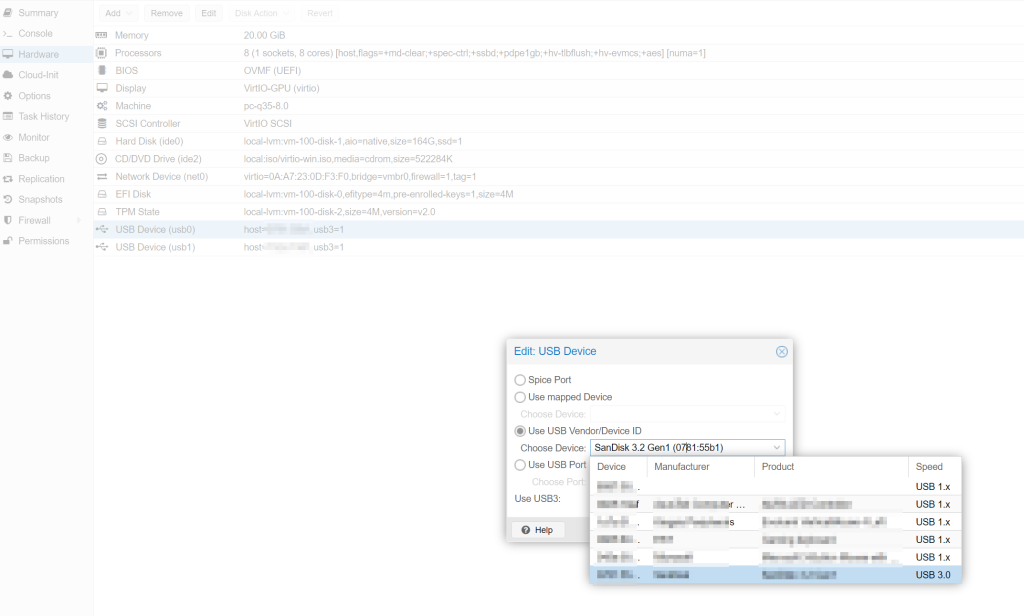
USB mapping
I have to give Proxmox credit for implementing PCI and USB passthrough/mapping, which is often a pain in the butt to get the unique string from command line and hack together the right reference to mount the hardware.
VNC over WebUI is horrendous
I often hate people for squeezing all the UIs in a browsers when they shouldn’t. VNC is one of them. The reason is that when you are remote controlling another computer, you need to make sure most keystrokes goes to the VM, not the host, unless released. You cannot do this from within in a browser as the Alt-F4 closes the client’s browser, not the guest VM’s Windows!
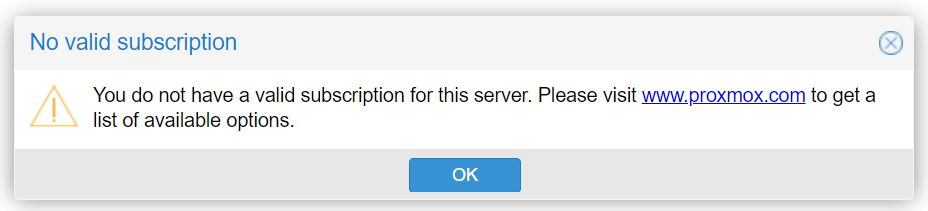
The first thing that trips me from Proxmox is the downloadable, despite it said it’s free if you don’t use their enterprise repository, is Enterprise (paid) version out of the box, with no option to download the free version that’s configured as free/community edition.
It’s a dick move to greet ALL new users with this, hoping to scare them to consider a subscription:
I don’t think frustrating people who are trying to learn/explore the software will make them want to pay for a subscription. The best this dick move can do is to scare new users away as the user might think they did something wrong getting things they don’t expect. I certainly thought of throwing out Proxmox had there be better options out there when I run into this, as I’m still evaluating whether I should go with Qemu or Hyper-V.
First of all. This scary message doesn’t actually block you from using Proxmox. It’s just that you don’t get updates until you either pay for their enterprise repositories or change to the free repositories. At least you can still use the interface to gain shell access which we’ll need to fix it (or you can go to the physical computer and enter the same thing in the text terminal display locally)
The difference between enterprise and free is just which servers the update repositories points to. Getting the latest and greatest is not necessarily a plus for enterprise users so they let free users take the risks first and provide feedback so they can polish their software. Fair enough. Great model.
There are two parts to fixing this ordeal:
Configuring the update repositories to the free no-subscription repositories (Functional issue, and it’s per node, including slave nodes)
Removing the nag screen (Cosmetic, and it’s the overall Proxmox, aka the main node hosting the Proxmox management interface)
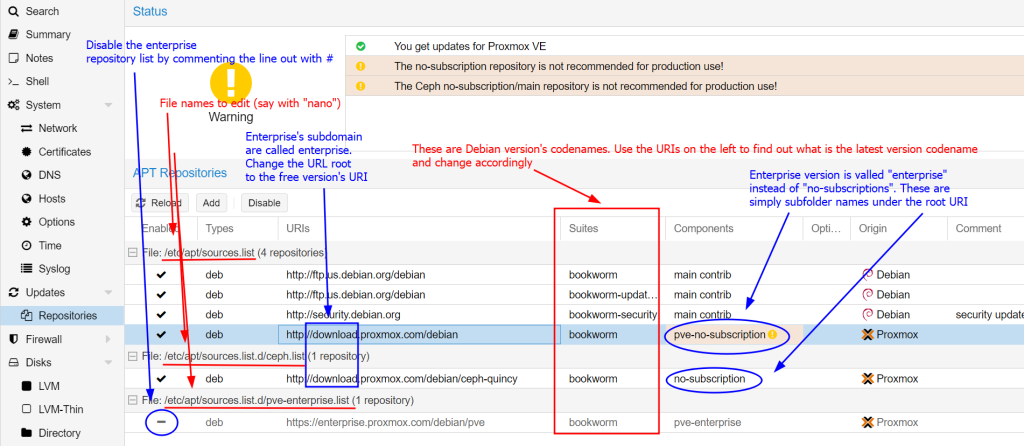
Fix Subscription Scare Part 1: Updating repositories locations
Basically, what you’ll need to do is to notice edit the lines file names show below (underlined in red) corresponding to the repository URL path you want to change:
/etc/apt/sources.list.d/pve-enterprise.list is not necessary for free users, so you can simply comment all the lines out (there’s only one line)
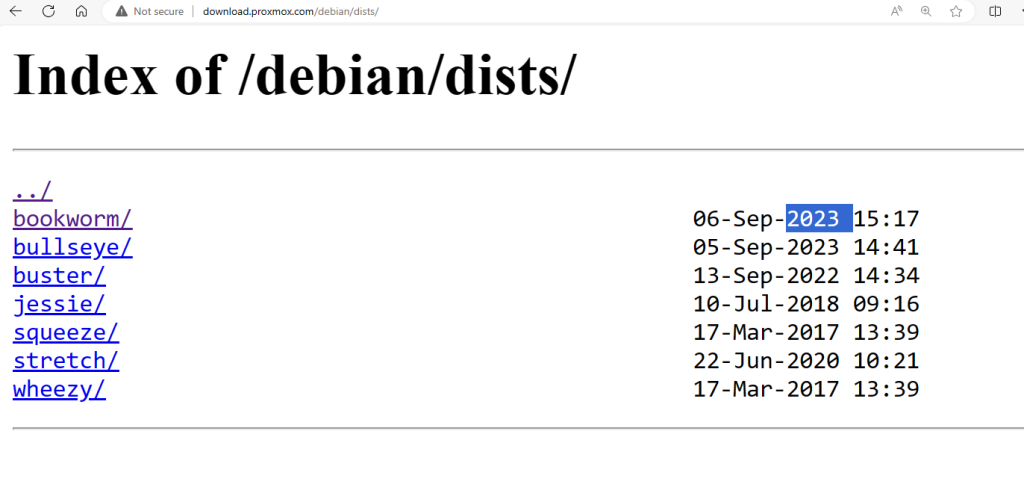
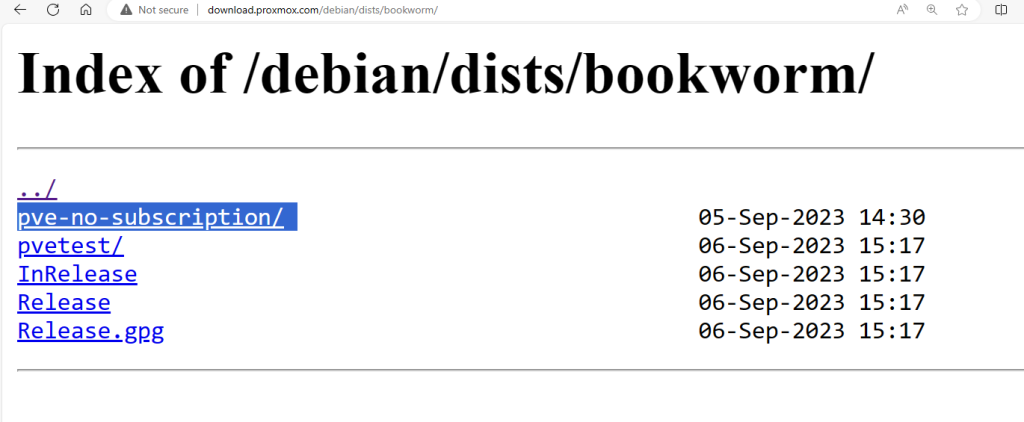
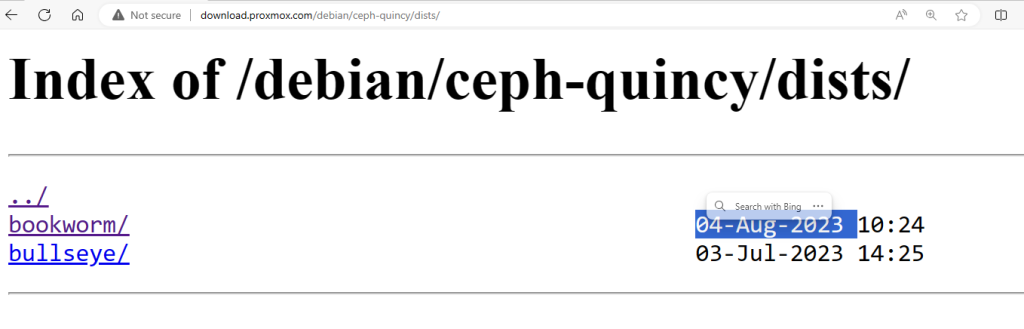
/etc/apt/soruces.list is the link to the core repository for Proxmox updates. Instead of blindly following exact instructions which can go stale as version progresses, open the URL http://download.proxmox.com/debian/ and see what’s out there. What’s not spelled out in the web admin interface is the intermediate folder called ‘dist‘
bookworm is the latest Debian version’s code name at the time of writing
and obviously we pick the branch/sub-folder that says no-subscription (there’s no enterprise here since it belongs to a different root URL), but you still have to get the name right for the ‘Components’
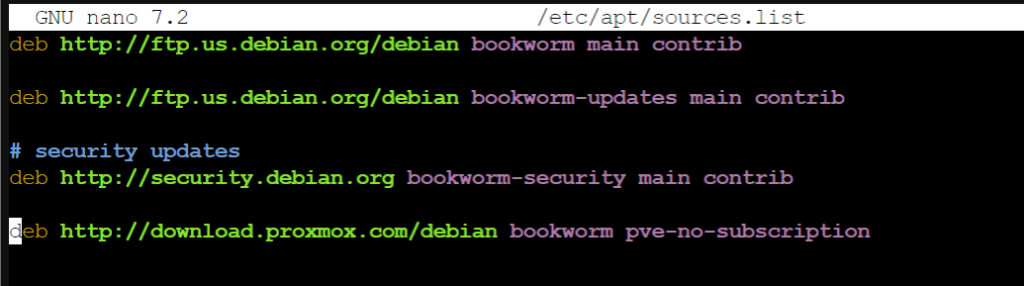
You can open it with a text editor like nano:
nano /etc/apt/sources.list
and edit this proxmox’s repository line (remember to skip the ‘dists‘ intermediate folder). Every space after a word that is just a subfolder you see from the folder structure. If Debian released a new version/codename, you might also want to update the first 3 lines of debian repositories as well to match the name code name (and folder structure if they rearranged it).
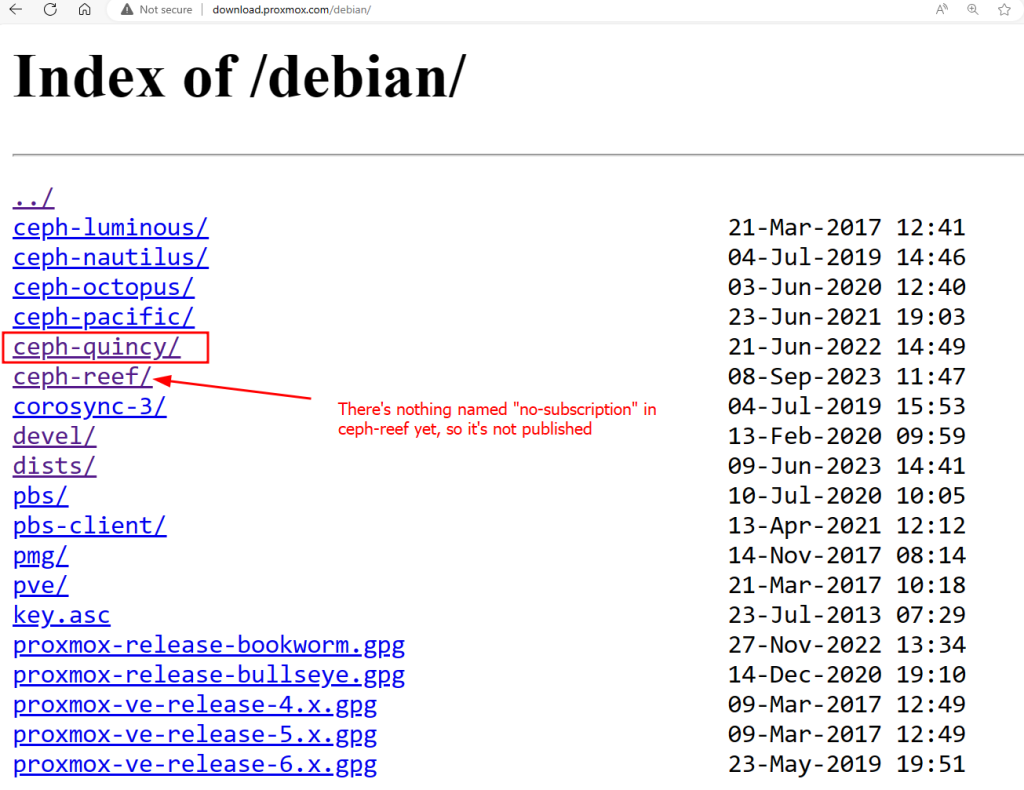
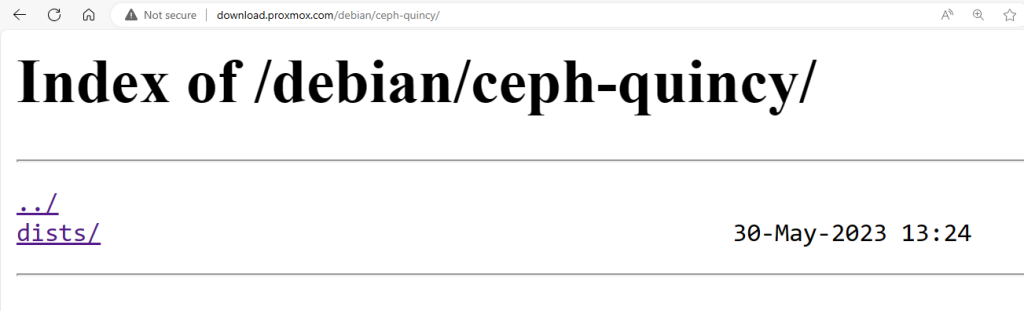
Ceph is an optional feature (not installed) yet it’s configured to be enterprise as well, so for consistency, we might want to change it to the no-subscription (free) version as well. The latest codename for ceph that was published at the time of writing is “quincy” (there’s nothing in the “reef” folder), so we click on it.
Again the ‘dists’ is boilerplate and not spelled out (so we don’t enter it) in the entries of the repository sources file.
bookworm is the current Debian version for that
and we see a “no-subscription” folder which is the one we want obviously. We can just guess by sensible names you’d choose if you were the developer.
You can again open a text editor like nano to edit the repository location file as shown in the web admin UI
nano /etc/apt/source.list.d/ceph.list
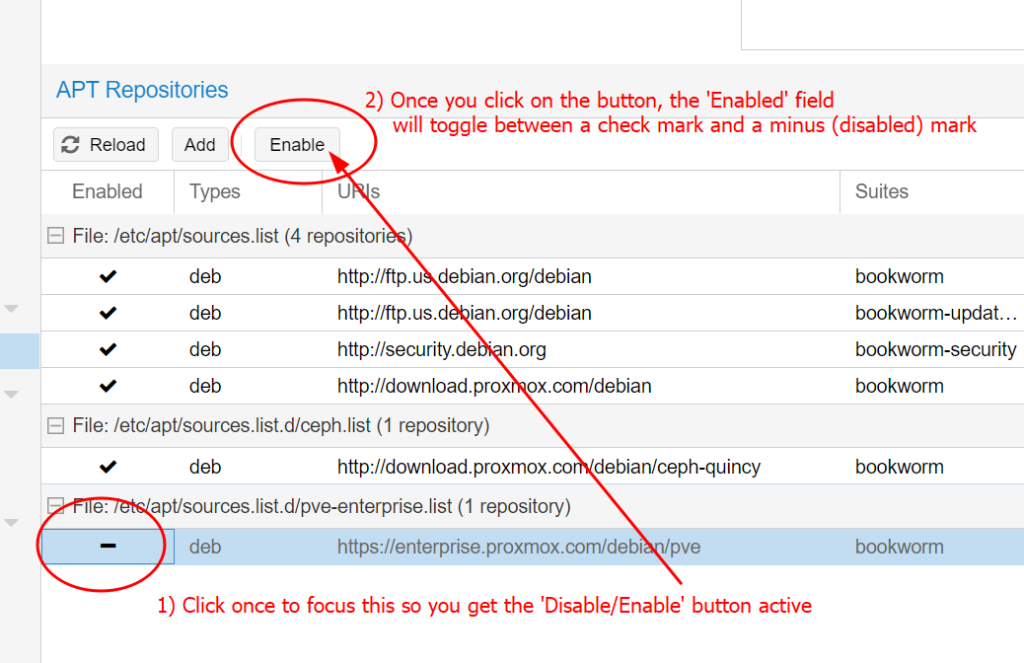
And finally, disable /etc/apt/source.list.d/pve-enterprise.list
Under the hood, it’s basically Proxmox adding a # (comment sign) to disable the line in /etc/apt/source.list.d/pve-enterprise.list with the similar procedures we did:
Hit Reload and you are done with this subscription scare tactic.
Actually out of consistency, you can build your own pve-no-subscription.list to repace pve-enterprise.list and replace ‘enterprise‘ in the root URL with ‘download‘, update the Debian codename (at the time of writing it’s ‘bookworm‘), and the change the components folder from ‘pve-enterprise‘ to ‘pve-no-subscription‘, which translates to crawling this repository path: http://download.proxmox.com/debian/pve/dists/bookworm/pve-no-subscription/
There’s nothing fancy and hard-coded about these names. It’s basically the URL of where the update files are stored with an intermediate folder ‘dists‘ sandwiched between the root URL and the tokens (separated by spaces) which are basically subfolder names. All it does is to attach a ‘/dists/‘ after the root URL and replace the rest of the ‘/‘ with spaces.
It simply looked like the developers for the web admin UI didn’t have the time to get to making the table entries clickable and editable yet and they merely got to make the enable/disable button to comment out the lines in the file. You’ll see similar UI deficiencies in a lot of places later which you’d have to go to the shell to do it yourself after researching the concepts.
Fix Subscription Scare Part 2: Removing the nag screen
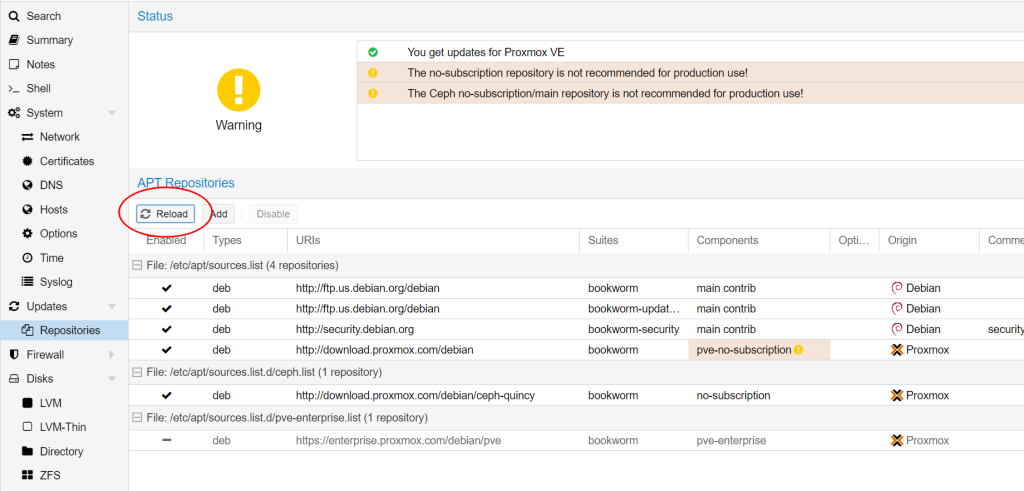
Even after you fixed the repository locations, it’s only per node, yet the nag screen is at the top admin UI level. The Updates/Repositories interface won’t show error messages (undownloadable repositories) anymore, but the nag screen still needs to be addressed.
# Download script
wget https://raw.githubusercontent.com/foundObjects/pve-nag-buster/master/install.sh
# Good practice to read ANY unknown script to make sure there's no shenanigans 1st

# Then run the script with sudo
sudo bash install.sh
TAP interface is necessary for the ethernet card on the VM directly interact with the router connected to the physical hardware (PHY/NIC) but with a different identity, which puts it at equal level as other physical computers on your network. This is often useful when you want to host servers.
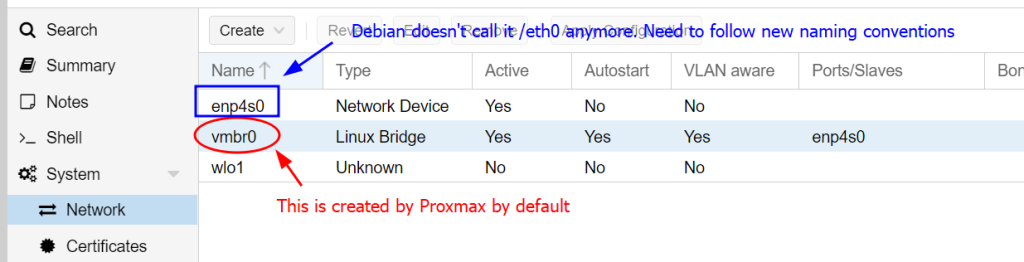
I’ve adapted the instructions from Extremecoders on Github here as the default ethernet device names are different
Debian doesn’t use the /eth0 naming scheme anymore. It’s /enp4s0
/br0 now has a prefix “vm” in front of it since it’s a virtual bridge. Proxmox created this by default. The ‘bridge’ in this case is not in the ethernet bridge we understand in Windows (which bridges two interface together as one), but instead it’s just a virtual ethernet switch. Once I know this twist, I understand how to set TAP up
Since we are using the /vmbr0 which is already set up, we can skip the bridge creation and adding the physical network card /enp4s0 to the /vmbr0 ‘bridge’ (virtual switch).
The core step is to create a TAP interface. Let’s call it /tap0
tunctl -t tap0
You don’t need the “-u (username)” part unless you want to assign ownership of this specific TAP interface to a specific user.
Then you need to add this TAP (/tap0 in this example) to the ‘bridge’ (/vmbr0 in this example). ‘addif’ means ‘addinterface’. ‘brctl’ means ‘bridge control‘
brctl addif vmbr0 tap0
Make sure all the physical card (/enp4s0), the TAP interface (/tap0) and the ‘bridge’ (/vmbr0) is up. Then assign IP to the ‘bridge’ /vmbr0. If using acquiring new IP address from DHCP, use DHCP client (dhclient):
dhclient -v vmbr0
Pools for resources
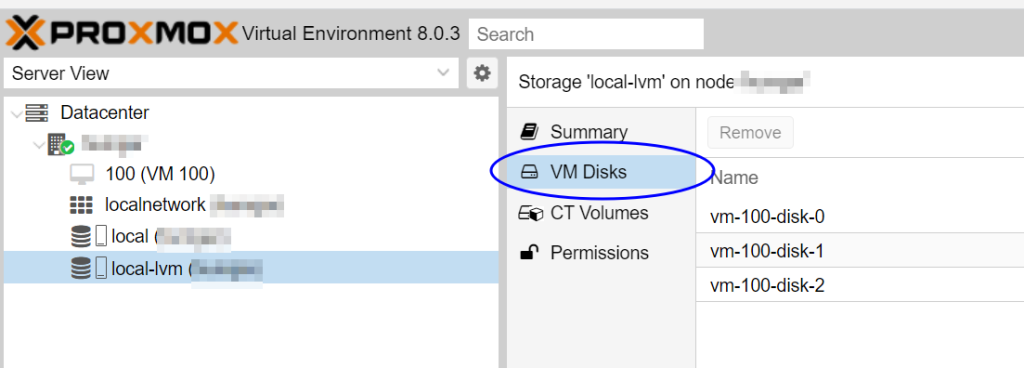
You can directly create the virtual hard disks directly from where you are configuring your VM, but you can only delete it from a Pool viewer. This is the same as VirtualBox. ‘local-lvm’ is a bunch of virtual hard drive images that you need to mount to act like a hard disk drive. Your VM images lives in /dev/pve
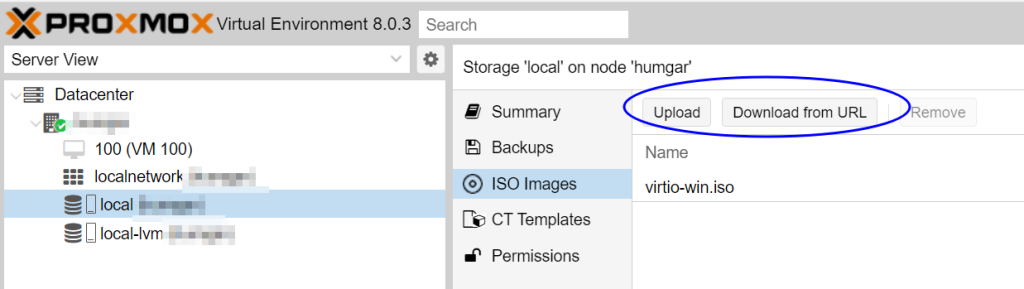
It’s a little more rigid than VirtualBox where you can directly point to the CD image. In Proxmox you have to upload the CD image to a pool before referring them in the VM’s settings. ‘local’ is just a folder of files (specifically /var/lib/vz), and the CD images goes to /var/lib/vz/template/iso.
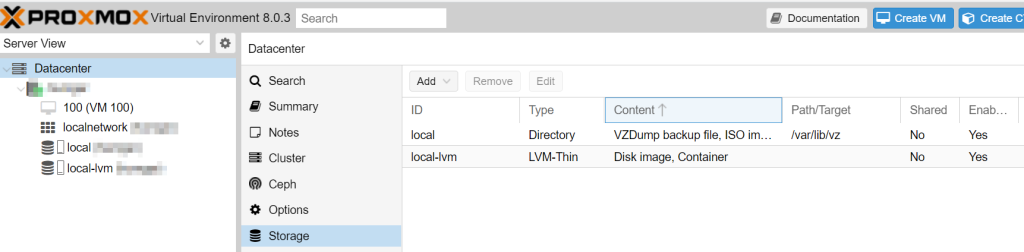
Actually local and local-lvm are all defined at the root level called ‘Datacenter’
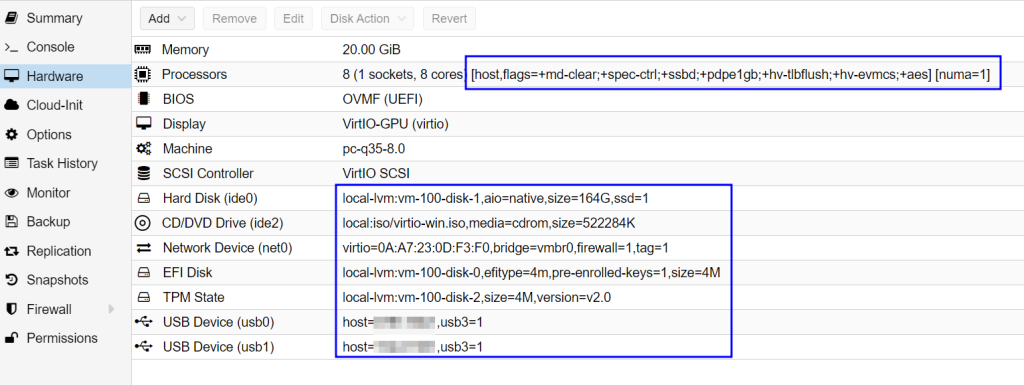
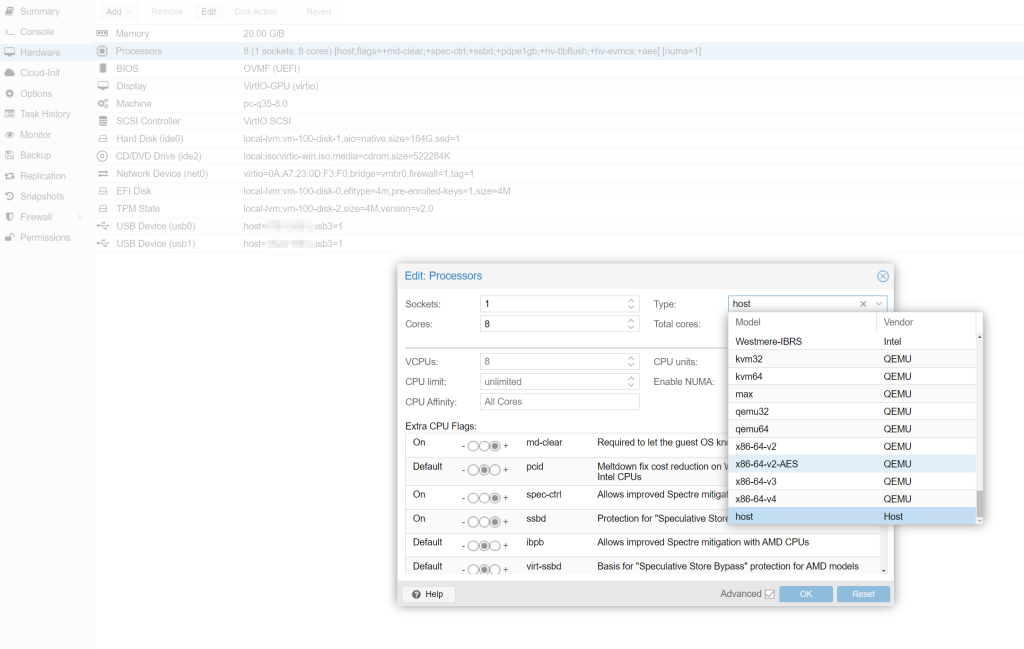
Default CPU
By default Proxmox choose x86-64-v2-AES for you, which might have better compatibility. I had trouble with the Windows port of Qemu not supporting hosts because my CPU is too new for it, but the Linux Qemu-Kvm have no trouble recognizing my new CPU under ‘hosts’ type. Look into the extra CPU flags to match whether you are using an AMD or Intel CPU.