It’s frustrating that there are no simple packages provided by Microsoft or Ubuntu to get something as basic as sound working on Hyper-V. It’s nuts that we still have to deal with these kind of integration bullshit in 2023 when people are claiming that Linux is useable! At the time of writing, there are still way too many rough edges on Linux that are clearly not the users’ fault!
To understand why things are the way they are. We have to first understand that Hyper-V talks to the VM under RDP under the hood which has many advantages that the RDP provides. RDP is way less sluggish for the video and sound quality than the damned X11 server, which people spent little time to provide for Windows. MobaXterm is the only decent free X11 server for Windows in terms of user experience but it’s not the first one that populate search results.
In other words, we’ll need to set up Linux to stream the apps through RDP, not X11 to take advantage of Hyper-V manager’s interface (specifically vmconnect.exe under the hood). In Linux, this area is not maturely developed and the author of xrdp is not keen to make polished packages so most of the time we get pointed to the struggle of compiling the source code.
Given RDP is not native to Linux, xrdp did not rebuild the guts of X11 that maps natively to RDP. Instead it launches a bare minimal RDP session with nothing on it other than a basic client (sesman) that you can use it as a VNC client or X11 client that streams to the bare minimum RDP, so there’s an extra layer of indirection. You are not running RDP natively. That RDP session is for you to call X11.
Since X11 does not natively stream audio, you need to a sound server (over network) system that streams the audio to the bare minimal RDP layer of xrdp, then have the RDP layer stream/relay to RDP with pulseaudio-module-xrdp (which is a kernel package that you need to build from scratch at the time of writing since there’s no packages for it).
By the way, if you get this xrdp+pulseaudio ordeal working, you also get (x)RDP working for the linux even if you don’t use vmconnect to connect to it, because it’s RDP under the hood anyway.
I followed the messy (and often broken) instructions from multiple sources to build and install pulseaudio-module-xrdp, but it turned out this wasn’t enough. There’s no sound and the anticipated sound device didn’t show up in Ubuntu and all I see is a dummy sound driver.
Turns out there are many pieces of the puzzle scattered through different blogs and the blog either has typos, missing a key component, or the URLs changed so it’s broken. Here’s an overview of what you need to do
- Replace Pipeware completely with PulseAudio on Ubuntu
- RDP Enhanced Session is required for sound. This is true for Windows Guests as well. Linux doesn’t have RDP so you’ll need xrdp first before you even talk about enhanced session. Vsocket is how Enhanced Session talk. On Linux side we configure xrdp to talk on vsocket instead of a raw rdp protocol over Port 3389. On Windows we enable Enhanced Session (if not already) and enable hv-socket (with it the Windows side of vsocket).
- Since xrdp ‘cheats’ by redirecting X11 instead of implementing RDP from the core, you’ll need to relay the pulseaudio from the Ubuntu itself to the RDP layer which is done by
pulseaudio-module-xrdp. Unfortunately it’s does not come with xrdp and there’s no package so you have to build it yourself the install your compiled product. Remember by default source code repo is disabled so you need to enable it first before following the any build instructions.
Get rid of Pipeware Completely & Install PulseAudio
Griffon’s IT library provided the insight that we need to take out Pipeware (the competitior of PulseAudio) completely and replace it with PulseAudio. After that I got it working. Here’s a path to his tutorial:
XRDP – Bring back xRDP sound redirection on Ubuntu 22.10 – Griffon’s IT Library (c-nergy.be)
His tutorial included the script he made to install a more recent xrdp he built but the link is now broken. So what I did turned out to be necessary after all.
His tutorial basically stop/disabled/masked the hell out of Pipewire so it’s dead and deader and make sure the users cannot install it later and displace PulseAudio. It’s a lot of gymnastics because systemctl disable and mask do not take wildcards so you have to find out each service/daemon named pipewire. I’ll take this shortcut instead:
sudo apt purge pipewire
A tool to check if there’s audio server running (optional) is
pactl infoHouse keeping and install both pulseaudio and xrdp if not already done. pavucontrol is for controlling the volume which is often needed:
sudo apt update
sudo apt install pulseaudio pavucontrol xrdp
Then enable pulse audio and start it immediately (the –now switch follows enable with start) without rebooting:
systemctl --user enable --now pulseaudio.service pulseaudio.socketConfigure Ubuntu and xrdp for Enhanced Session (nothing to do with PulseAudio itself)
I got the clue from this blog: How to install Ubuntu 20.04 on Hyper-V with enhanced session | by Francesco Tonini | Medium, but some of the details changed as time moves on so I’ll document it here for the state of the art in 2023.
Part 1 [DONE BY DEFAULT NOW]: Change xrdp to receive vsocket instead of raw RDP
TLDR: No actionable item here. Included here for educational purposes only as it was a required step before.
Enhanced Session uses vsocket instead of raw Port 3389 for connection which xrdp.ini defaults to out of the box. Griffon’s IT library gave the instruction to replace the port=3389 to port=vsock://-1:3389 in xrdp.ini. However it’s already taken care of in the new install.sh script for linux-vm-tools:

The more recent xrdp already defaulted to use_vsock=false. Discussion: Cannot establish RDP connection to Ubuntu VM made with Hyper-V Quick Create · Issue #1260 · neutrinolabs/xrdp (github.com)
Part 2: install linux-vm-tools (think of it as vsocket driver)
linux-vm-tools is “Hyper-V Linux Guest VM Enhancements” developed by Microsoft which dropped support for it and picked up (forked) by hinara to support Ubuntu 22.04. Hinara’s version is more updated.
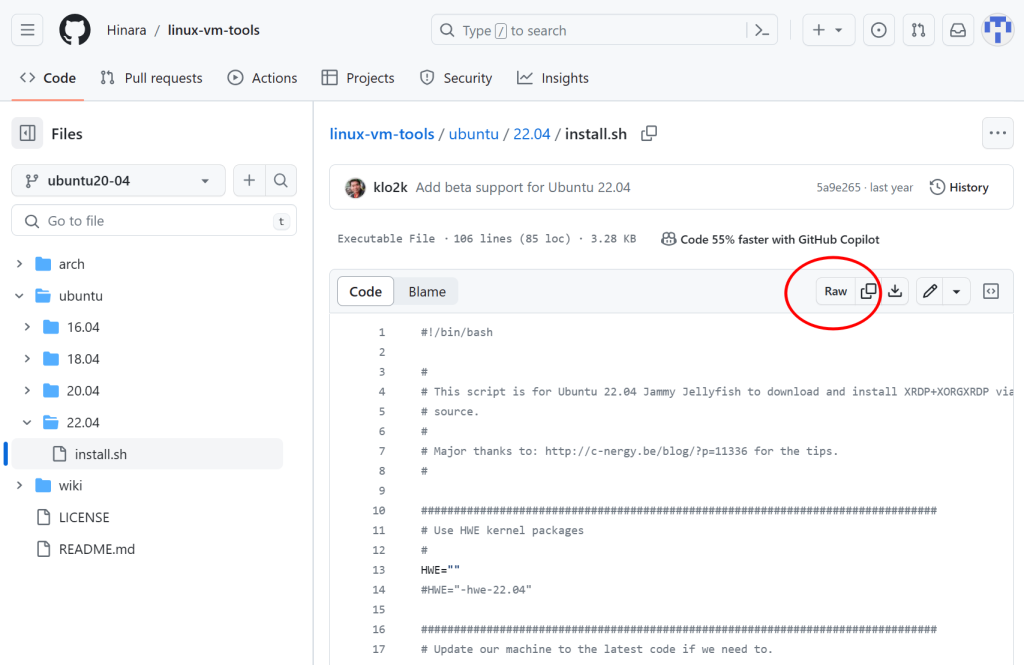
So the first thing you do is to download (can use wget, curl, aria whatever you like as the downloader) the install.sh of the latest/appropriate version (right now it’s Ubuntu 22.04):
wget https://raw.githubusercontent.com/Hinara/linux-vm-tools/ubuntu20-04/ubuntu/22.04/install.shThis blog (Enable Sound Output Hyper-V (ubuntuforums.org))’s answer is a little outdated as involves a hack to rename 20.04 to 22.04 and keep the same script.
Note that the folder name at the top level says 20.04 (branch name) but at the lower level says 22.04 (folder name). So be prepared the path might change in the future if the author figured it’s better to use a consistent branch name later. The safest bet is to go to the Github page and discover the latest version then click raw to get the direct link to use with wget (or any file downloader).
Downloads by default are not executable for your safety, so enable the execute attribute with chmod +x:
sudo chmod +x install.shand of course execute the install.sh after you checked it’s all kosher:
sudo ./install.shThe last 2 lines of the script tells you to RUN IT AGAIN AFTER REBOOT. It’s easy to overlook given the text doesn’t stand out after the user got bombarded with lots of verbose info. Make sure you follow it!
Configure Hyper-V for Enhanced Session (Host)
On Windows side, you’ll need to enable the Windows version of vsocket to communicate with the vsocket. There’s no curly braces when you type in {your VM’s name}:
Set-VM {your VM's name} -EnhancedSessionTransportType HvSocketThe chaos trying to build pulseaudio-module-xrdp
Deploy a Linux VM on Hyper-V with Sound 20.04 Edition – techbloggingfool.com‘s scripts do not use the default folder choices by the build script so the changes in the upstream broke his folder scheme by adding a ‘+dfsg1‘ to the folder name. Instead of fixing it, I followed the official instructions on the github page but take advantage of the one very useful piece he provided: enable source code repo:
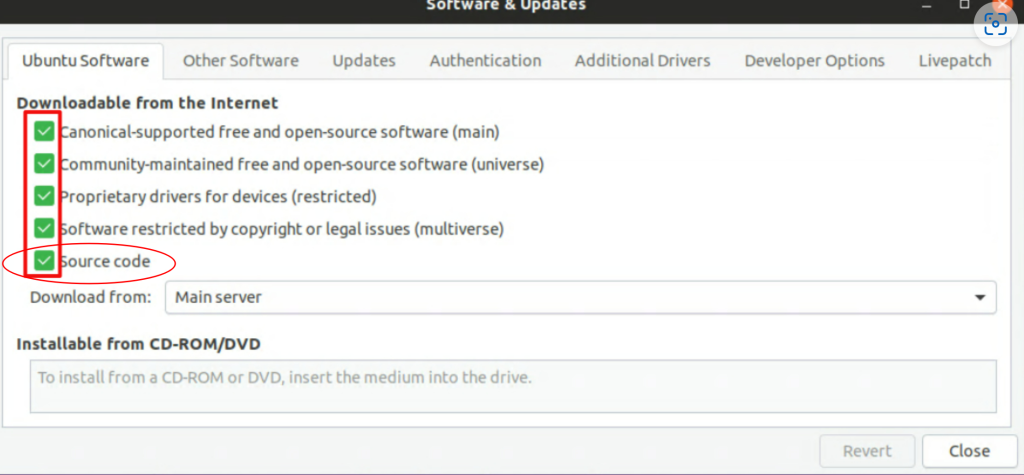
He has command line scripts that enables the source code too. Given my confidence about linux developer coordinating with people downstream about the naming schemes changes, I’ll stick with the GUI which gives a consistent interface.
After source repos are allowed, get the build tools (official instructions for Ubuntu):
sudo apt install build-essential dpkg-dev libpulse-dev git autoconf libtoolGrab the pulseaudio-modle-xrdp source code and go into that folder
git clone https://github.com/neutrinolabs/pulseaudio-module-xrdp.git
cd pulseaudio-module-xrdp
Run the install_pulseaudio_sources_apt-wrapper.sh under the /scripts folder:
./scripts/install_pulseaudio_sources_apt_wrapper.sh(I tried the non ‘_wrapper’ version next to it. It works too, but it doesn’t relieve you from the rest of the build and install process). This is taken straight from Build on Debian or Ubuntu · neutrinolabs/pulseaudio-module-xrdp Wiki (github.com):
./bootstrap && ./configure PULSE_DIR=$HOME/pulseaudio.src
make
PULSE_DIR=$HOME/pulseaudio.src because this is the default in the wrapper script above if no arguments are specified. Stick with the defaults (working at home folder) as it’s not wise to trust people to coordinate their naming scheme consistently. The defaults are likely tested more thoroughly.
And the last step is to install your hard work (README · neutrinolabs/pulseaudio-module-xrdp Wiki (github.com)):
sudo make installwhich you can OPTIONALLY check your work to see if the kernel modules are indeed installed:
ls $(pkg-config --variable=modlibexecdir libpulse) | grep xrdp[Optional Cleanup] If you don’t have anything named pulseaudio that you’d like to keep, you can clean up by removing the files using wildcard and the install.sh
sudo rm -rf ~/pulseaudio*
sudo rm ~/install.sh
Summary
Here’s a consolidated ‘script’ to show the complexity. I do not recommend copying and pasting it as the dependencies might change and it might break.
# Change audio server in Ubuntu
sudo apt -y update
sudo apt -y purge pipewire
sudo apt -y install pulseaudio pavucontrol xrdp
systemctl --user enable --now pulseaudio.service pulseaudio.socket

# [Optional] check if PulseAudio was installed correctly
pactl info

# Build pulseaudio-module-xrdp and install the kernel modules
# Stick with official instructions which assumes home folder
cd ~
sudo apt -y install build-essential dpkg-dev libpulse-dev git autoconf libtool
git clone https://github.com/neutrinolabs/pulseaudio-module-xrdp.git
cd pulseaudio-module-xrdp
./scripts/install_pulseaudio_sources_apt_wrapper.sh
./bootstrap && ./configure PULSE_DIR=$HOME/pulseaudio.src
make
sudo make install

# [Optional] check if pulseaudio-module-xrdp was installed correctly
ls $(pkg-config --variable=modlibexecdir libpulse) | grep xrdp

# Install linux-vm-tools which enables Enhanced Session
# Give linux-vm-tools its own folder to avoid confusion
mkdir -p ~/linux-vm-tools
# Note: "... && cd $_" will
cd ~/linux-vm-tools
wget https://raw.githubusercontent.com/Hinara/linux-vm-tools/ubuntu20-04/ubuntu/22.04/install.sh
sudo chmod +x install.sh
sudo ./install.sh

# The last 2 lines of screen output of install.sh tells you to reboot and run this again
# This is automated below by making a icon in Gnome desktop's autostart folder
# that will self-destruct after first launch
cat > ~/.config/autostart/startonce.desktop <<EOF
[Desktop Entry]
Type=Application
Name=startonce.desktop
Exec=gnome-terminal -- sh -c 'sudo ~/linux-vm-tools/install.sh && rm -rf ~/pulseaudio-module-xrdp ~/pulseaudio.src ~/linux-vm-tools ~/.config/autostart/startonce.desktop && init 0;$SHELL'
EOF

sudo reboot
I also noticed a quirk that the first reboot after everything’s installed might be a little too fast. In this case restart again once more. So instead I just have the desktop shortcut shutdown your VM after it’s done and have you manually start it again so it’d work right the first time.
I’ve created a Github repo for my own convenience, but feel free to use it however way you like, but I’m not responsible for any damages it might cause. Better read through the code with the help of this blog page and understand what it does and decide if you want to try it for your setup. I tried to make it robust, but it’s designed to be installed on freshly install Ubuntu guest VMs.
https://github.com/wonghoi/enhanced_session_linux/
![]()
Hey, it worked! You are my hero!
The only other solutions I’ve found online were rdp-Sessions or streaming the audio – and both weren’t possible in my case. And this worked. Had a few cases were I needed a moment – but mostly because I haven’t used Linux in quite some time and I was using debian instead ubuntu. Thanks for ur work!
Thanks a lot!Report
Cool. Did you use my github script (setup_enhanced_session.sh) or you simply followed the instructions on the page?Report
Tbh, I’m the type of guy who begins on the top and just starts doing it (after a fast scan over it). So I saw the github script last, therefore I only used it to verify that I haven’t forgot any steps. And because I used debian stead ubuntu I’m not sure that script would have worked – at least for me I couldn’t start the .sh files with ./install.sh but needed I think sh install.sh. And I’m not sure the Hinara ubuntu script for the linux-vm-tools would have worked as well, but I’ve found a debian 12 version by… Read more »
Thanks for the feedback. If you looked at the README.md in Github, I tested it on Debian (specifically Debian 12). If you have another VM, please feel free to try it. My script calls Hinara’s linux-vm-tools.
I haven’t heard of wswind before. Can you point me to what you were referring to? ThanksReport
Uninstalling pipewire immediately killed my graphical session. And even after a reboot, it just boots to text-only mode now. I don’t know what kind of dependencies are there, but it seems like it wipes out quite a bit with a blind ‘-y’ option on purging pipewire.Report
The ‘-y’ option means it answers yes to all questions (no confirmation). If uninstalling pipewire killed your graphical session, something’s wrong from the programmer’s side, not an user mistake. Can you share what distro and what version you were using so people know what to avoid? Linux is an integration nightmare. Users are the testers.Report
I have been a windows (desktop, server, and SQL) user for decades. After privacy concerns I decided to change how I access the internet by trying Linux. I see people say it’s time to move. Then I try and can’t get sound. WTF? Linux is ready? If I can’t get this to work with generic VM drivers, what chance do I have with a pile of various components in my PCs? I will try VirtualBox before giving up completely. Not too happy so far.Report
PS VMWare Workstation Pro is now free. However, the brodcom website is so broken that it’s impossible to download it.Report
You might have better luck with Virtualbox or native Linux. Only Hyper-V uses RDP to talk to the VM to gain access to sound while Linux’s support for RDP sucks. Both of them did half-assed jobs for cross-platform compatibility.Report
I looked into VMware and it looked reasonable faster than Virtualbox yet it can coexist with Hyper-V with an acceptable performance hit. I have to keep Hyper-V because of Windows Sandbox and Windows Subsystem for Android.Report
I just tried these steps on Ubuntu 26.04 with the GNOME desktop and it complete corrupted my VM. I had to rebuild. Thankfully it was still new.Report
The problem came from Ubuntu mandating migration to Wayland which breaks the flimsy hacks to get sound on Hyper-V 1) Hyper-V can only pass sound with RDP 2) xrdp does not support Wayland 3) Wayland’s own RDP does not support direct integration with Hyper-V 4) New Ubuntus starting 26.04 comes with a GNOME 50 that uses exclusively Wayland out of the bpx In short you are SOL if you insist on sticking to the new Ubuntu defaults on Hyper-V. Here are your optiobs 1) Ditch Hyper-V competely. Use VMware Workstation Pro. Sound works right out of the box without the… Read more »