I’m trying to cross compile my router’s firmware as I made a few edits override the update DDNS update frequency. Turns out it doesn’t work on the latest Linux so I’d need to run an older Ubuntu just to keep it happy.
RANT: Package servers keep pulling the rug on outdated linux frustrates the hell out of me. Very often developers didn’t make a whole installer for it so we are often wedged between downloading a package at the mercy of its availability from package managers and their servers or compiling the damn source code!
With the promise that Qemu might have less overhead than Hyper-V or VirtualBox (indeed it observably is), I tried installing Qemu on Windows host and it turned out to be a frustrating nightmare.
RANT: Linux is not free in the sense of free beer. The geniuses did the most sophisticated work for free but users pay time and energy cleaning after them (aka a support network dealing with daily frustrations) to make these inventions usable. There’s a company that does the clean up to make BSD (same umbrella as Linux/Unix) usable and made a lot of money: it’s called Apple Computers (since Steve Jobs’ return).
qemu is just the core components. System integration (simplifying common use cases) is practically non-existent. Think of them as the one who produced an ASIC (chip) and the end-user happens to be the application engineers. There’s a few tutorials on qemu Linux hosts for moderately complex scenarios, but you are pretty much on your own trying to piece it altogether for Windows because there are some conceptual and terminology differences. The man page --help for the qemu’s Windows host’s VM engine was blindly copied from the Linux hosts counterpart, so it tells you about qemu-bridge-helper which is missing.
I stupidly went down the rabbit hole and drained my time on qemu. So I documented the quirks to help the next poor sap who has to get qemu running on Windows 10 host efficiently over Bridged-Adapter (VirtualBox lingo) networking mode.
- Preparation work to get HAXM accelerator set up
- Release VT-d (hardware assisted virtualizations) so HAXM can acquire it
- You’ll need to remove Hyper-V completely as it will hoard VT-d’s control
- Windows Sandbox and Windows Subsystem for Linux (WSL2) uses Hyper-V. If you just unchecked Hyper-V in Windows Optional Features leaving any of these 2 on, Hyper-V is still active (it only removes the icons)
- You’ll need to remove Hyper-V completely as it will hoard VT-d’s control
- HAXM v7.6.6 not recognized by qemu on clean install. Install v7.6.5 first, then remove it and install v7.6.6. Likely they forgot a step in v7.6.6’s installer
- Turn on optimization by:
-accel hax
- Release VT-d (hardware assisted virtualizations) so HAXM can acquire it
- Command line qemu engine
qemu-system-{architecture name}.exeis what runs the showqemu-system-{architecture name}w.exeis the silent version of the above engine. Won’t give you a clue if something fails (like invalid parameters)qemu-img create -f{format such as vhd/qcow2} {hard drive image name} {size like 10G}
- QtEmu sucks, and they lack any better GUIs out there!
- It’s basically a rudimentary command line’s GUI wrapper
- It only has user mode (SLIRP) networking (default)
- It’s not maintained actively so it doesn’t keep up with the parameter syntax changes (i.e. can generate invalid combinations)
- Since it uses the silent (with a
wsuffix) engine, likely to avoid a lingering command window, it also won’t tell you shit and why if something fails. It just ignores you when you press the start button unless all the stars align (you got everything right)
- Basic command line parameters
- Set aside 10G for the VM:
-m 10G - 1 core if unspecified. Number of available threads (in hyper-threaded system) show up as # of processors. It’s referring to logical processors, not physical cores.
- Windows:
-smp %NUMBER_OF_PROCESSORS% - Linux:
-smp $(nproc)
- Windows:
- Attach virtual hard drive:
-hda{virtual hard drive file name} - Attach optical drive (iso):
-cdrom{iso file}
- Set aside 10G for the VM:
I typically want Bridged-Adapter option from VirtualBox, which means the virtual NIC plugs into the same router as the host and just appears as another computer on the same network as host. This is broken into a few components in qemu and you have to manage them separately. Great for learning about how Bridged-Adapter really works, but a lot of swearwords coming from people who just want to get basic things done.
Networking in QEMU is another can of worms if you deviate from the default SLIRP (user mode). I figured out how to work it, but the network bridge is faulty and it keeps crashing my windows with BSOD on bridge.sys with varying error tag. I have short glimpse of it working if I move very fast. Looks like the TAP driver is corrupting the memory as the bridge became very erratic that I see error messages deleting it and have persistent BSOD when the bridge starts after the VM hanged at the TAP bridge on boot.
I listed the steps below to show what should have been done to get the Bridge-Adapter (VirtualBox) equivalent function if there are no bugs in the software, but hell I’m throwing qemu for Windows to trash as it’s half-baked.
First, of all, you need to install OpenVPN to steal its TAP-Win32 virtual network card. It’s not VMware or Virtualbox that it’s part of the package. Qemu didn’t care to tightly integrate or test this driver properly.
Then you’ll need to bridge the “TAP-Windows Adapter (V#) for OpenVPN” with the network interface you want it to piggy back on.
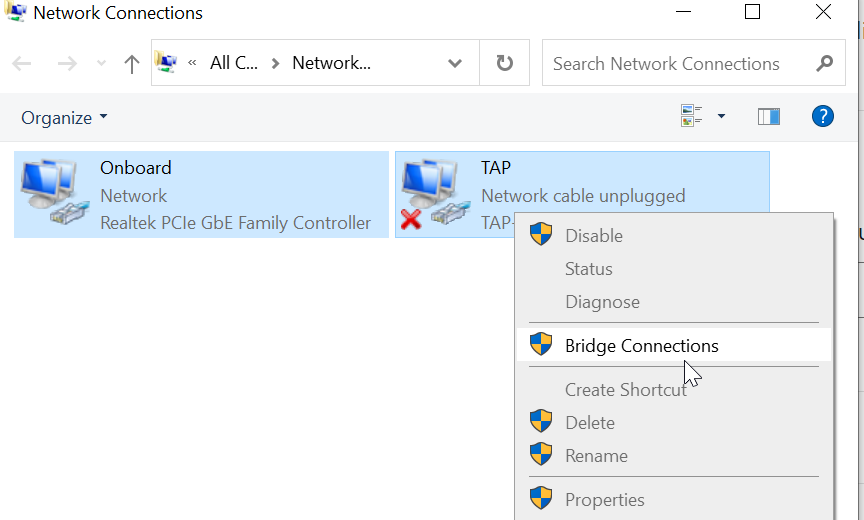
The name of the TAP adapter is what you enter as ifname= parameter of the tap interface in qemu command line. You have to tell qemu specifically which interface you want to engage in. I named the virtual network card as ‘TAP’ above. After bridging it looks like this:
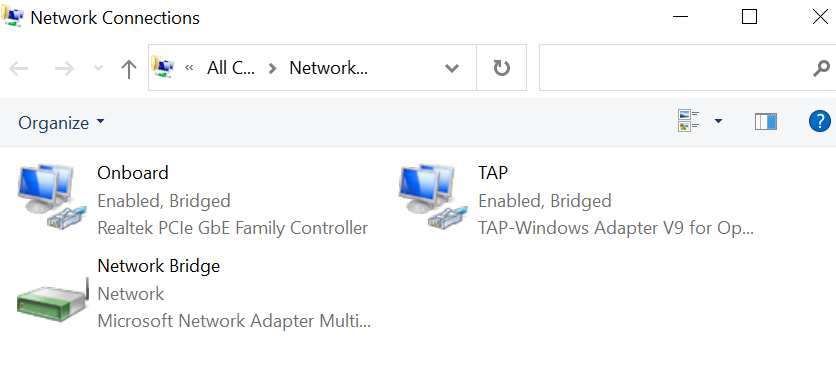
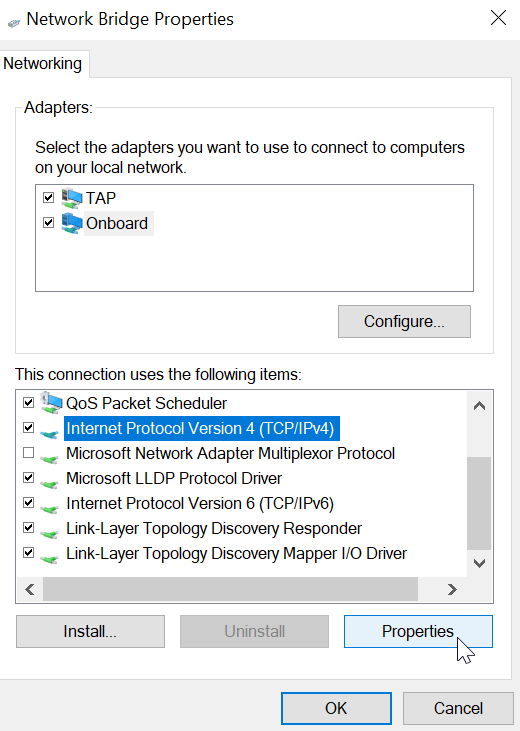
You are not done yet! The bridged network (seen as one logical interface) is confused and it won’t be able to configure with your physical network card’s DHCP client. You’ll have to go to the properties of the Network Bridge and configure the IPv4 with static IP.
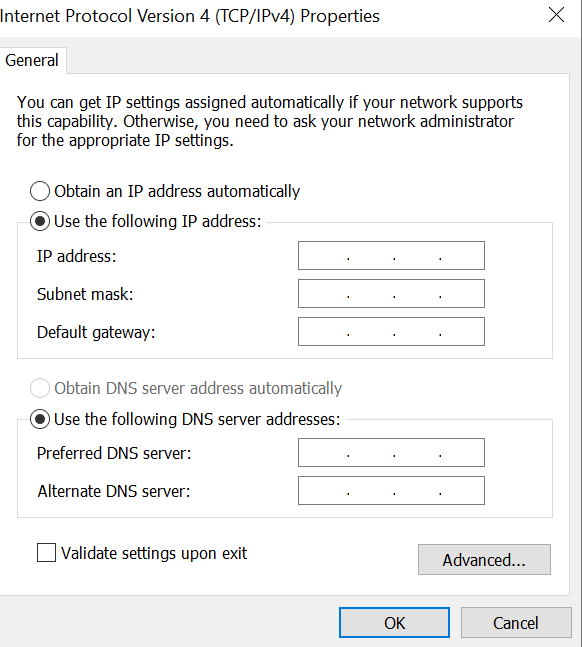
You can use ipconfig /all to find out the relevant adapters acquired DHCP settings and enter it as static IP. Coordinate with the network administrator (can be yourself) to make sure you own that IP address so you won’t run into IP conflict if you reboot and somebody took your IP.
After these are all set up the parameter to add to qemu call is:
-nic tap,ifname=TAP
There are complicated settings like -net nic and -netdev -device. These are old ways to do it and have bloated abstractions. -nic switch combined them into one switch.
Then welcome to the world of Windows 10 bridge.sys crashing frequently and you might get a short window of opportunity that it boots and ifconfig acquire the IP address settings from your router (or network the physical adapter is on)’s DHCP server.
It’s like a damn research project finding out something is technically feasible but definitely not ready for production. Welcome to the FOSS jungle!
Postscript: I put Hyper-V back and realized it’s insanely slow with Linux Mint as it does not support hardware graphics acceleration. It’s night and day of a difference. Qemu is fast, but it crashes on Windows 10 if I bridge the adapters!
![]()