This is another example of open source projects not going through a comprehensive use case study before changing the default behavior, which ended up pulling a prank on some users.
This time it’s Spyder’s good-intentions trying to proactively prevent user mistakes (such as not keeping track of the workspace) throwing the people who meticulously understand their workspace off.
I was working on a FT4222 device which should not be opened again if it’s already opened, aka the ft4222 class object exists. So naturally like in MATLAB, at the top of the script I check if the device object already exist and only create/open it when it’s not already there, like this:
if 'dev' in locals():
    pass
else:
    print('Branch')
    dev = ft4222.openByDescription('FT4222 A')
To my surprise it doesn’t work. 'dev' in locals() always return False every time I press F5, despite when I check again after the script runs, the variable is indeed in there and 'dev' in locals() returns True. WTF?!
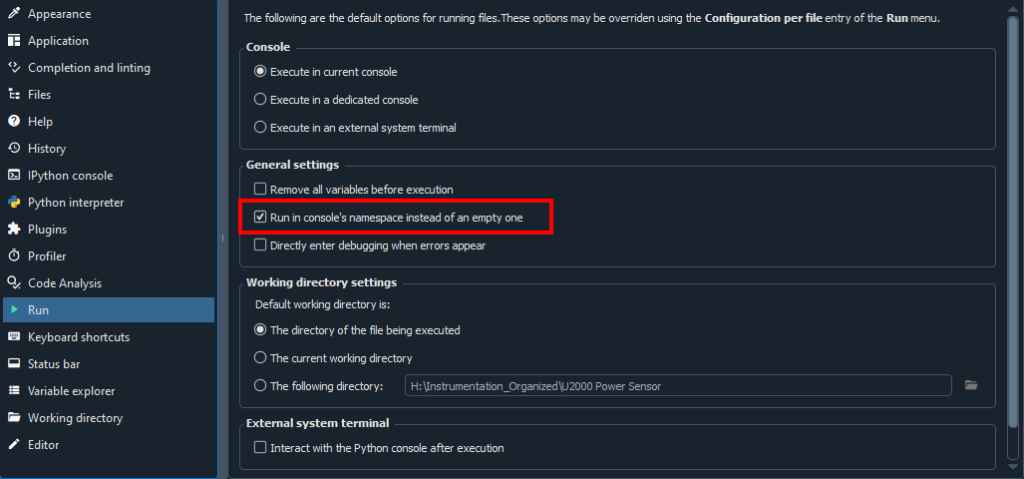
Turns out I was not alone! Somebody had the exact same idiom as I did. Spyder 4 changed the default behavior, and we are supposed to manually check this dialog box entry so the scripts do not run off a clean slate when we press F5!
Spyder 5Spyder 6
It’s an extremely terrible idea to have the IDE muck with the state by default. In MATLAB, if we want the script to start with clean state, we either put clear at the top of the script or clearvars -except to keep the variable.
It’s even harder to catch the new default insidious behavior of Spyder given it runs the script from a clean slate from F5/Run then dump the values to the workspace. It’s now a merge between pre-existing variables in the local() workspace and the results of the script from from a blank state!
The people who decided change to this default behaveior certainly didn’t think through this and rushed to do the obvious to please the careless programmers. If a programmer made a mistake by re-running the script without clearing the workspace and was impacted by the dirty variables, they can always reset everything and get out of this (and learn they should clean up the dirty state through the experience), however, somebody who know what they are doing will not be able to easily find out what they did wrong until they search for a behavior that looked more like a bug from Spyder/Python! It’s just horrible design choice! MATLAB doesn’t casually to throw users off like this. Damn!
Also I looked into code cells #%% (MATLAB has the equivalent %%), but there’s another annoyance in Spyder: block commenting through """ or ``` pairs is interpreted as output string from runcelll()! In other words, runcelll() outputs docstrings! So every time you execute the cell, the code you commented out will be concatenated into one long raw string with escape characters and pollute your console screen! Damn!
Spyder annoyances (3): The shortcut key Ctrl+D to reset console doesn’t work unless there’s nothing half typed in the console.
I discovered today in a hard way (wasted time) to find out that NTFS images modified by new Ghost (AFTER and not including v8.3) Explorer (files injected deleted) will behave as if it’s unmodified (changes not committed) when you try to restore the said image IF YOU DID NOT RECOMPILE!
First of all, injecting/deleting files with Ghost Explorer is like a journaling file system, where the changes are tacked at the end of the file (added files are appended to the end, and deletion doesn’t actually delete, but append extra info saying such file is marked as deleted).
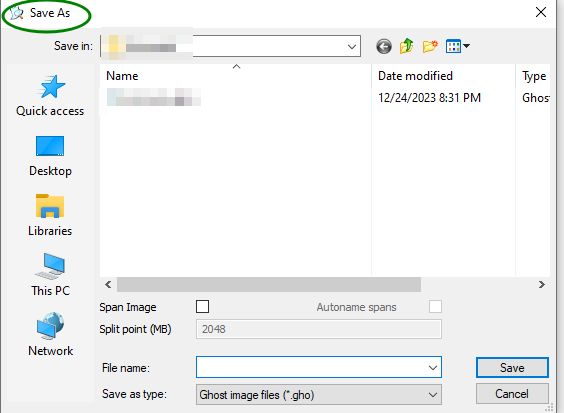
This means until you RECOMPILE (File -> Compile, which shows up as a “Save As” dialog box) the original image stays there.
CompileCompile – Save As (Dialog)
New Ghosts compatible with file injection/deletion mechanism will respect the extra info tacked at the end and correctly skip the old files that are available when deploying the image. Old Ghosts that doesn’t recognize the extra stuff tacked on at the end that’s written by new Ghost Explorer will just ignore it and your image works as if it’s the old, unmodified image when restored with old Ghosts.
I’ve experimented with that and realize new Ghosts clones the updates (before compiling) correctly while old Ghosts clones as if it’s the unmodified image. Of course both of them clones correctly after recompilation.
Recompile is a lengthy process that actually go in and delete the orphan files and inject the new files but this needs to be done if you want to save space.
As for compatibility, recompiled ghost images do not work on older ghosts. So you’ll need to restore the image on a physical disk (or a mounted vhd) using new ghost and create the image with old ghost.
T && X is equivalent to "if( T) then run X"
T || X is equivalent to "if(!T) then run X"
I don’t exploit this too much in C/C++ because it’s hard to read (and therefore hard to keep track of it to make sure it’s bug free) and most often I’m interested in the output value so I have to watch out for the side effects. However this is common in Bash scripts
Domination Property
In languages that expressions evaluates to a value, sometimes if-statements can be replaced by short-circuit evaluation because short-circuit evaluation exploits the domination property of AND and OR logic operations:
When you FIRST run into the dominant value for the binary operation (0 for AND) and (1 for OR), evaluate no further (i.e. skip the rest) because rest won’t change the overall result away from the dominant value.
So in this use case (emulating if-then statements), what the latter expression X evaluates to or what the combined logic value is irrelevant. We are merely tricking the short-circuit mechanism to trip (short) to NOT evaluate based on what the earlier expression turned out. Action is the ‘norm’. Conditional inaction is the essence of this idiom.
The dual of domination property is idempotent, which is easier to reason because if pre-condition (say T) forces overall expression to boil down to the expression we want to conditionally execute (say X), we are stuck evaluating X if condition T is met.
\newcommand{\Hquad}{\hspace{0.5em}}
\begin{alignat*}{2}
1 \Hquad & \mathrm{AND} &  \Hquad X  =  X \\
0 \Hquad & \mathrm{OR} & \Hquad X =  X
\end{alignat*}
These 2 possibilities (domination and idempotency) partitions to space (choices) of possibilities (i.e. cover all possible combinations), in other words there are no other scenarios than described. So the precondition T decides whether you run X or not, which is the equivalent of an if-then statement.
Operator (function) view of logic domination [Functional programming perspective]
By grouping the first value and the binary logic operator with a pair of parenthesis, in dominance view
(0 AND) is also called the ‘clear’ operator
(1 OR) is also called the ‘set’ operator
but this view is not too interesting for our case because we are not interested in what the conditional expression and the overall expression evaluates to, which is signified by ‘clear’ and ‘set’.
On the other hand, (1 AND) and (0 OR) are pass-through (idempotent) operators which passes the evaluation to the latter expression X.
\newcommand{\Hquad}{\hspace{0.5em}}
\begin{alignat*}{2}
(1 \Hquad & \mathrm{AND}) \Hquad & \circ &  \Hquad X  =  X \\
(0 \Hquad & \mathrm{OR}) \Hquad & \circ & \Hquad X =  X
\end{alignat*}
The firewall rules in MerlinWRT just quit working so the table I entered doesn’t do anything. Seems like other people had the same problem too. So if you just use the WebUI, it’s either turning the firewall all on or all off.
There’s a twist in configuring the firewall with iptables in routers: the instruction you got on the Internet often append the entry to the end of the table in the section (they use the -A switch) and they didn’t explicitly tell you that’s what they are doing and what the implications are.
Turns out when you enable the firewall in the router, it enters a table of DROP ALL lines, which is supposed to be a catch all after all the exceptions you spelled out! You are supposed to enter the exceptions BEFORE the default entries set by the router, not append after, so the packet you want to accept gets fished out before it reaches the catch all (drop all) entries entered by the router automatically when you turn on firewall. So the solution is to replace the -A (append) switch with -I (insert) switch
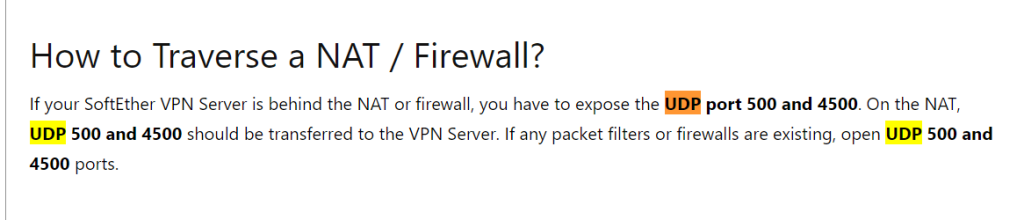
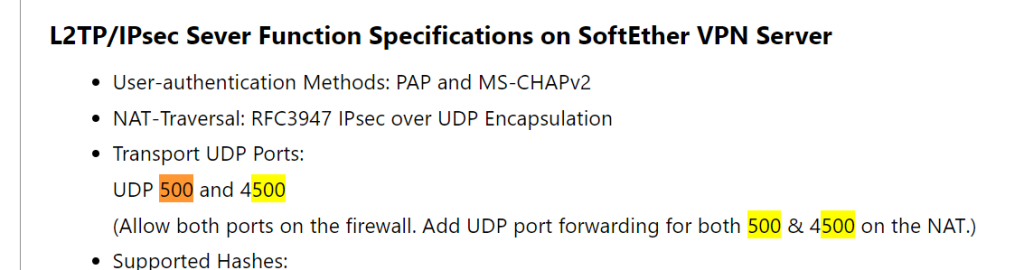
As for putting SoftEther VPN on MerlinWRT, here’s the commands to type in SSH to add the firewall rules to open the port, which is what the broken WebUI interface was supposed to do:
This line opens SoftEther’s standard ports 443,992,5555,8888, all TCP only.
Don’t even think of using iptables-save as the router do not have persistent storage other than /jffs or USB. I suspect iptables-save merely writes to RAM disk so the changes will be lost on next boot.
You’ll need to put this line in/jffs/scripts/firewall-start script instead. If this is a new file, make sure you chmod +x /jffs/scripts/firewall-start to make the file executable.
Well it’s not too bad of a design after-all since it’s a mess to fish out the iptable lines you want to delete, so keeping your changes in a file to be loaded with the firewall on boot is a smart move.
If all your devices downstream that you forward incoming traffic to (aka servers) has firewalls, the built-in firewall mainly protect the router itself, so if it gets too frustrating, it might not be too big of a deal to turn the router’s firewall off.
There’s also another weird behavior that if the port is firewall blocked, the server admin program intermittently still connect but it connects to a blank state server (blank config). WTF!
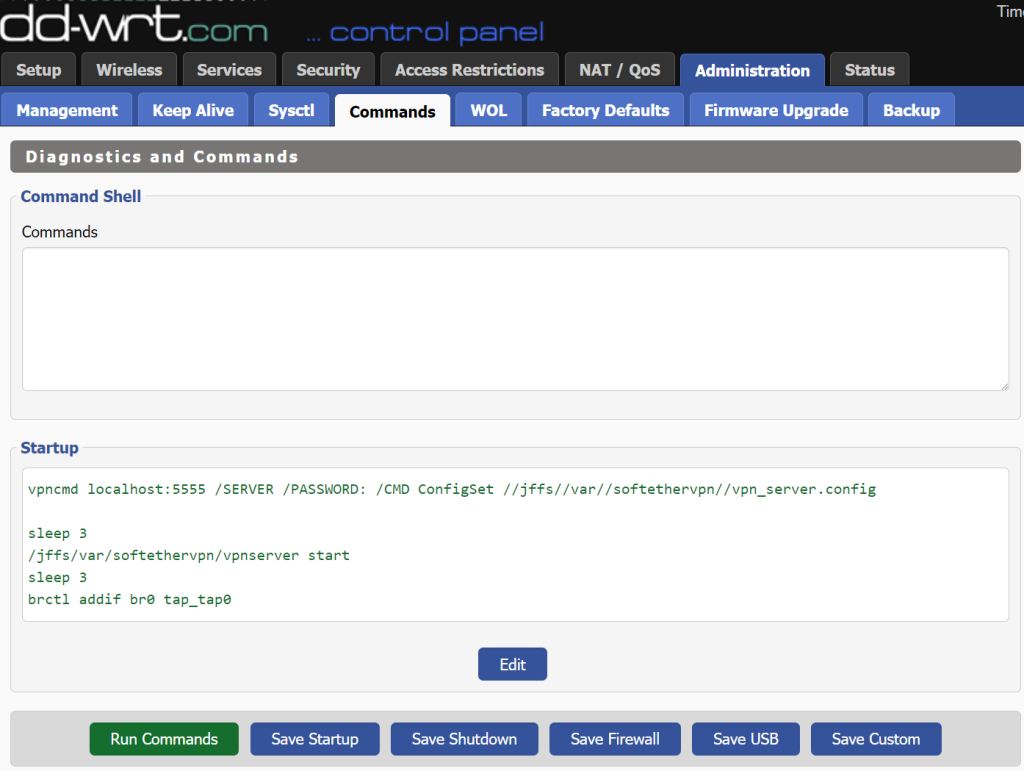
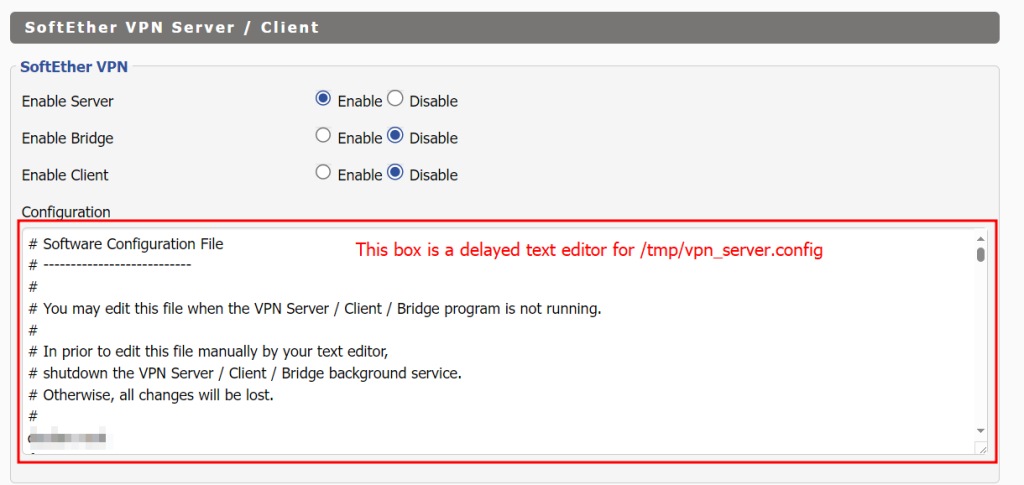
DD-WRT came with SoftEther VPN and it looked pretty scary because it shows no user interface and a box for you to enter a config file!
Turns out SoftEther VPN’s Remote Admin interface is basically a tool that takes all user settings, generate a config file and upload it to the server behind the scenes!
Concepts to know
vpn_server.config is the core file the defines the server.
SoftEther VPN Server Manager (The remote admin program) is basically a tool to generate the config text string from the UI and pass it to the server’s memory (not file yet until the server stops and flushes its config state out)
Default location of the config file
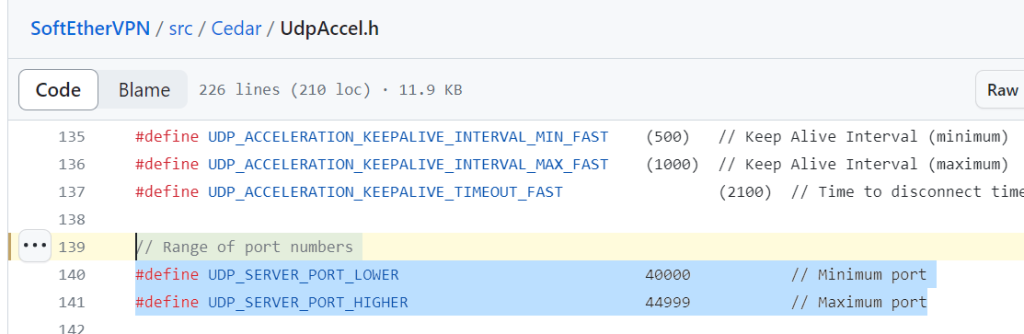
SoftEther by default reads and writes the vpn_server.config file which controls everything in a JFFS folder. So you are better off identifying it by doing a path search because they move around from version to version of dd-wrt:
find /jffs -name vpn_server.config
So for my case the core file path is
/jffs/var/softethervpn/vpn_server.config
Config file’s file access/update mechanism
SoftEther’s explicitly stated that their config file (vpn_server.config) handling mechanism does not flush the current state in use to the file until the server stops. So it has the following behavioral implications:
Changes made by the admin program is reflected immediately despite no file is updated
If you change the config file while the server is running, the changes will be lost/overwritten as the server flushes the data on RAM to disk
If you abruptly power off the server, the changes made while the server is running (through the remote admin program) is lost as it doesn’t have a chance to flush the updated state out.
If you read the config file while the server is running, you are not getting the changes that are currently done through the Manager (Remote Admin) program.
In summary the config file is stale while the server is running.
When loading the config file to the server by any means (command or GUI), the server parses the entire file and immediately scan and act on the new state defined by the config file (eager execution), not waiting for the next turn the specific state is accessed (lazy execution).
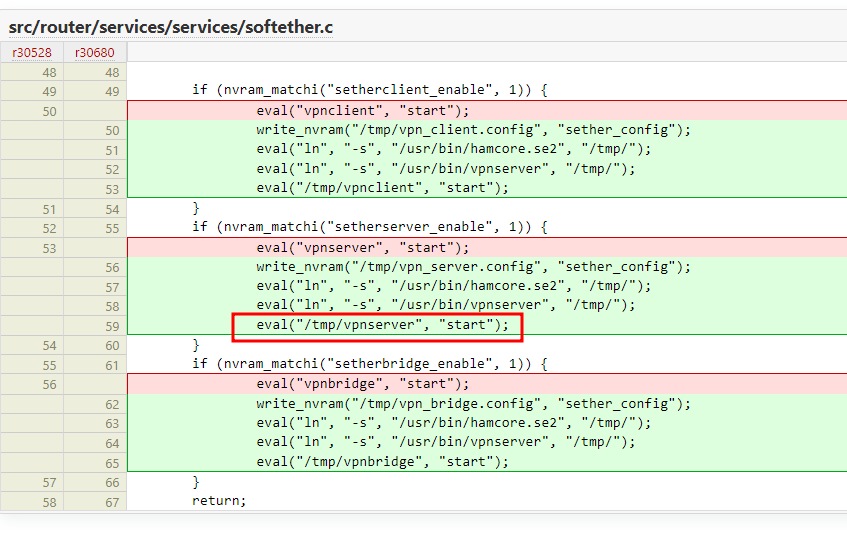
Softether on DD-WRT has no memory out of the box!
Disable this WebUI section entirely and script it yourself!
Out of the box the DD-WRT did not specify which config file to tie to (or open with by default) so the config received from the Server Manager only stays in memory and is not written anywhere! WTF!
So every time I reboot, the settings are totally lost and I have to re-enter it from scratch. Linux mentality again! People did the hardest fun work showing off how smart they are yet their software doesn’t gain the mainstream adoption because nobody ties up the loose ends so the 95% excellent work got sabotaged by the 5% loose ends that are not tied!
Turns out Softether, if enabled in DD-WRT‘s web UI, will always boot with a blank config which makes it useless!
The stuff in the Web UI in general loads BEFORE the startup (user custom) scripts! This means you are opening the router up for a few seconds of confused state before your startup scripts loads your custom config file to Softether on the fly!
This few seconds of sloppy logistics has more sinister effects than the designer expected (I bet he thought loading a config on the fly later is good enough)! When we connect to the Softether server admin tool while it’s on a blank config, it will ask the user to create a new password then write it as a new config! If you finished initializing a blank config (creating a new password) before your startup scripts kick in with the old config file you meant to load, you just nuked your intended config file by overwriting it with a blank you just initialized with your new password!
This means the whole Web UI on Softether is a disastrous TRAP! Disable it!
Softether is pre-installed and you must enable Softether solely from startup scripts to avoid this undesirable behavior that you might accidentally overwrite your config file with a blank!
Luckily by reading the source code, I realized that the pre-installed Softether won’t be neutered if we don’t enable it in the Web UI. The Web UI primiarly calls vpnserver start to start the Softether service, which we can do it ourselves LATER in our custom startup scripts. This means we can safely just disable the Web UI’s garbage Softether section.
Script it yourself
You need to start by enabling JFFS (if not already done so) so you can put in your own startup scripts and saved config file.
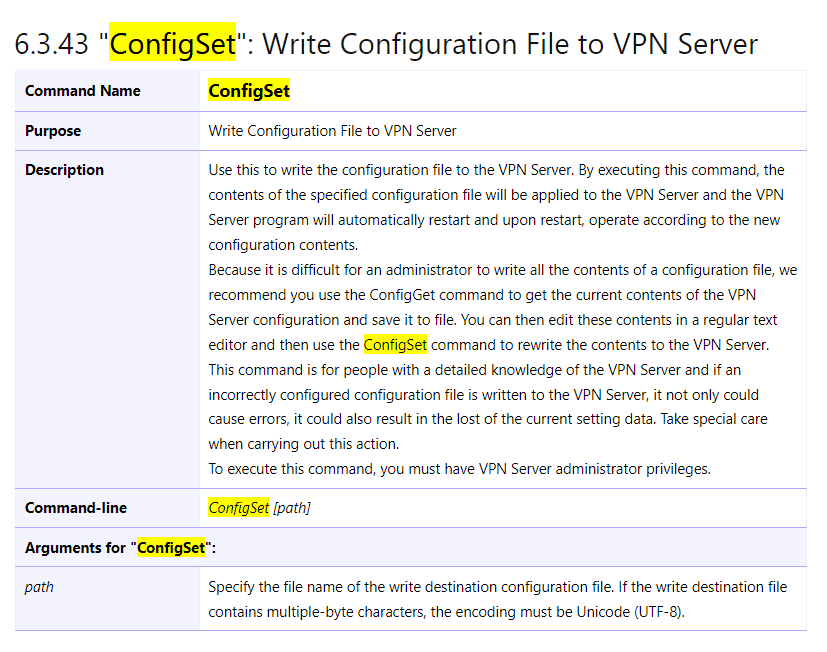
Step 1: Load the config file into the running server’s memory on start
vpncmd is a prompt based command line user interface like diskpart, but there’s a shortcut to log into the server and execute a command like ConfigSet in one line instead of starting vpncmd first then type the syntax, which is the /CMD switch:
Note that the program uses ‘//’ for the path names to prevent the ‘/’ symbol from being misinterpreted as a command switch.
Technically you can load any config file anywhere, but if you want to read the config file SoftEther VPN server flushes out (the most updated state after your changes through the Remote Admin interface), stick with loading the default path. This is likely what most people wanted (closes to live edit).
/SERVER merely means the remote admin interface is going to administer a SoftEther VPN Server/Bridge, not Client, or VPN tools mode. Yes, you can puppeteer the Client setup managing connections from elsewhere with the all-in-one vpncmd tool, so the distinction is necessary.
/PASSWORD: should be left empty as the SoftEther VPN server ALWAYS start in a blank state (with a blank password) until you explicitly tells the server program to load a config file into its memory. The server starts blank is the reason we had to go through this drivel in the first place. If you had a set password, you already had a config file loaded.
Step 2: Enabling the server after the configuration file is loaded
I typically give it around 3 seconds for the changes to reflect after loading the config file before doing anything else with it. Wait 3 seconds then start the server
sleep 3
/jffs/var/softethervpn/vpnserver start
The server must be started BEFORE briding TAP interface in the next step because Softether programmed it robustly: the TAP inteface has the same lifetime as when the Softether server is active. It doesn’t exist if the Softether service (vpnserver) didn’t start, and the TAP interface is gone after the service stops.
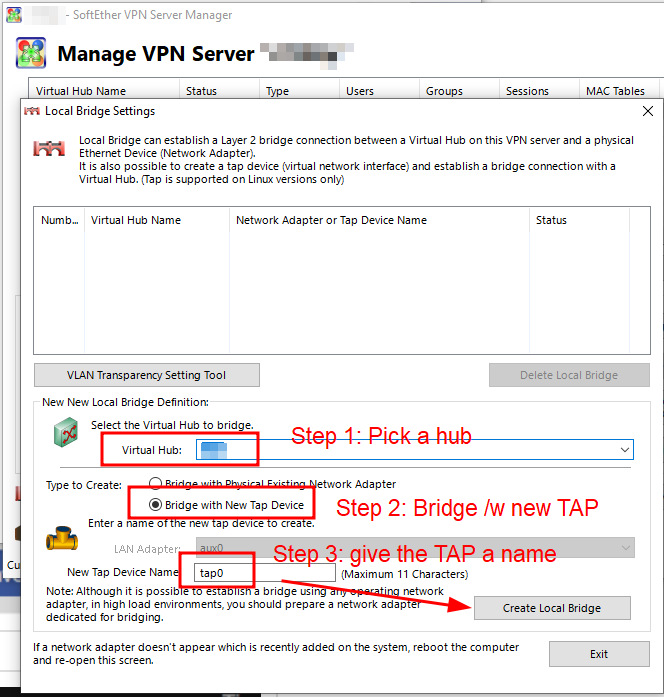
Step 3: Add the TAP adapter to the LAN Bridge
This part is described in my other article for a different router firmware platform (Merlin WRT), but the same idea translates here: you need a TAP adapter to put SoftEther VPN Server on a Router, despite SoftEther UI has the option to create the TAP adapter, it doesn’t have the feature to add that newly created TAP adapter to the LAN bridge and therefore renders the feature useless out of the box the way it came with DD-WRT!
The good part about DD-WRT is that the tun kernel module is already loaded so SoftEther VPN server can freely make the TAP adapter (for Merlin you need to modprobe tun first).
Since the TAP adapter only appears when SoftEther’s VPN is running WITH with config file that defines the TAP adapter, you have to make sure give enough time for the TAP adapter to finish building before attempting to bridge it or it’d fail!
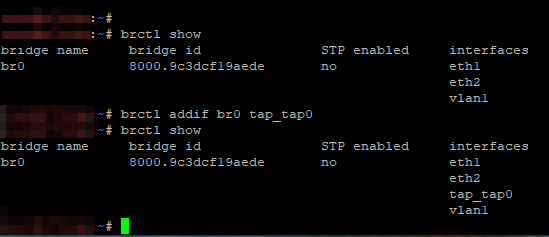
If you call your TAP adapter tap0 in SoftEther’s config, it’s called tap_tap0 in Linux when it exist. Most often the LAN bridge is called br0, so if you have these common default names, the command to add the TAP interface to the LAN bridge is
sleep 3
brctl addif br0 tap_tap0
Of course replace the names accordingly. You can check the names by ifconfig or ip link show, or use whichever tool you know that lists all network device and adapters.
Summary
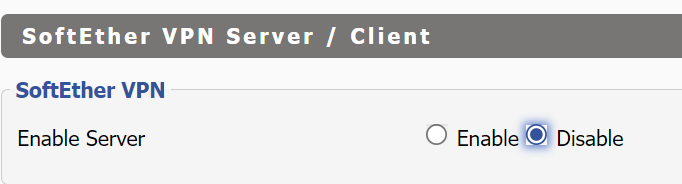
SIDE panel: DD-WRT’s text entry box for config string (useless)
The text box in DD-WRT’s UI for SoftEther VPN is hardwired to /tmp/vpn_server.config (EDIT: it’s broken now as of 2024-05-11. The text box now loads and writes directly onto the nvram variable called sether_config, which doesn’t even interpret a file path anymore.), which is freaking used by nowhere unless the user points to it. WTF?! This is very unpolished and wastes people a lot more time than it saves. At least drop people a hint with a text note saying this is not done yet and the rail connects to nowhere!
As said above, we should disable the entire “SoftEther VPN Server/Client” section in the WebUI anyway so you won’t even get to use this worthless ‘Configuration’ textbox. I’ve wasted so much time on this nonsense and wished this WebUI section didn’t exist in the first place. It’s just irresponsible to leave something this broken out there that ended up being a deadly trap/time-sink.