The power brick that came with my U1620A order has a rattling noise when I shook it. I suspected a piece of soldered cracked and was wandering inside so I chose not to power it on as it might short something. So I had to crack open the wall wart, which turns out many people have little luck open it up non-destructively.
Just prying it open by force with a screwdriver will ruin the plastics. I needed to somehow soften the glue first and work into it (like using a cutter) to dislodge/cut the glue. Rubbing alcohol doesn’t work that well. The glue is quite stuff so it’s not the easily dissolvable kind.
After some experimentation, I used my hot air station and set it to a temperature right below it melts the hard ABS plastic outside (143 deg C, max air flow), and carefully pried it after taking the heat away.
WARNING: Do not pry while the hot air is blowing as the ABS plastic might be slightly softened! The hot air might overshoot in its temperature feedback) so you might accidentally remold it. When working at the borderline temperature that barely soften the ABS plastic, the second you take the hot air away the plastic cools back (hardens) enough for you to pry.
Out of practicality, I heat up one edge at a time, then focus on 1/3 of the area at a time get an entry point prying one hook open at a time. It takes a lot of patience.
After I got all the 4 sides pried open for some reason I couldn’t release the case and it felt something was stuck in the middle. Turns out the wall wart I have happened to have a center screw hidden from plain sight under the label. The label quality was so good that just pressing it around with a pair of tweezers won’t find the screw hole (because of the tension). I used hot air (at the same 143 deg C) to probe with tweezers to locate the screw hole. I cut a hole in the label for the screw hole because it’d be a pain to use hot air to get the label off in one without ruining it and be able to put it back like new.
Bonus discovery: molded plastics have some memory!
I dented the ABS plastic case during prying (before I thought of using hot air), but I discovered this magical temperature (143 deg C) actually heals the plastic when I blow it in a direction that undoes the dent! The small (like 2mm) dents magically smooth itself out and went back to rough where it was before I screwed it up (pun intended)!
Yes, for molded plastics, small dents caused by prying and bumping, heating it up to the temperature right before it softens will return it to its near original shape without external forces!
Of course, do not go past the softening temperature (143 deg C). If you heat it to a melting temperature, the plastic will lose its memory so you need to apply external force to beat it to the shape you wanted (which is a pain in the butt and it requires a lot of post-processing to get it to look like original).
Architecturally, the DSO6000A series shares common designs with 54830 series oscilloscope and 54640 series oscilloscopes. I noticed the Acq board numbers for my DSO6052A start with 54672 and the my M/DSO6104A starts with 54684. Looks like the 5467X means 500Mhz and 5468X means 1Ghz while the X is the number of analog channels.
This is ‘confirmed’ by a slip up in the documentation (user guide) which they forgot to update the model number in their vector graphics:
I think I’m getting a hang of Agilent’s oscilloscope’s hardware to do deep level board repairs as I have various model to compare. I used If you need yours repaired, please reach me at 949-682-8145.
Python’s import structure is confusing. Learning by examples (i.e. imitating example code) does not help understanding the logic of it, and there are a lot of possible invalid combinations that are dead ends. One needs to understand the concepts below to use it confidently!
Just like C++ quirks, very often there’s valid reasoning behind this confusing Python design choice and it’s not immediately obvious. Each language cater certain set of use cases at the expense of making other scenarios miserable. That’s why there’s no best universal language for all projects. Know the trade-offs of the languages so you can pick the right tool for the job.
MATLAB’s one file per function/script design
MATLAB made the choice of having one file describe one exposed object/function/class/script so it maps directly into the mental model of file systems. This is good for both user’s sanity and have behavioral advantages for MATLAB’s interpreter:
Users can reason the same same way as they do with files, which is less mental gymnastics
Users can keep track of what’s available to them simply by browsing the directory tree and filenames because file names are function names, which should be sensibly chosen.
MATLAB leverages the file system for indexing available functions and defer loading the contents to the memory until it’s called at runtime, which means changes are reflected automatically.
Package/modules namespace models in MATLAB vs Python
MATLAB traditionally dumps all free functions (.m files) available in its search paths into the root workspace. Users are responsible for not picking colliding names. Classes, namespaces and packages are after-thoughts in MATLAB while the OOP dogma is the central theme of Python, so obviously such practices are frowned upon.
RANT: OOP is basically a worldview formed by adding artificial man-made constructs (meanings such as agents, hierarchy, relationships) to the idea of bundling code (programs) and data (variables) in isolated packages controlled (scoped) by namespaces (which is just the lexer in your compiler enforcing man-made rules). The idea of code and data being the same thing came from Von Neumann Architecture: your hard drive or RAM doesn’t care what the bits stands for; it’s up to your processor and OS to exercise self-restraint. People are often tempted to follow rules too rigidly or not take them seriously when what really matters is understanding where the rules came from, why they are useful in certain contexts and under what situations they do not apply.
Packages namespaces are pretty much the skeleton of classes so the structure and syntax is the same for both. From my memory, it was at around 2015 that MATLAB started actively encouraging users (and their own internal development) to move away from the flat root workspace model and use packages to tuck away function names that are not immediately relevant to their interests and summon them through import syntax as needed. This practice is mandatory (enforced) in Python!
However are a few subtle differences between the two in terms of the package/module systems:
MATLAB does not have from statement because import do not have the option to expose the (nested tree of) package name to the workspace. It always dumps the leaf-node to the current workspace, the same way as from ... import syntax is used in Python.
MATLAB does not have an optional as statement for you to give an alternative name to the package you just imported. In my opinion, Python has to provide the as statement as an option to shorten package/module names because it was too aggressively tucking away commonly used packages (such as numpy) that forcing people to spell the informative names in full is going to be an outcry.
Unlike free functions (.m files), MATLAB classes are cached once the object is instantiated until clear classes or the like that gets rid of all instances in the workspace. Python’s module has the same behavior, which you need to unload with del (which is like MATLAB’s clear).
Python’s modules are not classes, though most of the time they behave like MATLAB’s static classes. Because modules lacks instantiated instances, you can reload Python modules with importlib.reload(). On the other hand, since MATLAB packages merely manages when the .m files can get into the current scope (with import command), the file system still indexes the available function list. Changes in .m file functions reflects immediately on the next call in MATLAB as MATLAB detects file changes, yet Python has to reload the module to update the function names index because the only way to look at what functions are changed is revisiting the contents of an updated .py file!
MATLAB abstracts folder names (that starts with + symbol) as packages and functions as .m files while Python abstracts the .py file as a module (like MATLAB’s package) and the objects are the contents inside it. Therefore Python packages is analogous to the outer level of a double-packed (nested) MATLAB package. I’ll explain this in detail in the next sections.
Files AND directories are treated the same way in module hierarchy!
This comes with a few implications
if you name your project /myproj/myproj.py with a function def myproj(), which is a very usual thing most MATLAB users would do, your module is called myproj.myproj and if you just import myproj, you will call your function as myproj.myproj.myproj()!
you can confuse Python module loader if you have a subfolder named the same as a .py file at the same level. The subfolder will prevail and the .py file with the same name is shadowed!
The reason is that Python allows users to mix scripts, functions, classes in the same file and they classes or functions do not need to match the filenames in order for Python to find it, therefore the filename itself serves as the label for the collection (module) of functions, classes and other (script) objects inside! The directory is a collection of these files which itself is a collection, so it’s a two level nest because a directory containing a .py file is a collection of collection!
On the other hand, in MATLAB, it’s one .m file per (publicly exposed) function, classes or scripts, so the system registers and calls them by the filename, not really by how you named it inside. If you have a typo in your function name that doesn’t match your filename, your filename will prevail if there’s only one function there. Helper functions not matching the filename will not be exposed and it will have a static/file-local scope.
Packages in MATLAB are done in folders that starts with a + symbol. Packages by default are not exposed to global namespaces in your MATLAB’s paths. They work like Python’s module so you also get them into your current workspace with import. This means it’s not possible to define a module within a file like Python. Each filename exclusively represent one accessible function or classes in the package (no script variables though).
A module (in Python) is basically treating a file as a package folder, which contradicts with MATLAB’s function loading system’s design. So there’s only the concept of packages in MATLAB and no concept of modules in MATLAB. Multiple functions in a Python module should be written into one file per function in MATLAB and loaded as a package.
Python separated the two concepts (modules and packages) because .py file allows a mixture of scripts, classes and loose functions formed a logical unit with the same structure as packages itself, so they need another name called module to separate folder-based collection (logical unit) and file-based collections (logical unit).
This is very counterintuitive at the surface (because it defeats the point of directories) if you don’t know Python allowing user to mix scripts, functions and classes in a file meant the file itself is a module/collection of executable contents.
from (package/module) import (package/module or objectS) <as (namespace)>
This syntax is super confusing, especially before we understand that
packages has to be folders (folder form of modules)
modules can be .py files as well as packages
packages/modules are technically objects
The hierarchy for the from import as syntax looks like this:
package_folder > file.py > (obj1, obj2, ... )
This has the following implications:
from strips the specified namespace so importdumps the node contents to root workspace
import without fromexposes the entire hierarchy to the root workspace.
functions, classes and variables in the scripts are ALL OBJECTS.
if you do import mymodule, a function f in mymodule.py can only be accessed through mymodule.f(), if you want to just call f() at the workspace, do from mymodule import f
These properties also shapes the rules for where wildcards are used in the statement:
from cannot have wildcards because they are either a folder (package) or a file (module)
import is the only place that can have wildcards * because it is only possible to load multiple objects from one .py file.
import * cannot be used without from statement because you need to at some point load a .py file
it’s a dead end to do from package import * beacuse it’s trying to load multiple raw .py files to the root workspace instead of importing multiple objects defined in the .py file.
it also does not make sense (nor possible) to follow import * with as statement because there is no mechanism to map multiple objects into one object name
So the bottom line is that your from import as statement has to somehow load a .py file in order to be valid. You can only choose between these two usage:
load the .py file with from statement and pick the objects at import, or
skip the from statement and import the .py file, not getting to choose the objects inside it.
as statement can only work if you have only one item specified in import, whether it’s the .py file or the objects inside it. Also, if you understand the rationales above, you’ll see that these two are equivalent:
from package_A import module_file_B as namespace_C
import package_A.module_file_B as namespace_C
because with as statement, whatever node you have selected is accessed through the output namespace you have specified, so whether you choose to strip the path name structure in the extracted output (i.e. use from statement) is irrelevant since you are not using the package and module names in the root namespace anymore.
The behavior of from import as is very similar to the choices you have to make extracting a zip file with nested folder structures, except that you have to make a mental substitution that a .py file is analogous to a subfolder while the objects described in the .py file is analogous to files in the said subfolder. Aargh!
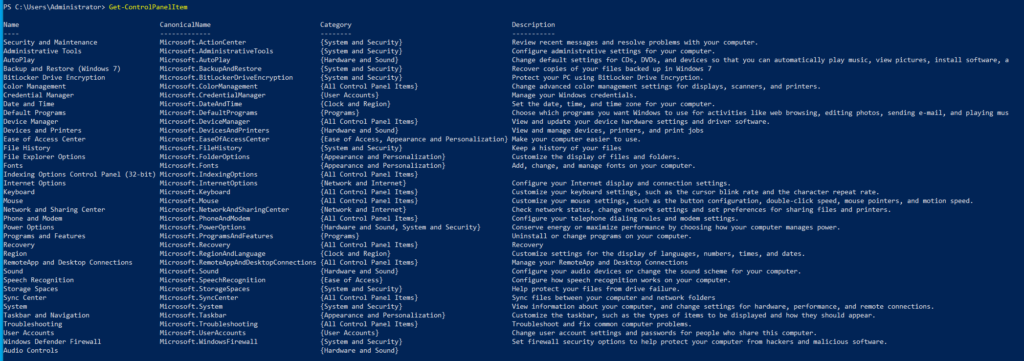
Control panel has a lot of kinda-secret calls that open specific configuration windows that it’d be difficult to get to (need many clicks from other windows) and they might not necessarily have a path that you can access normally when Microsoft discourage their uses. Sometimes it’s just a phrase, sometimes it’s a .cpl in Windows’ system folder, yet sometimes you can call a .cpl that does not exist at all yet the control panel recognizes it.
Here are some examples
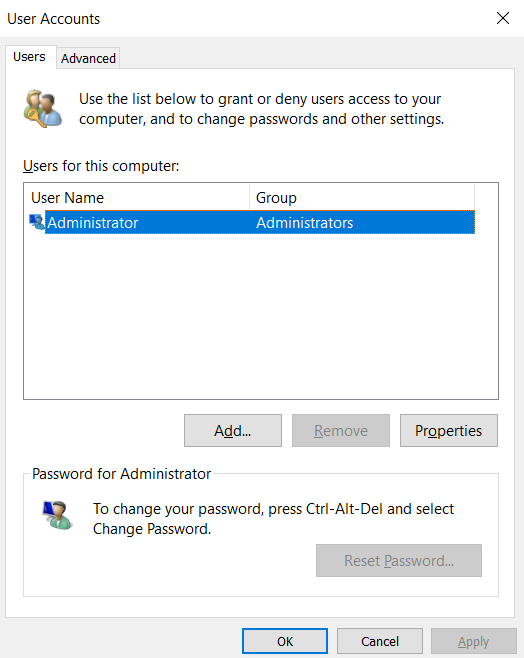
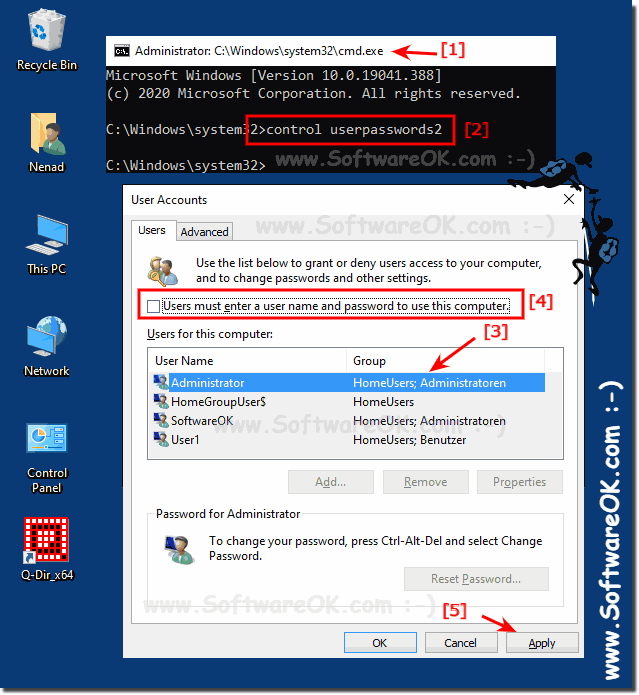
control userpasswords2 opens a dialog box to manger user accounts more directly without going through MMC’s user management (typically Local Users and Groups within compmgmt.msc Computer Management). It’s also netplwiz
It used to be valuable way of managing autologon until Microsoft Removed the checkbox “Users must enter a username and passwords to use this computer” because it doesn’t make sense with their freaking vision of Windows Hello where you logon with biometrics or other ways that you’d do with your cellphones. They are trying to make passwords a thing of the past.
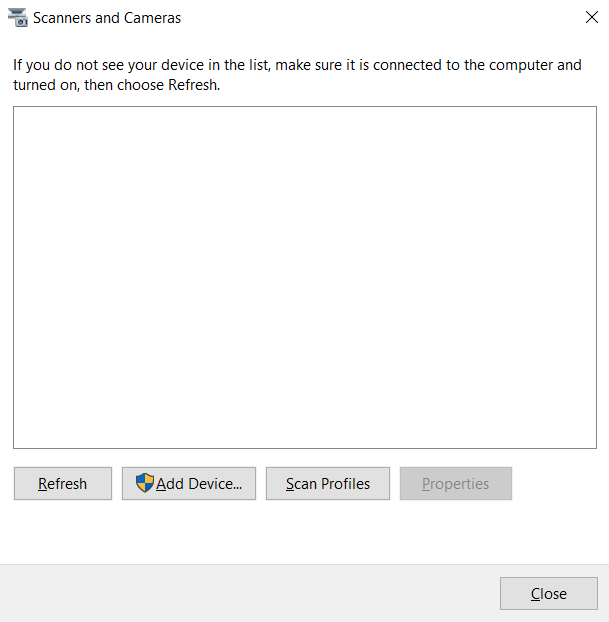
I picked this shortcut up from the README file of Network TWAIN Driver installer, which plug and play doesn’t make sense because the device is on the network so there’s no hardware to detect. Instead you add a scanner device manually and enter the connection information in its properties.
The interesting thing about this one is that sticpl.cpl do not exist! There’s no control panel file (.cpl) anywhere in the system drive!
There are more information from Microsoft about these commands.
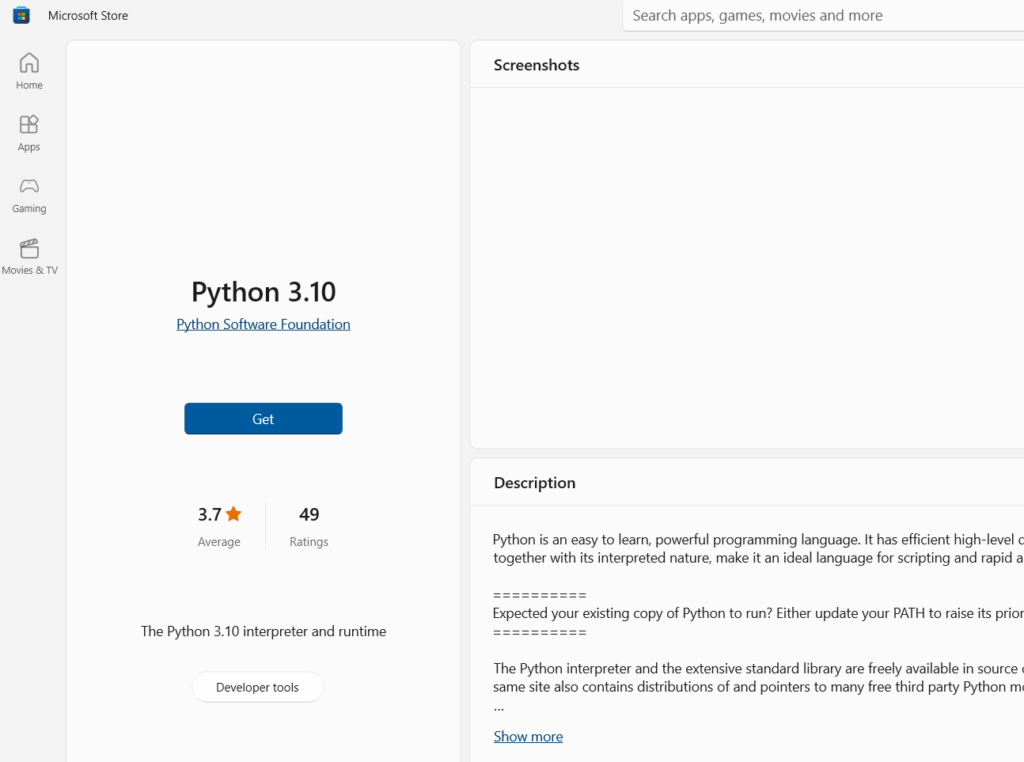
Windows 10 comes with a default alias that if you type python anywhere in terminal, powershell, run, etc, It will run a stub that points you to getting it in Windows Store. WTF man! I hate these stubs that are nothing but advertising! People will know there’s Python available in the store if Python Software Foundation’s website announces it. There’s no need to hijack the namespace with a useless stub!
After I installed Spyder 5.3.0, it started with a Windows console instead of a Python Interpreter console, so when I typed Python (Spyder 5.3.0 came with Python 3.8.10 in its subfolder), this damn App store stub came up:
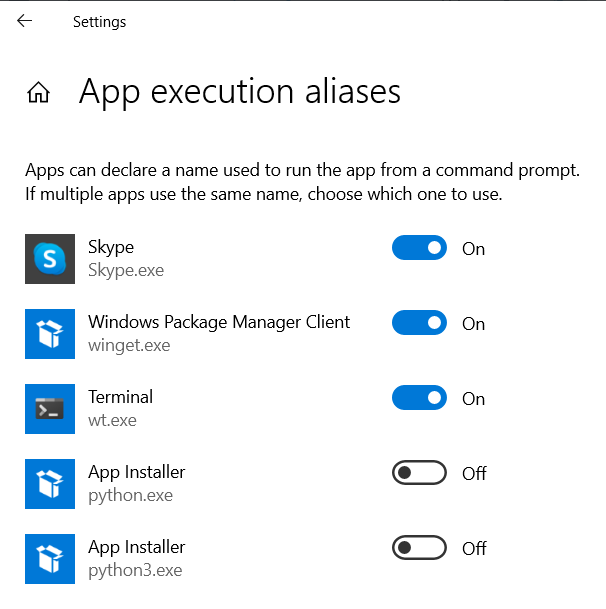
When I tried to force a .exe exceution in Powershell, I saw this:
So there’s a way to disable this!
It’s not the first time Spyder not working as intended out of the box, but Microsoft’s overzealous promotion of their ‘good ideas’ causes grief and agony to people who simply want things done.