Quirks of SoftEther VPN Server that came with DD-WRT

DD-WRT came with SoftEther VPN and it looked pretty scary because it shows no user interface and a box for you to enter a config file!

Turns out SoftEther VPN’s Remote Admin interface is basically a tool that takes all user settings, generate a config file and upload it to the server behind the scenes!

Concepts to know

vpn_server.config is the core file the defines the server.

SoftEther VPN Server Manager (The remote admin program) is basically a tool to generate the config text string from the UI and pass it to the server’s memory (not file yet until the server stops and flushes its config state out)

Default location of the config file

SoftEther by default reads and writes the vpn_server.config file which controls everything in a JFFS folder. So you are better off identifying it by doing a path search because they move around from version to version of dd-wrt:

find /jffs -name vpn_server.config

So for my case the core file path is

/jffs/var/softethervpn/vpn_server.config

Config file’s file access/update mechanism

SoftEther’s explicitly stated that their config file (vpn_server.config) handling mechanism does not flush the current state in use to the file until the server stops. So it has the following behavioral implications:

  • Changes made by the admin program is reflected immediately despite no file is updated
  • If you change the config file while the server is running, the changes will be lost/overwritten as the server flushes the data on RAM to disk
  • If you abruptly power off the server, the changes made while the server is running (through the remote admin program) is lost as it doesn’t have a chance to flush the updated state out.
  • If you read the config file while the server is running, you are not getting the changes that are currently done through the Manager (Remote Admin) program.
  • In summary the config file is stale while the server is running.
  • When loading the config file to the server by any means (command or GUI), the server parses the entire file and immediately scan and act on the new state defined by the config file (eager execution), not waiting for the next turn the specific state is accessed (lazy execution).

Softether on DD-WRT has no memory out of the box!

Disable this WebUI section entirely and script it yourself!

Out of the box the DD-WRT did not specify which config file to tie to (or open with by default) so the config received from the Server Manager only stays in memory and is not written anywhere! WTF!

So every time I reboot, the settings are totally lost and I have to re-enter it from scratch. Linux mentality again! People did the hardest fun work showing off how smart they are yet their software doesn’t gain the mainstream adoption because nobody ties up the loose ends so the 95% excellent work got sabotaged by the 5% loose ends that are not tied!

Turns out Softether, if enabled in DD-WRT‘s web UI, will always boot with a blank config which makes it useless!

The stuff in the Web UI in general loads BEFORE the startup (user custom) scripts! This means you are opening the router up for a few seconds of confused state before your startup scripts loads your custom config file to Softether on the fly!

This few seconds of sloppy logistics has more sinister effects than the designer expected (I bet he thought loading a config on the fly later is good enough)! When we connect to the Softether server admin tool while it’s on a blank config, it will ask the user to create a new password then write it as a new config! If you finished initializing a blank config (creating a new password) before your startup scripts kick in with the old config file you meant to load, you just nuked your intended config file by overwriting it with a blank you just initialized with your new password!

This means the whole Web UI on Softether is a disastrous TRAP! Disable it!

Softether is pre-installed and you must enable Softether solely from startup scripts to avoid this undesirable behavior that you might accidentally overwrite your config file with a blank!

Luckily by reading the source code, I realized that the pre-installed Softether won’t be neutered if we don’t enable it in the Web UI. The Web UI primiarly calls vpnserver start to start the Softether service, which we can do it ourselves LATER in our custom startup scripts. This means we can safely just disable the Web UI’s garbage Softether section.

Script it yourself

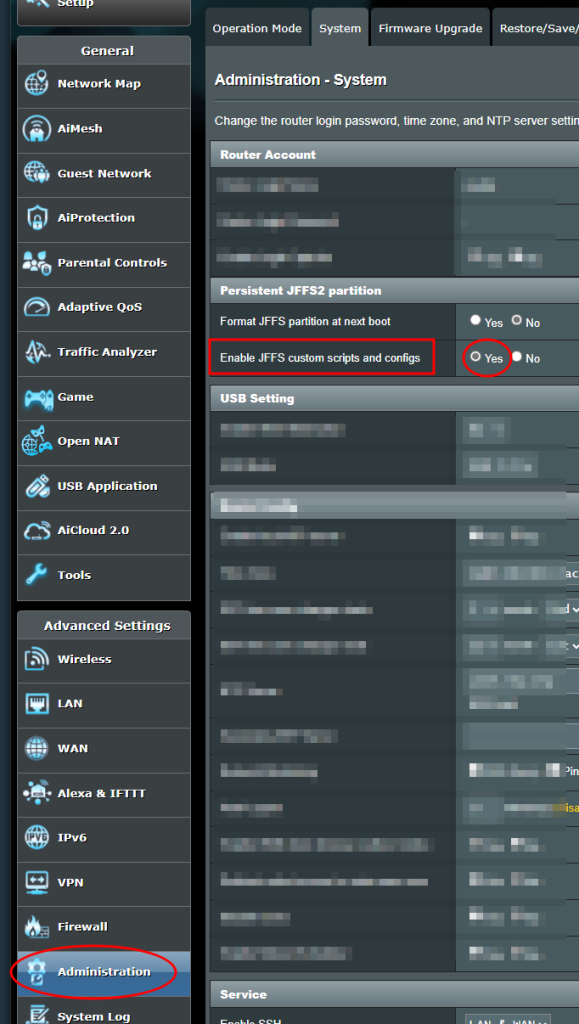
You need to start by enabling JFFS (if not already done so) so you can put in your own startup scripts and saved config file.

Step 1: Load the config file into the running server’s memory on start

The key idea came from this forum post DD-WRT :: View topic – SoftEther Working after reboots *Special Way with JFFS2*. There’s a programatically way to load a config file at any point:

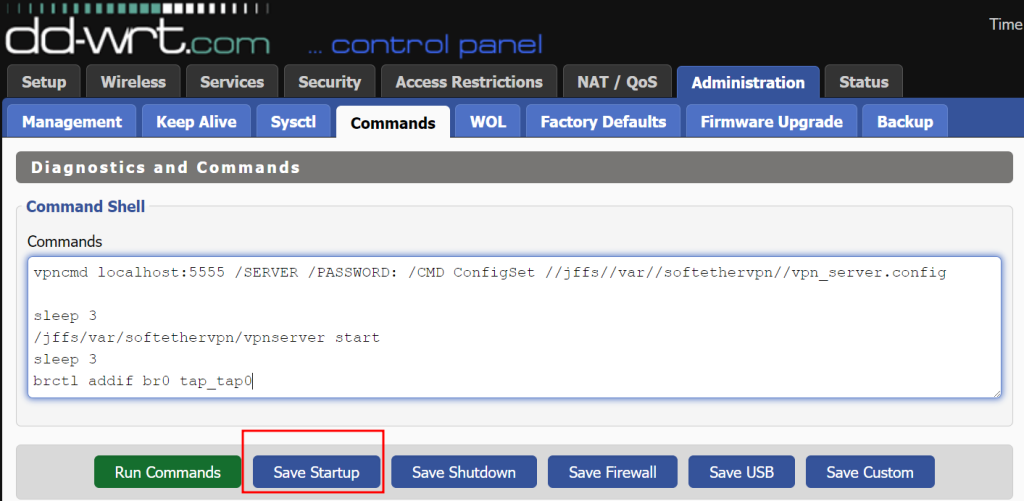
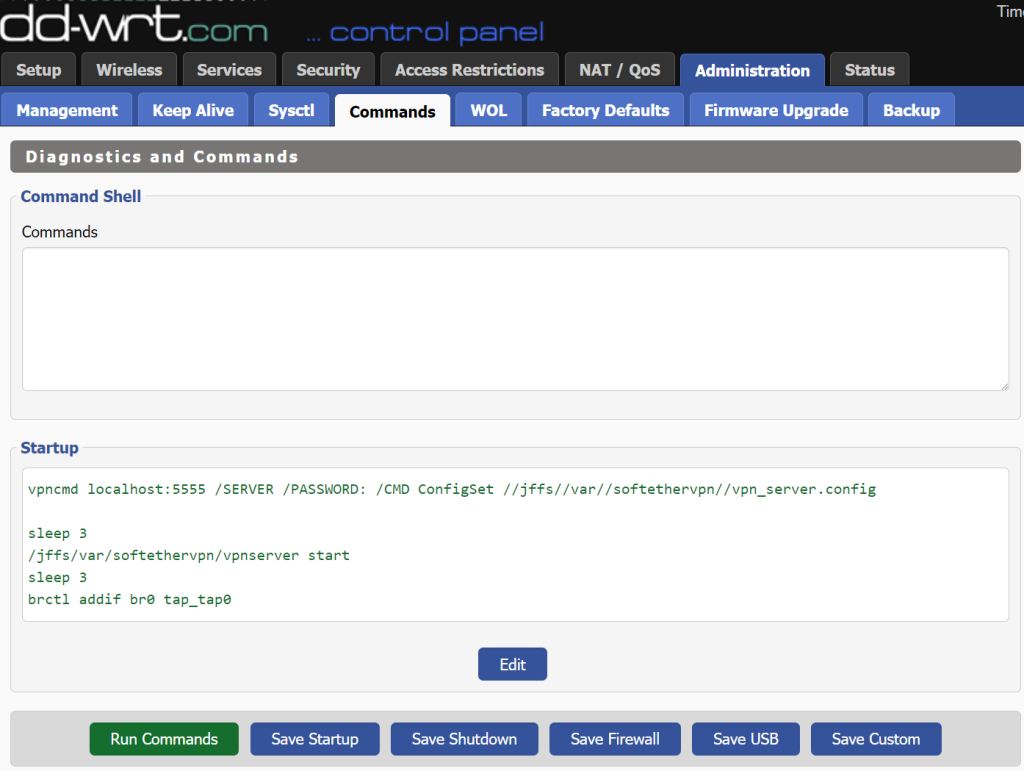
vpncmd localhost:5555 /SERVER /PASSWORD: /CMD ConfigSet //jffs//var//softethervpn//vpn_server.config

vpncmd is a prompt based command line user interface like diskpart, but there’s a shortcut to log into the server and execute a command like ConfigSet in one line instead of starting vpncmd first then type the syntax, which is the /CMD switch:

Note that the program uses ‘//’ for the path names to prevent the ‘/’ symbol from being misinterpreted as a command switch.

Technically you can load any config file anywhere, but if you want to read the config file SoftEther VPN server flushes out (the most updated state after your changes through the Remote Admin interface), stick with loading the default path. This is likely what most people wanted (closes to live edit).

/SERVER merely means the remote admin interface is going to administer a SoftEther VPN Server/Bridge, not Client, or VPN tools mode. Yes, you can puppeteer the Client setup managing connections from elsewhere with the all-in-one vpncmd tool, so the distinction is necessary.

/PASSWORD: should be left empty as the SoftEther VPN server ALWAYS start in a blank state (with a blank password) until you explicitly tells the server program to load a config file into its memory. The server starts blank is the reason we had to go through this drivel in the first place. If you had a set password, you already had a config file loaded.

Step 2: Enabling the server after the configuration file is loaded

I typically give it around 3 seconds for the changes to reflect after loading the config file before doing anything else with it. Wait 3 seconds then start the server

sleep 3
/jffs/var/softethervpn/vpnserver start

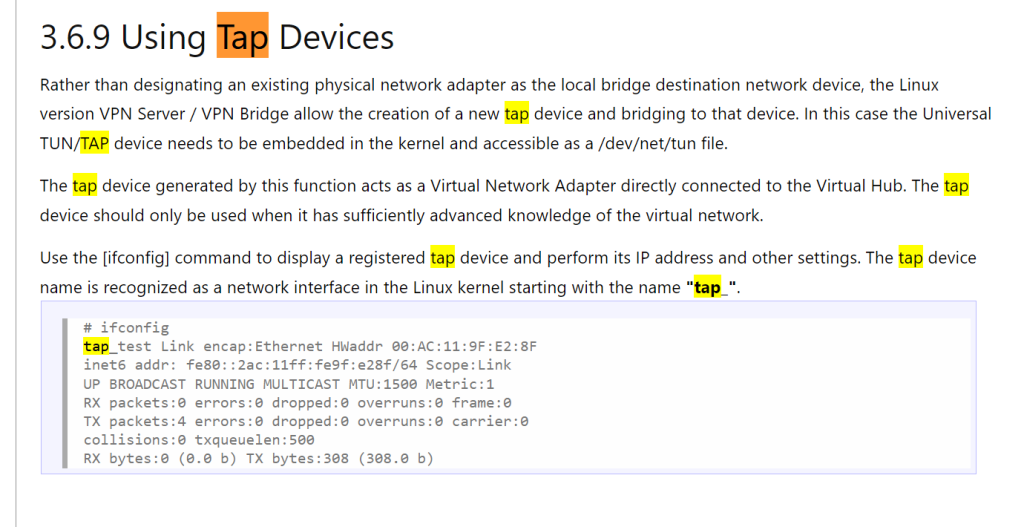
The server must be started BEFORE briding TAP interface in the next step because Softether programmed it robustly: the TAP inteface has the same lifetime as when the Softether server is active. It doesn’t exist if the Softether service (vpnserver) didn’t start, and the TAP interface is gone after the service stops.

Step 3: Add the TAP adapter to the LAN Bridge

This part is described in my other article for a different router firmware platform (Merlin WRT), but the same idea translates here: you need a TAP adapter to put SoftEther VPN Server on a Router, despite SoftEther UI has the option to create the TAP adapter, it doesn’t have the feature to add that newly created TAP adapter to the LAN bridge and therefore renders the feature useless out of the box the way it came with DD-WRT!

The good part about DD-WRT is that the tun kernel module is already loaded so SoftEther VPN server can freely make the TAP adapter (for Merlin you need to modprobe tun first).

Since the TAP adapter only appears when SoftEther’s VPN is running WITH with config file that defines the TAP adapter, you have to make sure give enough time for the TAP adapter to finish building before attempting to bridge it or it’d fail!

If you call your TAP adapter tap0 in SoftEther’s config, it’s called tap_tap0 in Linux when it exist. Most often the LAN bridge is called br0, so if you have these common default names, the command to add the TAP interface to the LAN bridge is

sleep 3
brctl addif br0 tap_tap0

Of course replace the names accordingly. You can check the names by ifconfig or ip link show, or use whichever tool you know that lists all network device and adapters.

Summary


SIDE panel: DD-WRT’s text entry box for config string (useless)

The text box in DD-WRT’s UI for SoftEther VPN is hardwired to /tmp/vpn_server.config (EDIT: it’s broken now as of 2024-05-11. The text box now loads and writes directly onto the nvram variable called sether_config, which doesn’t even interpret a file path anymore.), which is freaking used by nowhere unless the user points to it. WTF?! This is very unpolished and wastes people a lot more time than it saves. At least drop people a hint with a text note saying this is not done yet and the rail connects to nowhere!
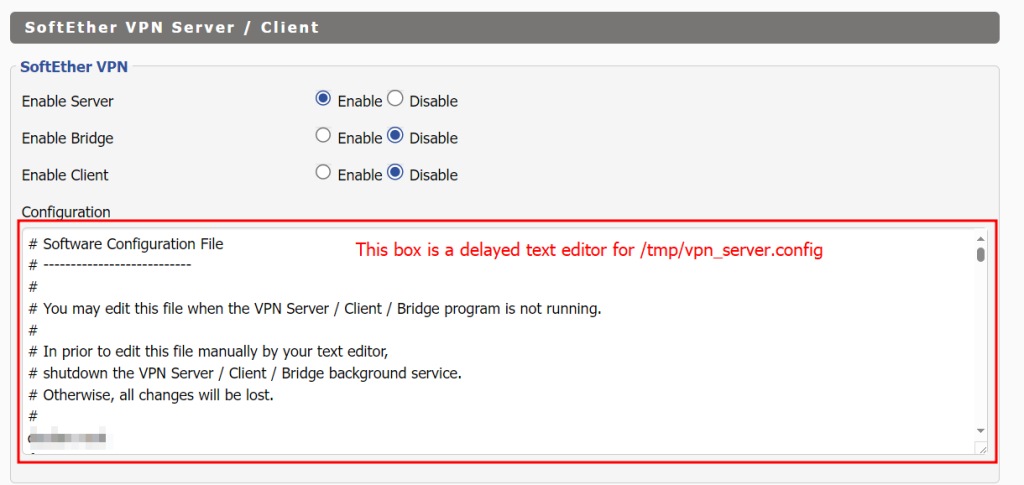
As said above, we should disable the entire “SoftEther VPN Server/Client” section in the WebUI anyway so you won’t even get to use this worthless ‘Configuration’ textbox. I’ve wasted so much time on this nonsense and wished this WebUI section didn’t exist in the first place. It’s just irresponsible to leave something this broken out there that ended up being a deadly trap/time-sink.

Loading

Installing SoftEther VPN Server in Asus Merlin WRT

I’m experimenting with SoftEther as the user experience/interface is a lot more polished than WireGuard and OpenVPN and it has wide platform coverages. The Windows administration interfaces are sensibly designed (organized conceptually), unlike the Linux software culture that basically pretend to have a user interface yet it’s just a step away from editing the raw config file. SoftEther’s documentation also has nice graphical illustrations and it’s use cases oriented. The best part of the docs is that they are short and to the point.

Here I have a use case that’s not as quite as common for SoftEther’s users, so I might as well do a quick write up so if I run into this again in the future, I don’t have to do the research again.

Use case: router doubling as VPN server

I made a diagram based on my current understanding of how ethernet router works, and what needs to be done to have the router dual as SoftEther VPN server.

No guarantee that it’s the correct model and the lingo, and I’d appreciate comments to help me improve as I’m still learning (I was in algorithms and non-networking software development, more on the DSP side + light embedded systems, so this area is new to me).

  • The part shaded in blue is the new part we are building.
  • Installing SoftEther from Entware is just the square block.
  • You need to modprobe tun to let the SoftEther Server Admin software create the TAP port (made up Ethernet card).
  • At the same time the TAP port is created, say tap0, what SoftEther ‘bridges‘ is NOT the LAN, but the orange link in the diagram that goes to the virtual hub (which belongs to a VPN server instance). This lingo confusion wasted me days.
  • The ‘bridge’ on SoftEther’s side tells the incoming VPN connection which ‘Ethernet card’ (turns out to the the TAP interface) on the host computer should act on its behalf.
  • I felt like something is odd that SoftEther did not ask me what local network should the TAP interface go into so I suspect the TAP is just sitting there not talking to anybody, and it turned out to be the reason why my incoming VPN connection succeed but I’m not getting DHCP assignments.
  • I bit the bullet and understand how a Linux router work as if it were a computer with 5 Ethernet cards and one important piece of the puzzle is that the 4 LAN ports aren’t directly talking to the the WAN, but instead they form a bridge (software switch) which the bridge represents them and talk to the processed WAN traffic.
  • So the missing link is the double-line on the diagram where I add the TAP interface to the LAN bridge, namely brctl addif br0 tap_tap0. Linux adds a tap_ prefix to tap interfaces so it’s tap_tap0 for tap0 in SoftEther.
  • One more non-obvious thing here is that you also need to register the brctl a few seconds (using sleep delay) right after the SoftEther VPN Server service starts and nowhere else. The TAP has to exist before you put it on the LAN bridge and the TAP is programmed correctly to be as short-lived as needed, which is very responsible.

What to watch out for this use case

SoftEther’s interface does support creating a TAP adapter, but it provides scary warnings as this is an unusual settings.

TAP depends on the TUN module being loaded first, but Merlin-WRT’s firmware do not load this out of the box.

Some other websites tells you to install packages ip-full (for ip command) and OpenVPN (for the TAP) adapter, but it’s not necessary in some newer releases of Merlin-WRT. It’s all there, just waiting for you to modprobe tun (load TUN/TAP kernel drivers) before you can create TAP adapters.

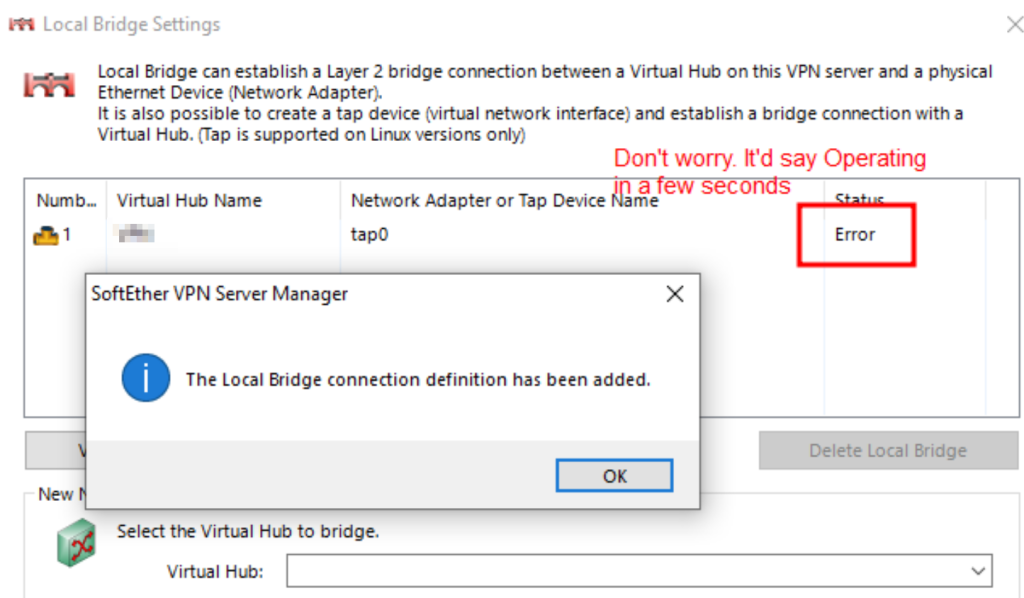
If you don’t have the TUN module loaded first, the newly created bridge will show ‘Error’ with no explanation, which is confusing.

I figured out this is the missing part that causes the Error status by learning how TAP interface are created on Linux and speculated the Windows remote server admin interface (Server Manager) calls this under the hood:

ip tuntap add dev {YOUR TAP DEVICE NAME GOES HERE} mode tap

and tried to imitate the call and researched the error messages.

The next hard part is that the TAP adapter created by SoftEther’s is not tied to anything in the router when freshly created by “Local Bridge Setting”! It’s like you just freshly added an extra network card into a computer with the drivers set up, it doesn’t interact with anything on your network before you plug a cable in the right port!

As the last step you will need to SSH into the router to put in brctl addif br0 tap_tap0.

Obvious preparations

  1. Prepare USB storage (format it with amtm) to host Entware if not already done
  2. install Entware (amtm has an installer for it)
  3. install softethervpn5-server through Entware (opkg install softethervpn5-server)

Enable TUN/TAP drivers

By default TUN/TAP kernel module is by default not loaded, so we somehow need to add modprobe tun to startup scripts.

Out of the box the router is read-only so you cannot get it to remember the startup scripts unless you turn on /jffs, a small (like 64MB) onboard non-volatile memory to store user data such as startup scripts.

After you turn on /jffs, you will see tapping points to the startup process provided by executable files located in /jffs/scripts:

If you haven’t installed anything that has written to services-start (the earliest point), you can install spdmerlin (from amtm), a tool that provides a customized router admin page that creates a dashboard with all admin goodies and it will create services-start and make it executable if it’s not already there for you to tap in the modprobe tun line.

If you want to do this yourself, make sure you spell ‘services’ with the plural ‘s’ (the pre-existing ‘service-event’ which the ‘service’ is singular might tempt you to imitate it, which is incorrect) and chmod +x services-start to make the script executable.

I use nano to sneak modprobe tun into /jffs/scripts/services-start (I also tried init-start and it works too since modprobe is very early kernel stuff). Do whatever that’s convenient for you as long as you can sneak modprobe tun in:

I recommend rebooting right away then run lsmod | grep tun to make sure the module is indeed loaded. If you can’t spare a reboot (which is like 5 minutes), you can simply run modprobe tun at the terminal right away and hope the startup script remembers to do it on the next reboot

Use SoftEther Server Manager to remotely configure the softethervpn5-server installed on the router

The server program on the router did not ask for a password, yet SoftEther asks for it. This UI design is actually a little confusing. Turns out you enter an empty password on the first access/run and the user interface will ask you to create a proper password (just like some routers’ admin pages do).

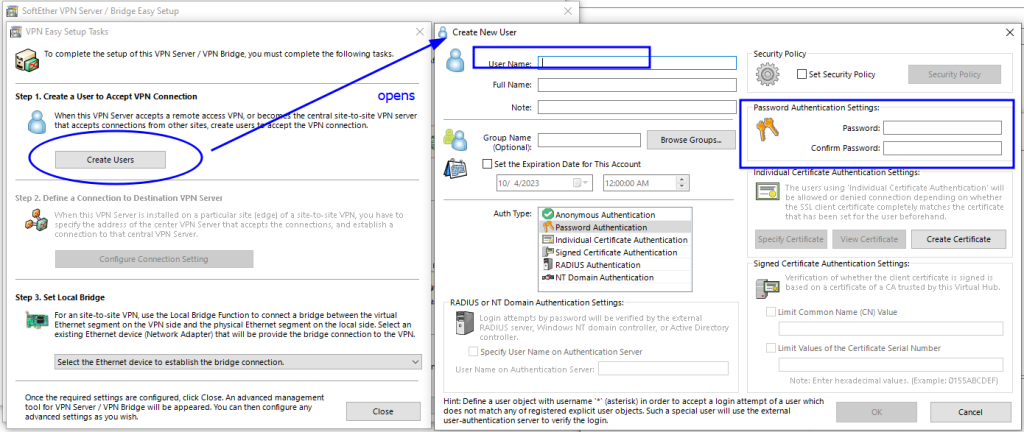
The first time you set it up, you will be greeted by a Wizard which I cannot find again. This wizard is equivalent to ‘Create a Virtual Hub’ -> [‘Manage Virtual Hub’ -> Add Users] -> Local Bridge Setting. However, you want to skip the last step (create bridge) in the wizard because the wizard version caters basic users and they don’t offer the option to make a TAP adapter for the bridge.

By exiting the wizard at the bridge creation step, you’ve created the ‘Virtual Hub’ (which SoftEther sees ‘Virtual Hub’ as an instance of VPN server which you can run in parallel. Confusing lingo for beginners, but it might be sensible with the logic of the architecture). Click on the ‘Local Bridge Setting’ to finish the step that was not done by the Wizard

Bridging is a matter of hardware, so it’s universal across all Virtual Hub (or VPN server instances). This is why it’s at the top level outside your VPN server instance (Virtual Hub) configs.

Softether is trying to be helpful but we know what we doing something unusual here (using the router itself as a computer that plugs into the router). Don’t get scared by the warning and just click Yes to continue

If you remember to start the TUN kernel module, the Status should turn from Error to Operating in a split second. If it stays in the Error, go back and check if you have TUN running properly.

Oversimplified view of LAN bridges

From an end-user perspective, a bridge can be thought of in terms of switches despite the order of evolution is the other way round.

You can think of a bridge as a switch where the computer that hosts it gets a free ride on the switch without the extra physical switch NIC port, physical ethernet cable, and physical device/computer NIC port. I called it ‘implied’ in the diagram on top of this post.

Say for example with 1 ethernet adapter computer A connects to the upstream (say Internet and home network managed by a router above) and let’s call it NIC-A. Then we install an extra network card/interface called NIC-B that’s for serving other devices.

By creating a bridge BR0 formed by NIC-A and NIC-B, you created an illusion of NIC-A behaving as two network cards NIC-A and NIC-B with 2 cables connected to the upstream LAN directly despite only 1 card (NIC-A) is physically there. So what NIC-A did in the bridge BR0 is it act as a software switch which it gets a free ride (implied) and the downstream Computer B rides on the switch that’s served by Computer A.

Add the TAP interface to the existing LAN bridge

brctl is the command line interface for managing bridges

addif adds an interface to the bridge. Here’s the manual page for the syntax:

In this forum post user miscell reversed the order and typed the interface first, which you’ll get a ioctl error complaining that you’re trying to write to an unwritable file.

However, since we are in a router, these changes won’t stick on reboot so we need to put this somewhere. Turns out it’s a colossal pain in the butt to figure this out because the tap0 adapter is correctly programmed to exist only when the SoftEther VPN server service is running and disappear when the service stops. In other words, the TAP adapters created and managed by SoftEther is ephemeral.

Since the TAP does not exist before the SoftEther VPN Server service (S05vpnserver) starts and vanished when the service stops, the ONLY place you should attach the bridging operation is within the start) section of /opt/etc/init.d/S05vpnserver, right after the core service completely finished starting so the TAP is fully created. I monitored the output of ifconfig and realize I need a few seconds of delay before adding the TAP interface to the bridge because the TAP bridge has to exist first. Add the highlighted line to the right place

with the chunk repeated here if your LAN bridge is called br0 and the TAP is called tap0 in SoftEther:

sleep 3
brctl addif br0 tap_tap0

I also tested it and it seems like the bridge association is removed when the TAP adapter was cleaned up when the service is stopped, so I didn’t bother to add the brctl delif in the stop) section.

/opt is actually points to your entware folder (I choose not to show the raw path because it contains my usb partition label which you’ll have to substitute your own) so the data is not volatile and it’s living in your USB entware storage. Basically the SoftEther VPN server registry lives in Entware’s /init.d as S05vpnserver.

Double check the naming on your router with say ifconfig instead of trusting the tap_ prefix which might not be universal across routers. Also check if your router’s LAN bridge is indeed named br0 and replace the interface names accordingly. You can also adapt this to other routers as long as you know where to sneak in the startup scripts


Bonus: Firewall instructions

The firewall rules in MerlinWRT just quit working so the table I entered doesn’t do anything when I turn the firewall on. It doesn’t seem like it’s placing firewall exceptions the way I intended.

There’s also another weird behavior that if the port is firewall blocked, the server admin program intermittently still connect but it connects to a blank state server (blank config). WTF!

You won’t run into these problems if the firewall is turned off, but if you want to keep the firewall on, here’s the SoftEther VPN Server Firewall instructions.

Suggestion to SoftEther: Add a LAN bridging UI to the TAP option

Since this is an unusual concept, I copied the diagram from 3.6 Local Bridges – SoftEther VPN Project and overlay it to illustrated the ‘Local (VPN) Bridge’ has nothing to do with your LAN bridge which is necessary for the TAP adapter to do anything useful.

Right now there’s too little help on this topic which SoftEther considers it as advanced. Turns out putting SoftEther on a router isn’t too uncommon of a thing to ask for once people find out that it’s not impossible.

It’d save us who want to put SoftEther on a Linux router a lot of grief if SoftEther has an extra UI section in the dialog with a pulldown menu that states what bridge it can optionally join:

This is better done inside SoftEther instead of outside it because the users do not have to anticipate the names of the TAP adapters administrators create in the UI. Don’t worry about this extra option of adding it to a LAN bridge could confuse new users, as the lack of such option is way more confusing because there’s a TAP adapter created just to not connect to anything and it shoves new users to a dead end!

In the worst case you can throw a dialog box when users choose a non-blank item from the bridge list saying that this is for advanced users and make sure you know what you are doing (it’d be helpful to remind this could be used for installing SoftEther server on a Linux router).

Extras (feel free to skip it): First-time Wizard

Under no circumstance you should pick one of the LAN ports like /eth0 to bridge. This made no sense (btw /eth0 is usually the WAN interface) and I tried it just out of curiosity and it bricked the router by boot loop (luckily there’s self-recovery to fresh state after a few crashes).

The wizard isn’t that useful as soon as you notice the so called ‘VPN server (instance)’ is called ‘Virtual Hub’ and the buttons on the screen make intuitive sense that requires little explanation.

Loading

Improved code for Toner Reset SP C250SF/DN

This is based on the Raspberry Pi implementation of the Toner chip reset:

https://gist.github.com/joeljacobs/c57550cdb4e68e3b86d6b89fb58f305d

I am using a Raspberry Pi Zero W so the chip is BCM2835 instead and I can use 100Kbps/400KBps instead of 9600 baud as in the original code

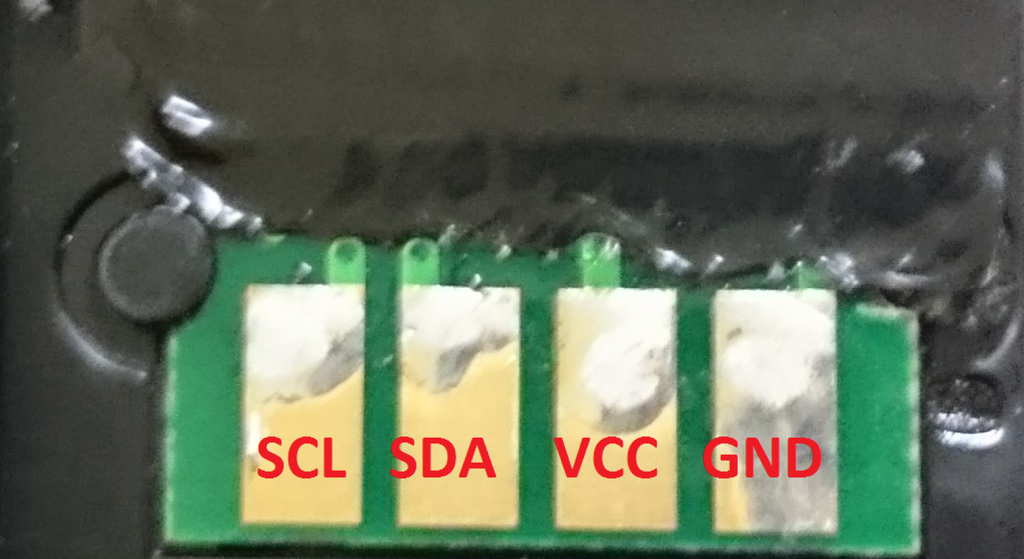
The electrical pins we need is clustered on to top left, Pins 1 (3.3V), 3 (I2C SDATA), 5 (I2C SCLK), 9 (Ground)

Raspberry Pi Zero GPIO Pinout, Specifications and Programming language

While looking for the pinouts (https://pinout.xyz/pinout/i2c), I discovered a useful tool called i2cdetect that allows me to find out the address of the chips which means I can write a program automatically figure out the right image to load to the chip without looking:

sudo apt-get install i2c-tools
sudo i2cdetect -y 1
Sorry I forgot where I got this image from.
Please remind me in the comments section if you find out who should I credit it to.

Since I don’t have cheap pogo pins lying around, I took the 2.4mm pitch (the standard size used in PC, Arduino and Raspberry Pi) jumper block I have (so all pins are set at equal lengths to make simultaneous contact) and hope somehow there’s 4 pins that kind of align with the contact, and it did. See pictures here:

Can press the pins down by using jumpers

You might be worried about shorting into the next pin or hooking something up in reverse damaging the chips, but luckily the chips survived. My guess is that it’s a good design to put the Vcc next to Ground on one side instead of making it symmetric so the polarity can be reversed. When reversed, SCL is set to low (Ground), SDA is pulled up to Vcc while there is no power supply, so no damage is done. Brilliant! The worst case for my poorly aligned jumper block is that SDA and Vcc might touch each other, but it doesn’t matter because it’s a perfectly legal hookup (just not communicating)!

So no worries if you didn’t touch the pins right! The only case it might go wrong is if you intentionally flip the block and slide it by two pins (reversing Vcc and Ground). Other cases (you are likely going to run into) are pretty much data lines getting hooked high or low levels while power lines not getting any supplies.

I’ve designed the program that it’ll detect the chip if you hook it up right and immediately program the chip (takes only a second), so you don’t have to hold the jumper for too long to worry about unstable contacts.

#!/bin/bash

# This program detects rewrite the toner chips to "full" for a Ricoh SP C250SF/DN Printer using Raspberry PI (defaults to BCM2835 models such as Raspberry PI Zero)

# The chip data is in file named "black" "cyan" "magenta" and "yellow".
# The pad closest to the edge is GND (-> Pin 9), followed by VCC (-> Pin 1) , DATA (-> Pin 3), and Clock (-> Pin 5).

# Be sure i2c is enabled and installed (it's turned off by default) on Raspbian

# This line is disabled because it takes too long to unregister i2c_bcm2835 to start from a clean slate
# modprobe -r i2c_bcm2835

# This program needs sudo permissions as it involves direct access to hardware
if [[ $EUID -ne 0 ]]; then
  echo "Need root permissions as this code involves direct hardware access. Try sudo"
  exit 2
fi

# Sets the baud rate
modprobe i2c_bcm2835 baudrate=400000

# Install i2cdetect if not exist (This idiom uses short-circuit OR for conditional exec)
command -v i2cdetect > /dev/null 2>&1 || {sudo apt-get install i2c-tools}

# Create I2C address to color map
COLORS=( [50]="yellow" [51]="magenta" [52]="cyan" [53]="black" )
# Detect chip I2C address
I2C_address=$( sudo i2cdetect -y 1 | grep 50 | sed -e 's/50: //;s/-- //g' )
# Keep the 0x5* address lines since only 0x50~0x53 is valid. Strip the 50: header, discard all "--" entries, and you are left with the detected address
HEX_I2C_address="0x$I2C_address"

# LED flash function(s)
target_device="/sys/class/leds/led0/brightness"
# This accounts for breaking changes (by renaming led0 to ACT) from Bookworm
[ -f ${target_device} ] || target_device="/sys/class/leds/ACT/brightness"

function turn_off {
  echo 0 > ${target_device}
}
function turn_on {
  echo 1 > ${target_device}
}
function toggle {
  # PI Zero only has 1 power LED which is on/off 
  # Reads 0 for OFF and 255 for ON
  readin=$(cat ${target_device})
  # Condition 255 to 1 to reduce platform dependency
  state=$[$readin>0]
  # Not equal to 1 is XOR (flip)
  flip=$[$state != 1]
  # Display output
  echo $flip > ${target_device}
}

function flash_once {
  period=${1:-0.5}

  toggle
  sleep $period

  toggle
  sleep $period
}

function flash {
  times=${1:-1}
  period=$2
  for((i=1; i<=times; i++)); do
    flash_once $period
  done
}

echo "Detecting toner chip ..."
turn_off
if [ -v COLORS[I2C_address] ]; then
  # Meat
  color=${COLORS[I2C_address]}
  echo "Detected toner chip for color: $color"

   # "address" counter sync up with the hex code index in file
   printf "Writing"
   address=0;
   datafile="${BASH_SOURCE%/*}/${color}"
   for i in $(cat $datafile); do
     i2cset -y 1 ${HEX_I2C_address} $address $i; || break
     address=$(($address +1));
     printf .
     flash 1 0
   done
   echo "Done!"
   turn_on
else
  echo "Invalid I2C address for SP C250DN/SF toner chips. ${I2C_address}"
  turn_on
  exit 4
fi

Turns out Linux’s dot sourcing (bash calling) syntax is relative to your current folder, not the scripts’ folder. So if you have one script calling another in the same folder when you are not currently at the same folder as the script (e.g. startup automation), the relative paths will be wrong. So instead of ./ , you should use this prefix instead:

${BASH_SOURCE%/*}/

I chose to flash the board’s only LED light quickly before starting and blink slowly a few times after it’s done for visual clues. It’s entirely optional. Here’s the guts of the code without the fancy indicators:

#!/bin/bash

# Sets the baud rate
modprobe i2c_bcm2835 baudrate=400000

# Create I2C address to color map
COLORS=( [50]="yellow" [51]="magenta" [52]="cyan" [53]="black" )

# Detect chip I2C address
I2C_address=$( sudo i2cdetect -y 1 | grep 50 | sed -e 's/50: //;s/-- //g' )
HEX_I2C_address="0x$I2C_address"

if [ -v COLORS[I2C_address] ]; then
  # Meat
  color=${COLORS[I2C_address]}

  # "address" counter sync up with the hex code index in file
  address=0;
  for i in $(cat ${color}); do
    i2cset -y 1 ${HEX_I2C_address} $address $i || break
    address=$(($address +1));
  done
else
  echo "Invalid I2C address for SP C250DN/SF toner chips: ${I2C_address}"
fi

Download the package. Run program_toner

Note: the blog page’

Just in case if people are wondering. The L01 chip’s datasheet is here:


To make a dedicated Raspberry Pi Zero device to run this script (program_toner) repeatedly on boot, I made a script loop_program_toner that runs the same program as infinite loop.

Since writing starts immediately once the chip is identified (no reason to hold the pogo pins for longer than needed), once the chip is detected, whether the writing finished successfully or not, threre’d be 5 seconds of delay so you can reseat the pogo pins (on write failure) or remove the pogo pins (so it won’t unnecessarily rewrite the chip again).

#!/bin/bash

if [[ $EUID -ne 0 ]]; then
  echo "Needs root permissions. Try sudo"
  exit -2
fi

while :
do
  bash "${BASH_SOURCE%/*}/program_toner"
  if (($?)); then
    # Wait longer to give time to detatch probe once chip is detected
    # whether the process completed successfully or not
    sleep 5;
  else
    sleep 1;
  fi
done

There are a few steps needs to auto make this automated:

  1. Have a user account dedicate to autorun the program on boot. In the example here, we’ll use Raspberry Pi’s default admin account
  2. Auto-logged on by running sudo raspi-config, select (1) System Option > (S5) Boot / Auto Login > (B2) Console Autologin
  3. Bless the said account with password free sudo rights: Run sudo visudo and add this to the end (replace admin with something else if you chose a different username)

admin ALL=(ALL) NOPASSWD:ALL
  1. Call loop_program_toner in ./profile or ~/.bashrc (startup script). Can place this at the bottom if your package folder is ~/spc250dn :
sudo ./spc250dn/loop_program_toner

The path can start with . or ~ because you are starting with at home folder anyway.


EDIT (2023-11-1): Linux people lack the backward compatibility decency again! They changed /led0 and /led1 to /ACT and /PWR under /sys/class/leds and they don’t have the decency to put in a symbolic link so old cold won’t break! WTF!

Do they have an idea how many code they’ll break and how many man hours they will waste the world to discover this breaking change when updating the distro? Non-caught exceptions just fall through and shows up as mysterious error messages!

If you want people to get the memo and change their code to match a more sensible notation, feel free to put in a warning stub, but hell no to just flip a switch and watch the world scream! This is apparently not a difficult decision to make when adding backward compatibility would be a huge project because of some catch-22 conditions!

ARM: dts: Standardise on the upstream LED names · raspberrypi/linux@ea14f14 (github.com)

Raspberry Pi Zero only has one LED which is /led0 (/ACT), so ignore /led1 (/PWR).

Loading

Get myself comfortable with Raspberry Pi

I2C is disabled by default. Use raspi-config to enable it. Editing config file /boot/config.txt directly might not work

Locale & Keyboard (105 keys) defaults to UK out of the box. Shift+3 “#” (hash) sign became “£” pound sign. Use raspi-config to change the keyboard.

It reads random garbage partitions for MFT assigned to FAT16 drives. Just use FAT32

USB drives does not automount by default. usbmount is messy as it creates dummy /media/usb[0-7] folders. Do this instead.

Loading

dd-wrt gotchas

dd-wrt is very a powerful firmware compared to ASUS Merlin, but the UI leaves a lot to be desired. It’s very close to editing a config file and there’s little help to what each setting. The developers of dd-wrt didn’t invest time in designing the web administration interface and used the most basic primitive HTML forms so there are no tooltip that explains the features and the interaction between different settings.

There are also some confusing (nonsensical) UI design that are a lot less work to the developer but confused users to no end. Here are the examples I’ve found so far:

  • Enabling remote admin through SSH (for embedded linux command prompt) is a two step process out of the box. You’ll need to first enable SSHd from Services -> Secure Shell before enabling SSH Management from Administration -> Management (otherwise it’s greyed out)
  • The router username (user modifiable) for dd-wrt applies to web UI only. SSH’s username remains root. They share the same password though (so login and password are decoupled in dd-wrt, they are effectively two passwords in practice except they don’t put asterisk over the username as you type). ASUS Merlin firmware’s login is consistent across both web page and SSH
  • Cron jobs is from a bare environment which means you need to manually define the paths and specify the user in the cron job syntax. e.g.
    PATH=/sbin:/usr/sbin:/bin:/usr/bin
    * * * * * root {command_to_execute}

Loading