[TLDR] Python doesn’t have RAII. C++ and MATLAB allows RAII. You can have a proper RAII only if destructor timing is 100% controllable by the programmer.
Python uses Context Manager (with ... as idiom) to address the old issue of opening up a resource handler (say a file or network socket) and automatically close (free) it regardless of whether the program quit abruptly or it gracefully terminates after it’s done with the resource.
Unlike destructors in C++ and MATLAB, which registers what to do (such as closing the resource) when the program quits or right before the resource (object) is gone, Python’s Context Manager is basically rehasing the old try-block idea by creating a rigid framework around it.
It’s not that Python doesn’t know the RAII mechanism (which is much cleaner), but Python’s fundamental language design choices drove itself to a corner so it’s stuck micro-optimizing the try-except/catch-finally approach of managing opened resourecs:
Everything is seen as object in Python. Even integers have a ton of methods. MATLAB and C++ treats POD, Plain Old Data, such as integers separately from classes
Python’s garbage collector controls the timing of when the destructor of any object is called (del merely decrement the reference count).
C++ has no garbage collection so the destructor timing is guaranteed and managed by the programmer.
Python cannot easily exclude garbage collecting classes (which breaks RAII) because fundamentally everything are classes (dictionaries potentially with callables) in Python.
This is one of the reasons why I have a lot of respects for MATLAB for giving a lot of consideration for corner cases (like what ’empty’ means) in their language design decisions. Python has many excellent ideas but not enough thoughts was given to how these ideas interact to produce unwanted/surprising side effects.
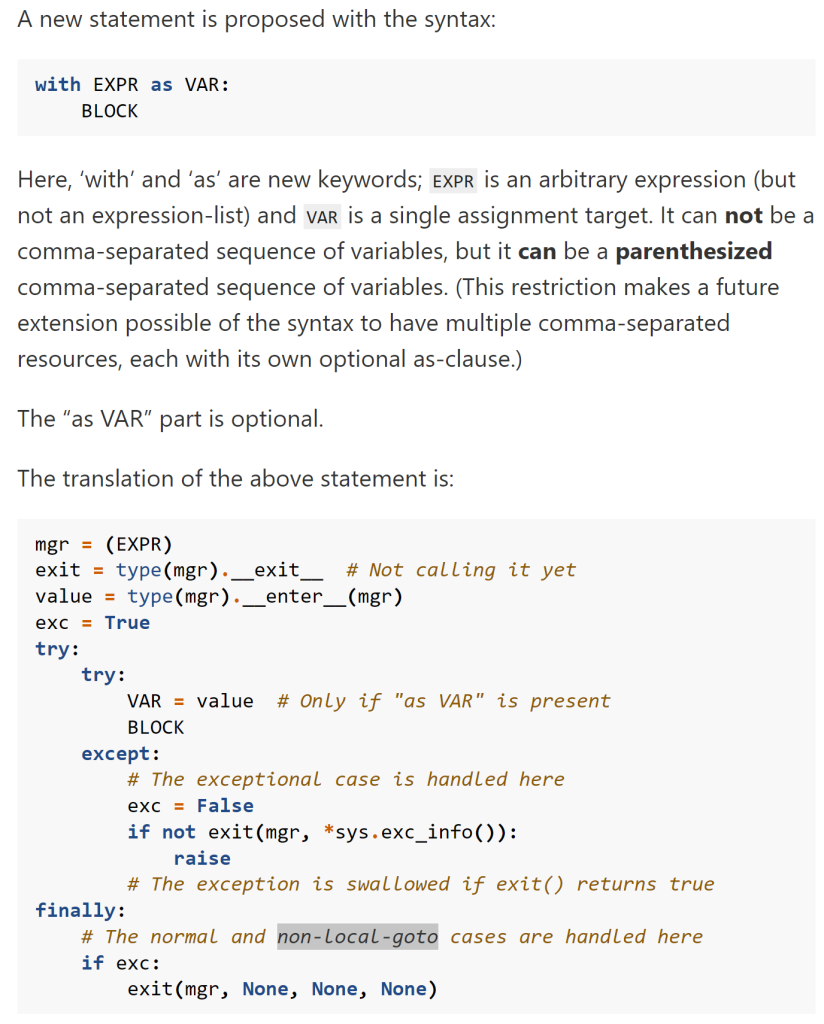
Pythons documentation says out loud right what it does: with ... as ... is effectively a rigidly defined try-except-finally block:
Context Manager heavily depends on resource opener function (EXPR) to return a constructed class instance that implements __exit__ and __enter__, so if you have a C external library imported to Python, like python-ft4222, likely you have to write in your context manager in full when you write your wrapper.
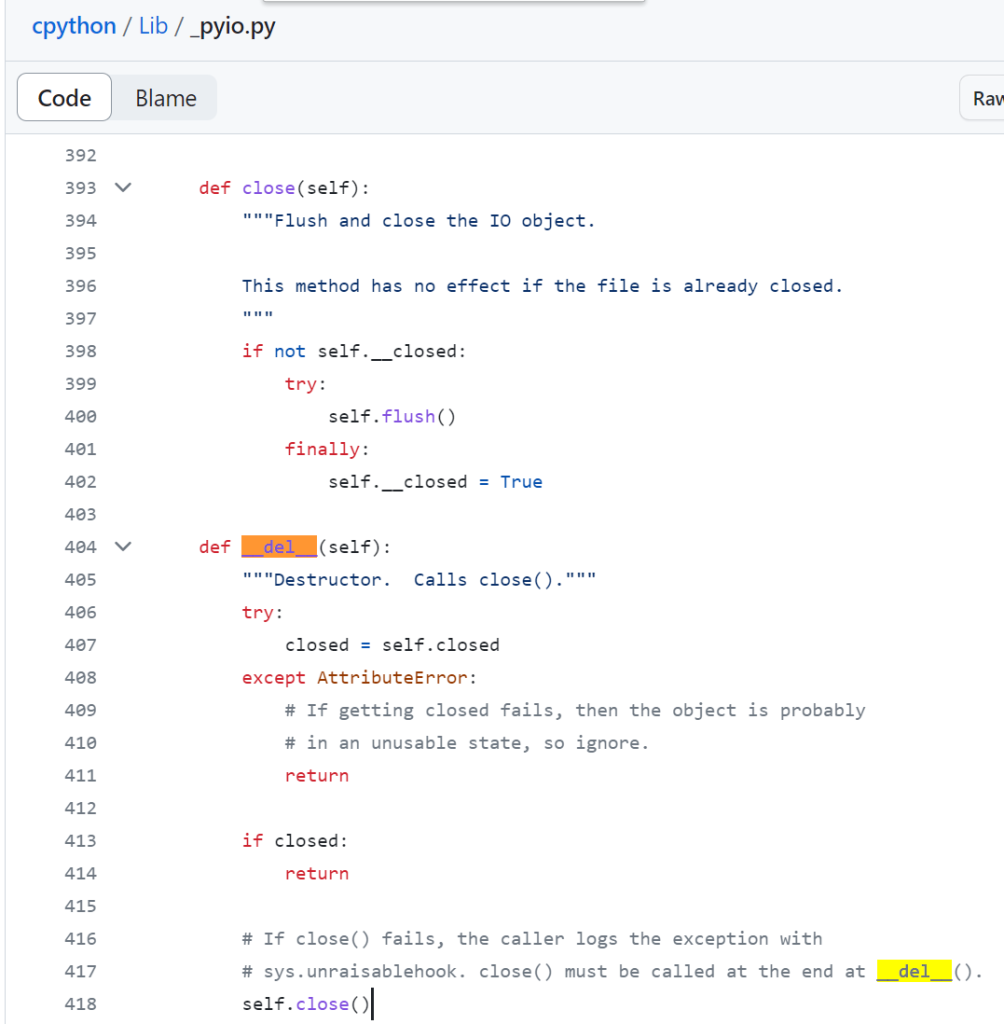
Typically the destructor should check if the resource is already closed first, then close it if it wasn’t already closed. Take io.IOBase as an example:
However, this is only a convenience when you are at the interpreter and can live with the destructor called with a slight delay.
To make sure your code work reliably without timing bugs, you’ll need to explicitly close it somewhere other than at a destructor or rely on object lifecycle timing. The destructor can acts as a double guard to close it again if it hasn’t, but it should not be relied on.
The with ... as construct is extremely ugly, but it’s one of the downsides of Python that cannot be worked around easily. It also makes it difficult for users to retry acquiring a resource because one way or another retrying involves injecting the retry logic in __enter__. It’s not that much typographic savings using with ... as over try-except-finally block if you don’t plan to recycle th contextmanager and the cleanup code is a one-liner.
This is a note-to-self page which I’ll update as I naturally revisit these ideas opportunistically.
Special numbers
: alternating signs through odd/even powers : null (trivial additive solution), invariant (sums to zero) : identity (trivial multiplicative solution), invariant (multiplies to 1) shrinks with growing powers : Odd: , Even:
Problem solving approaches
Properties of linearity, aka superposition
Find ways to see a raw definition of a concept hidden in the problem you’re solving.
Plugging in easy/obvious examples to verify a hypothesis (often used in differential equations) during exploration
Make up a convenient term or multiplier that you wish you could and hopefully the counteracting term can be pushed out or used somewhere, like or multiply the numerator and denominator both by
Special functions
Things only a constant function can do
Small goes to is the same as the small angle approximation for
Quadratics: Exploit (e.g. used in trace and det to infer eigenvalues)
Probe and extract with indicator function , elementary vector and elementary matrices , Dirac or Kronecker delta.
Calculus
Symmetric integrals cancels for odd function and doubles of one side for even functions
Series
Spotting hidden famous series (such as geometric sums)
Series expansion dropping terms
is even terms of with alternating signs starting with 1, is odd terms of with alternating signs starting with
Taylor series always have factorial at the bottom (denominator) of the coefficient matching the n-th derivative at the top (numerator) for the n-th power term.
Telescoping series (adjacent terms cancels)
Use derivative to bring down polynomial power by and create a shifted series (which can be used to recurse or cancel)
Topology
In real line topology, outside the intuitive examples (singletons included), consider universal and empty set first, rationals and irrationals, then blame Cantor.
Discrete Math (or Primes)
Modulos: generate all possible remainders of a certain modulo by multiplying.
There are two ways to access columns in DataFrame. The preferred way is by square brackets (indexing into it like a dictionary), while it’s tempting to use the neater dot notation (treating columns like an attribute), my recommendation is don’t!
Python has dictionaries that handles arbitary labels well while it doesn’t have dynamic field names like MATLAB do. This puts DataFrame at a disadvantage developing dot notation syntax while the dictionary syntax opens up a lot of possibilities that are worth giving up dot notation for. The nature of the language design makes the dot notation very half-baked in Python and it’s better to avoid it altogether
Reason 1: Cannot create new columns with dot notation
UserWarning: Pandas doesn't allow columns to be created via a new attribute name - see https://pandas.pydata.org/pandas-docs/stable/indexing.html#attribute-access
Reason 2: Only column names that doesn’t happen to be valid Python attribute names (say, no spaces) AND a DataFrame that does not have any method with the same name as the column can be accessed through dot notation.
Take an example of dataframe constructed from device info dictionaries created by the package pyft4222. I added a column called 'test me' to a table converted from the dictionary of device info. The tabe T looks like this:
I tried dir() on the table and noticed:
The column name "test me" did not appear anywhere, not even mangled. It has a space in between so it’s not a valid attribute or variable name, so this column is effectively hidden from the dot notation
flags is an internal attribute of DataFrame and it was not overriden by the data column flags when called by the dot notation. This means the flags column was also shadowed in (aka hidden to) the dot notation as there were no mangled name for it either
Even more weird is that getattr() works for columns with non-qualified attribute name like test me (despite the dot notation cannot access it because of the lack of dynamic field names syntax yet test me doesn’t show up in dir()). getattr(T, 'flags') still gets the DataFrame’s internal attribute flags instead of the column called flags as expected.
Since MATLAB doesn’t do references, iterators (by extension generators) and functions that do in-place operations do not make sense (unless you bend it very hard with anti-patterns such as handles and dbstack).
Data Types
Common
C
C++
MATLAB
Python
Sets
N/A
std::set
Only set operations, not set data type
{ , , ...}
Dictionaries
std::unordered_map
– Dynamic fieldnames (qualified varnames as keys) – containers.Map() or dictionary() since R2022b
Dictionaries {key:value} (Native)
Heterogeneous containers
cells {}
lists (mutable) tuples (immutable)
Structured Heterogeneous containers
table() dataset() [Old]
Mix in classes
Pandas Dataframe
Array, Matrices & Tensors
Native [ , ; , ]
Numpy/PyTorch
Records
struct
class (members)
dynamic field (structs) properties (class)
getfield()/setfield()
No structs (use dicts)
attribute (class) getattr()/setattr()
Type deduction
N/A
auto
Native
Native
Type extraction
N/A
decltype() for compile time (static)
typeid() for RTTI (runtime)
class()
type()
Categorical Arrays
categorical() Previously ordinal()/nominal()
pd.cut(x, bins, labels)
Native sets operations in Python are not stable and there’s no option to use stable algorithm like MATLAB does. Consider installing orderly-set package.
Array Operations
Common
MATLAB
Python
Repeat
repmat()
[] * N np.repeat()
Logical Indexing
Native
List comprehension Boolean Indexing (Numpy)
Equally spaced numbers
Internally colon(): start:step:end
linspace/logspace
range(begin, past_end, step) produces an iterator
list(range()) or tuple(range()) iterates to realize the vector
Equally spaced indexing
MATLAB has no generators, so produced vector only
[start:past_end:step] is internally slice() which produces a slice object, not range/lists/tuple. Faster but not iterable
Shallow copy
Deep copy-on-write
Slice: x = y[:] copy.copy()
Deep copy
Deep copy-on-write
copy.deepcopy()
Editor Syntax
Common
C
C++
MATLAB
Python
Commenting
/* ... */
// (only for newer C)
// (single line)
/* ... */ (block)
% (single line)
(Block): %{ ... %}
# (single line)
""" or ''' is docstring which might be undersirably picked up
Macros only make sense in C/C++. This makes code less transparent and is frowned upon in higher level programming languages. Even its use in C++ should be limited. Use inline functions whenever possible.
Python is messy about the workspace, so if you just delete
Python allows adding members (attributes) on the fly with setattr(), which includes methods. MATLAB’s dynamicprops allows adding properties (data members) on the fly with addprop
onCleanup() does not work reliably on Python because MATLAB’s object destructor time is deterministic (MATLAB specifically do not garbage collect user objects to avoid this mess. It only garbage collects PODs) while Python leaves it up to garbage collector.
*this is implicitly passed in C++ and not spelled out in the method declaration. The self object must be the first argument in the instance method’s signature/prototype for both MATLAB and Python.
Functional Programming Constructs
Common
C++
MATLAB
Python
Function as variable
Functors (Function Objects) operator()
Function Handle
Callables (Function Objects) __call__()
Lambda Syntax
Lambda [capture](inputs) {expr} -> optional trailing return type
Anonymous Function @(inputs) expr
Lambda lambda inputs: expr
Closure (Early binding): an instance of function objects
Capture [] only as necessary.
Early binding [=] is capture all.
Early binding ONLY for anonymous functions (lambda).
Can capture Po through default values lambda x,P=Po: x+P (We’re relying users to not enter the captured/optional input argument)
Concepts of Early/Late Binding also apply to non-lambda functions. It’s about when to access (usually read) the ‘global’ or broader scope (such as during nested functions) variables that gets recruited as a non-input variable that’s local to the function itself.
An instance of a function object is not a closure if there’s any parameter that’s late bound. All lambdas (anonymous functions) in MATLAB are early bound (at creation).
The more proper way (without creating an extra optional argument that’s not supposed to be used, aka defaults overridden) to convert late binding to early binding (by capturing variables) is called partial application, where you freeze the parameters (to be captured) by making them inputs to an outer layer function and return a function object (could be lambda) that uses these parameters.
The same trick (partial application) applies to bind (capture) variables in simple/nested function handles in MATLAB which do behave the same way (early binding) like anonymous functions (lambda).
Currying is partial application one parameter at a time, which is tedious way to stay faithful to pure functional programming.
List comprehension is a shorthand syntax for transform/map() and copy_if/remove_if/filter() in one shot, but not accumulate/reduce(). MATLAB and C/C++ does not have listcomp, but listcomp is not specific to Python. Even Powershell has it.
Listcomp syntax, if wrapped in round brackets like (x**x for x in range(5)), gives a generator. Wrapping in square bracket is the shortcut of casting the generator into a list, so [x**x for x in range(5)] is the same as list(x**x for x in range(5)).
Functions that yield value_to_spit_out_on_next (Implicitly return a generator/functor with iter and next)
Coroutines
Functions that value_accepted_from_outside = yield Send value to the continuation by g.send(user_input)
async/await (native coroutines)
Matrix Arrays
The way Numpy requires users to specify matrices with a bracket for every row drives me nuts. Not only there’s a lot of typing, the superfulous brackets reinforce C’s idea of row-major which is horrendous to people with a proper math background who see matrices as column-major . Pytorch is the same.
Once you are trained in APL/MATLAB’s matrix world-view, you’ll discover going back to the world where matrices aren’t first class citizens is clumsy AF.
With Python, you lose the clutter free readability where your MATLAB code is one step away from the matrix equations in your scientific computing work, despite a lot of the features that addresses frequent use patterns are implemented earlier in Python than MATLAB.
Don’t believe those who haven’t lived and breathed MATLAB tell you Python is strictly superior. No it isn’t. They just didn’t know what they were missing as they haven’t made the intellectual leap in MATLAB yet. Python is very convenient as a swiss-army knife but scientific computing is an afterthought in Python’s language design.
The only way to use MATLAB-like semi-colon to change rows only works for np.matrix() type, which they plan to deprecate. For now one can cast matrix into array like np.array(np.matrix(matrix_string)).
Even numpy’s ndarray (or matrix to be deprecated) are CONCEPTUALLY equivalent to a matrix of cells in MATLAB. There isn’t native numerical matrices like in MATLAB that doesn’t have the overhead of unpacking arbitrary data types. You don’t want to do numerical matrices in MATLAB with cell matrices as it’s insanely slow.
You get away without the unpacking penalty in Numpy if all the contents of the ndarray happens to have the same dtype (such as numerical), aka known to be uniform. In other words, MATLAB’s matrices are uniform if it’s formed by [] and heterogeneous if formed by {}, while for Python [] is context-dependent, kept track of by dtype.
Concept
MATLAB
Numpy
Construction
[8,9;6,4]
np.array([[8,9],[6,4]])
Size by dimension
size()
A.shape
Concatenate within existing dimensions
[A;B] or vertcat() [A,B] or horzcat() cat(dim, A, B, ...)
np.vstack() np.hstack() np.concatenate(list, dim)
Concatenate expanding to 3D (expand in last dimension)
cat(3, A, B, ...)
np.dstack() ‘d’ for depth (3rd dimension)
Concatenate expanding dimensions
cat(newdim, A, B, ...) then permute()
np.stack([A, ..], expand_at_axis) np.array([A, ..]) expands at first dimension as outermost bracket refers to first dimension
repelem() is just repmat() with the repetition by axes vector expanded out as variable input arguments one per dimension. Using ones vector to broadcast a singleton instead of repmat() is horrendously inefficient and non-intuitive.
Heterogeneous Data Structures
Heterogeneous Data Structures are typically column major as it is a concept that derives from Structs of Arrays (SoA) and people typically expect columns to have the same data type from spreadsheets.
While Pandas offers a lot of useful features that I’ve easily implemented with wrappers in MATLAB, the indexing syntax of Pandas/Python is awkward and confusing. It’s due to the nature that matrix is a first-class citizen in MATLAB while it’s an afterthought in Python.
Python does not have the { } cell pack/unpack operator in MATLAB, so in Pandas, you select the Series object (think of it as a supercharged list with conveniences such as handling missing values and keeping track of row/column labels) then call its .values attribute.
However, Pandas is a lot more advanced than MATLAB in terms of using multiple columns as keys and have more tools to exploit multi-key row names (row names not mandatory in MATLAB but mandatory in Pandas). In the old days I had to write my own MATLAB function with unique(.., 'rows') exploit its index output to build unique keys under the hood.
Concept
MATLAB
Python (Pandas Dataframe)
Rows
Observations (dataset()) Row (table())
Rows index
Columns
Variables
Columns
Select rows/columns
T(rows, cols)
T.loc[r, col_name] T.iloc[r,c]
Caveats:
– single index (not wrapped in list) have content extracted
– iloc on LHS cannot expand table but loc can, but it can only inject 1 row
– can get index number of names by T.get_loc() to use with T.iloc[]
Remove rows/columns
T(rows, cols) = []
T.drop(index=rows, columns=cols) Optionally: inplace=True del T[rows, cols] does NOT work
T.Properties.RowNames = T.cellstr_variablename If multiple columns are needed, need to combine them into one column using some user rules
T.set_index(column_to_use) Dataframe allows multiple columns as row index keys
Reorder or partial selection
T[rows, cols]
T.reindex(columns=..., index=...) New labels will autofill by NaN
Select columns
T[:, cols]
T[list_of_cols]
Pick column by data type
T[:, varfun(...)]
T.select_dtypes(include=[list of type names])
Pick column by string match
T[:, varfun(...)]
T.filter(like=str_to_match)
Blindly concatenate columns of 2 tables
[T1, T2]
If you defined optional rownames, they must match. You can delete it with T.Properties.RowNames = {}
Pandas assign row indices (labels) by default.
Mismatched row labels do not combine in the same row. Consider reset_index() or overwrite the row indices of one table with another, like pd.concat([T1, T2.set_index(T1.index)]
Blindly concatenate rows of 2 tables
[T1; T2]
pd.concat([T1, T2], ignore_index=True)
Format export
writetable()
.to_*()
MATLAB tables does not support ranging through column names (such as 'apple':'grapes') yet Pandas DataFrame support it. I don’t think it’s fine to use it in the interpreter to poke around, but this is just asking for confusing logic bugs when the columns are moved around and the programmer has a false sense of security knowing exactly what’s where because they are using only names.
Dataframe is a little smarter than MATLAB’s table() in terms of managing column names and indices as it’s tracked with Index() type which is the same idea as MATLAB’s ordinal() ordered categorical type, where uniques names are mapped to unique indices and it’s the indices under the hood. This is how 'apple':'grapes' can work in Python but not MATLAB.
MATLAB T.Properties.VariableNames is a little clumsy. I usually implement a consistent interface called varnames() that’d output the same cellstr() headings whether it’s struct, dataset or table objects.
MATLAB’s table() by default do not make up row names. Pandas make up row names by default sequentially.
MATLAB table() do requires qualified string characters as variable names. Dataframe doesn’t care what labels you use as long as Index() takes it. It can get confusing because you can have a number 1 and ‘1’ as column headers at the same time and they look the same when displayed in the console.
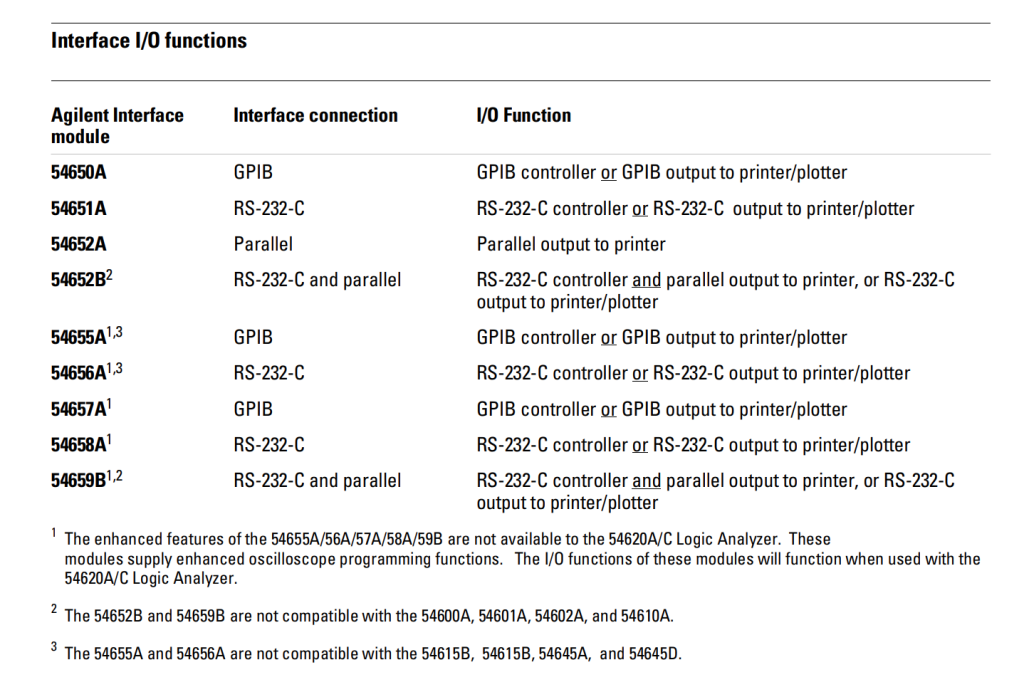
FFT/Time & Math License/Memory: 54657A (GPIB), 54659B (Serial+Parallel)
Serial + Parallel: 54652B (no FFT), 54659B (with FFT)
The matching oscilloscopes/logic analyzers are sorted into 3 main sub-generations:
Too Old (Cannot understand Serial+Parallel): 5460XA, 54610A
Everything in between: 5460XB, 54610B, 54620X
Too New (Cannot understand TAM): 54615/6B (I suspect C too), 54645A/D
Logic Analyzers (54620A/C) is considered “Everything in between” and it gleefully disregards the Test Automation/FFT features as they are only relevant to analog signals.
Only FFT modules have a RTC to keep time. TAM modules are too primative to have this.
The “Too Old” scopes have newer firmware available that handles FFT (which you need to upgrade by a chip swap if the firmware is too old), but they still don’t understand multiplexing serial & parallel lines they are stuck with 54657A.
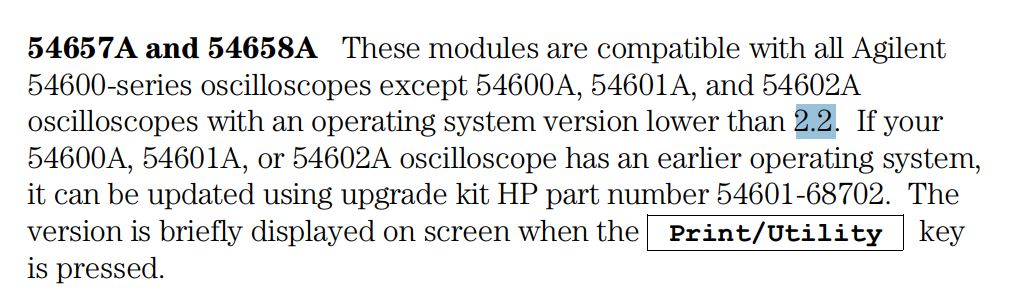
54657A covers the broadest range of oscilloscopes (everything). 5460XA with a firmware lower than 2.2 can be updated to use this module.
If you want the FFT and serial port together. There’s only one choice which is 54659B and you have to avold the “Too Old” oscilloscopes. 546XXA is no go. It works for 5460XB if you upgrade it to firmware 1.2 or above.
It’s hard to keep track of this compatibility matrix below. That’s why this blog post explained the reasoning by categories above. It really boils down to what features that are too new (multiplexing serial+parallel port) for an old firmware and what features (TAM) the newest firmware dropped support for.
 : alternating signs through odd/even powers
 : null (trivial additive solution), invariant (sums to zero)
 : identity (trivial multiplicative solution), invariant (multiplies to 1)
 shrinks with growing powers
 :
: 
 , Even:
 or multiply the numerator and denominator both by
 goes to
 (e.g. used in trace and det to infer eigenvalues)
 , elementary vector
  and elementary matrices
  , Dirac or Kronecker delta.
 is even terms of
  with alternating signs starting with 1,
 is odd terms of

 . Pytorch is the same.