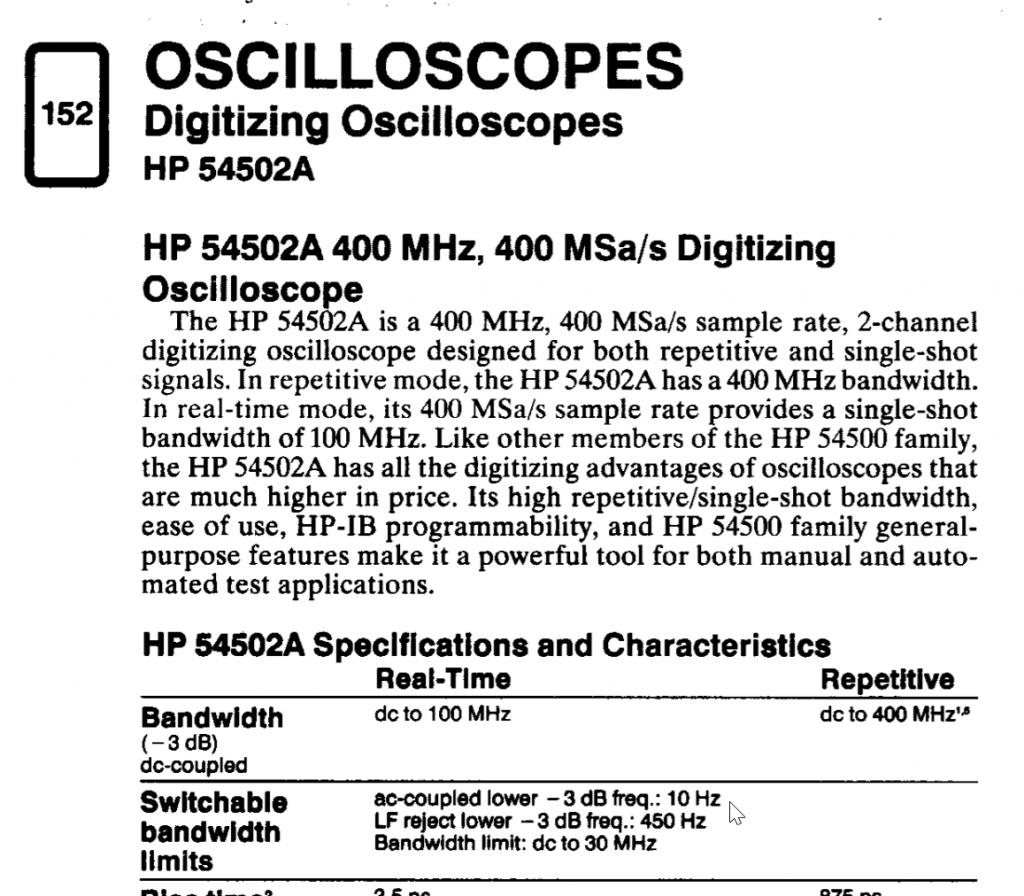
The cutoff frequency of 10Hz on the datasheet is a typo. Better scopes at the time claims 90Hz. 10Hz is just too good to be true.
Found the specs from the service manual:
Don’t be fooled by the -3dB cutoff and ignore how wide the transition band can be (depends on the filter type and the order). Turns out this model has a very primitive filter that AC couple mode still messes square waves below 3kHz up despite the specs says the -3dB is at 90Hz. You better have a 30+ fold guard band for old scopes!
Remember square wave pulse train in time domain is basically a sinc pulse centered at every impulse of the impulse train in frequency domain superimposed. Unless you have a tiny duty cycle (which is not the case for uniform square waves, they are 50%), the left hand side of the sinc function at 1kHz fundamental still have sub-1kHz components that can be truncated by the AC coupling (high pass filter).
I’m trying to cross compile my router’s firmware as I made a few edits override the update DDNS update frequency. Turns out it doesn’t work on the latest Linux so I’d need to run an older Ubuntu just to keep it happy.
RANT: Package servers keep pulling the rug on outdated linux frustrates the hell out of me. Very often developers didn’t make a whole installer for it so we are often wedged between downloading a package at the mercy of its availability from package managers and their servers or compiling the damn source code!
With the promise that Qemu might have less overhead than Hyper-V or VirtualBox (indeed it observably is), I tried installing Qemu on Windows host and it turned out to be a frustrating nightmare.
RANT: Linux is not free in the sense of free beer. The geniuses did the most sophisticated work for free but users pay time and energy cleaning after them (aka a support network dealing with daily frustrations) to make these inventions usable. There’s a company that does the clean up to make BSD (same umbrella as Linux/Unix) usable and made a lot of money: it’s called Apple Computers (since Steve Jobs’ return).
qemu is just the core components. System integration (simplifying common use cases) is practically non-existent. Think of them as the one who produced an ASIC (chip) and the end-user happens to be the application engineers. There’s a few tutorials on qemu Linux hosts for moderately complex scenarios, but you are pretty much on your own trying to piece it altogether for Windows because there are some conceptual and terminology differences. The man page --help for the qemu’s Windows host’s VM engine was blindly copied from the Linux hosts counterpart, so it tells you about qemu-bridge-helper which is missing.
I stupidly went down the rabbit hole and drained my time on qemu. So I documented the quirks to help the next poor sap who has to get qemu running on Windows 10 host efficiently over Bridged-Adapter (VirtualBox lingo) networking mode.
Preparation work to get HAXM accelerator set up
Release VT-d (hardware assisted virtualizations) so HAXM can acquire it
You’ll need to remove Hyper-V completely as it will hoard VT-d’s control
Windows Sandbox and Windows Subsystem for Linux (WSL2) uses Hyper-V. If you just unchecked Hyper-V in Windows Optional Features leaving any of these 2 on, Hyper-V is still active (it only removes the icons)
HAXM v7.6.6 not recognized by qemu on clean install. Install v7.6.5 first, then remove it and install v7.6.6. Likely they forgot a step in v7.6.6’s installer
Turn on optimization by: -accel hax
Command line qemu engine
qemu-system-{architecture name}.exe is what runs the show
qemu-system-{architecture name}w.exe is the silent version of the above engine. Won’t give you a clue if something fails (like invalid parameters)
qemu-img create -f {format such as vhd/qcow2} {hard drive image name} {size like 10G}
QtEmu sucks, and they lack any better GUIs out there!
It’s basically a rudimentary command line’s GUI wrapper
It only has user mode (SLIRP) networking (default)
It’s not maintained actively so it doesn’t keep up with the parameter syntax changes (i.e. can generate invalid combinations)
Since it uses the silent (with a w suffix) engine, likely to avoid a lingering command window, it also won’t tell you shit and why if something fails. It just ignores you when you press the start button unless all the stars align (you got everything right)
Basic command line parameters
Set aside 10G for the VM: -m 10G
1 core if unspecified. Number of available threads (in hyper-threaded system) show up as # of processors. It’s referring to logical processors, not physical cores.
Windows: -smp %NUMBER_OF_PROCESSORS%
Linux: -smp $(nproc)
Attach virtual hard drive: -hda {virtual hard drive file name}
Attach optical drive (iso): -cdrom {iso file}
I typically want Bridged-Adapter option from VirtualBox, which means the virtual NIC plugs into the same router as the host and just appears as another computer on the same network as host. This is broken into a few components in qemu and you have to manage them separately. Great for learning about how Bridged-Adapter really works, but a lot of swearwords coming from people who just want to get basic things done.
Networking in QEMU is another can of worms if you deviate from the default SLIRP (user mode). I figured out how to work it, but the network bridge is faulty and it keeps crashing my windows with BSOD on bridge.sys with varying error tag. I have short glimpse of it working if I move very fast. Looks like the TAP driver is corrupting the memory as the bridge became very erratic that I see error messages deleting it and have persistent BSOD when the bridge starts after the VM hanged at the TAP bridge on boot.
I listed the steps below to show what should have been done to get the Bridge-Adapter (VirtualBox) equivalent function if there are no bugs in the software, but hell I’m throwing qemu for Windows to trash as it’s half-baked.
First, of all, you need to install OpenVPN to steal its TAP-Win32 virtual network card. It’s not VMware or Virtualbox that it’s part of the package. Qemu didn’t care to tightly integrate or test this driver properly.
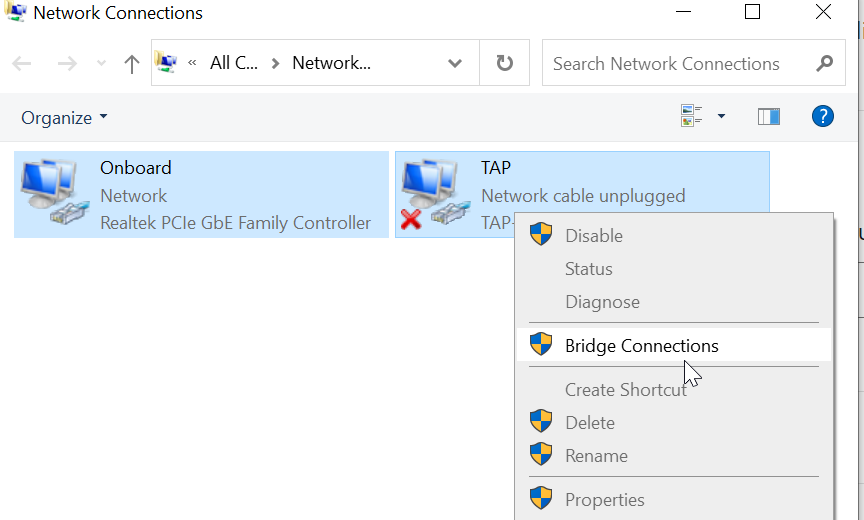
Then you’ll need to bridge the “TAP-Windows Adapter (V#) for OpenVPN” with the network interface you want it to piggy back on.
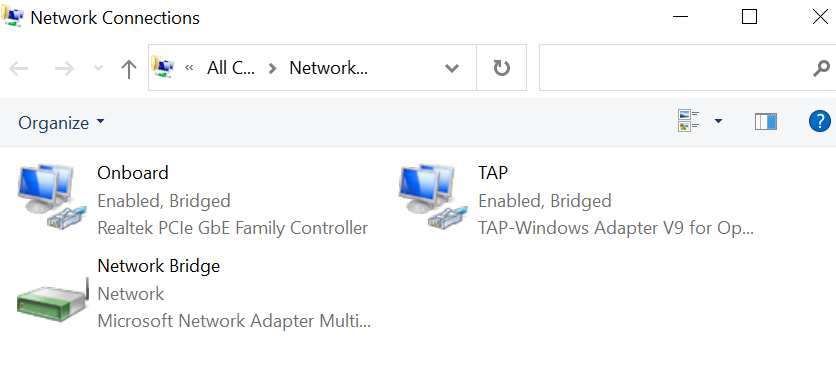
The name of the TAP adapter is what you enter as ifname= parameter of the tap interface in qemu command line. You have to tell qemu specifically which interface you want to engage in. I named the virtual network card as ‘TAP’ above. After bridging it looks like this:
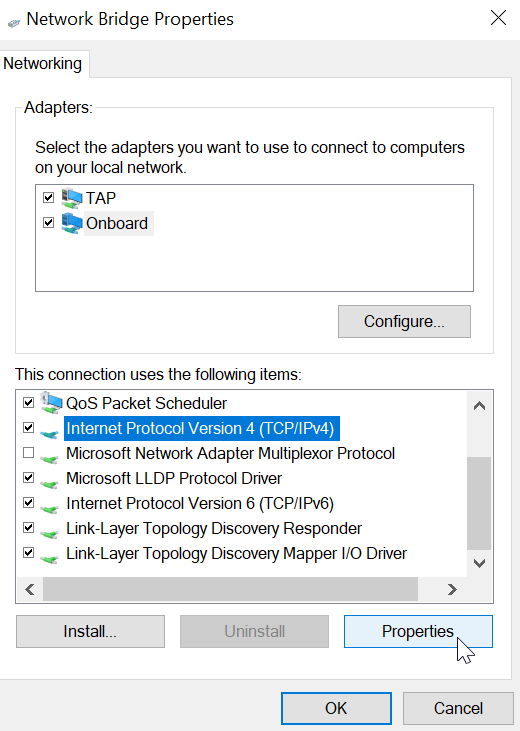
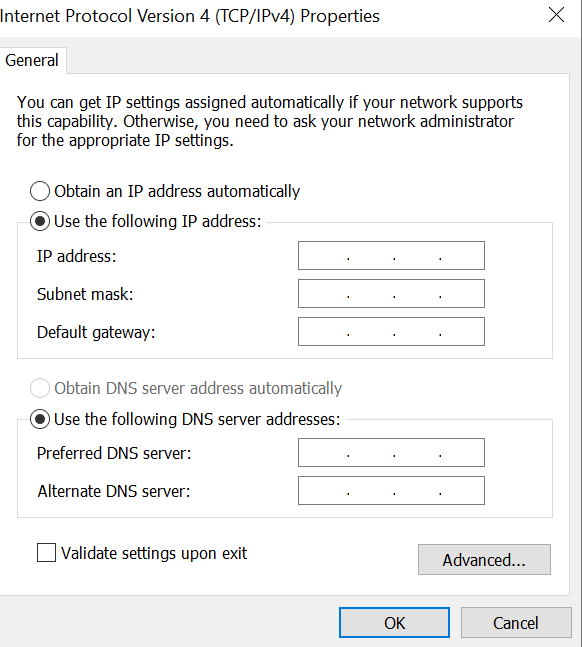
You are not done yet! The bridged network (seen as one logical interface) is confused and it won’t be able to configure with your physical network card’s DHCP client. You’ll have to go to the properties of the Network Bridge and configure the IPv4 with static IP.
You can use ipconfig /all to find out the relevant adapters acquired DHCP settings and enter it as static IP. Coordinate with the network administrator (can be yourself) to make sure you own that IP address so you won’t run into IP conflict if you reboot and somebody took your IP.
After these are all set up the parameter to add to qemu call is:
-nic tap,ifname=TAP
There are complicated settings like -net nic and -netdev -device. These are old ways to do it and have bloated abstractions. -nic switch combined them into one switch.
Then welcome to the world of Windows 10 bridge.sys crashing frequently and you might get a short window of opportunity that it boots and ifconfig acquire the IP address settings from your router (or network the physical adapter is on)’s DHCP server.
It’s like a damn research project finding out something is technically feasible but definitely not ready for production. Welcome to the FOSS jungle!
Postscript: I put Hyper-V back and realized it’s insanely slow with Linux Mint as it does not support hardware graphics acceleration. It’s night and day of a difference. Qemu is fast, but it crashes on Windows 10 if I bridge the adapters!
Aria2 is a convenient command line downloader that works like curl/wget on http/ftp, but it also support many other protocols, and it aria2 natively multipart download!
# Install the base (core) software first
# This example is for entware
opkg install aria2

# Download the package from Github zip to /opt/tmp
wget -c -O /opt/tmp/webui-aria2.zip https://github.com/ziahamza/webui-aria2/archive/master.zip --no-check-certificate

# Make sure you have some web server installed (nginx, httpd, apache, etc.)
# Nginx HTTP server instructions
# https://hqt.ro/nginx-web-server-with-php-support-through-entware/
# Make sure you know what {Webroot} is
# for Nginx, {Webroot} is /opt/share/nginx/html

# Unpack to the zip file at /opt/tmp and clean up the zip
unzip /opt/tmp/webui-aria2.zip -d /opt/tmp/ && rm /opt/tmp/webui-aria2.zip
# Move/rename to desired location
mv /opt/tmp/webui-aria2-master {Webroot}/aria2
Nginx defaults to port 82 (change it to where you set your web server). The WebUI can be accessed at http://your_server_here:82/aria2/docs.
/doc is inconvenient, so I created a redirection by placing this index.html under aria2’s root folder:
The RPC host breaks out of the box because the you’ll need to make a few adjustments to /opt/etc/aria2.conf before you can start the service without crashing it (so the WebUI of course will complain with a lot of cryptic error messages):
# Basic Options
dir={Change it to a viable folder that has enough space if /opt/var/aria2/downloads
 is is not big enough}

# RPC Options
# Unless you want to get a certificate, you'll need to use unsecure mode:
rpc-secure=false
# Change your rpc-secret to be matched in "Connection Settings" in the WebUI
rpc-secret=whatever_passphrase_you_like
After you get the config file correct
# Start the installed aria2 service
$ (the package already have a service wrap over aria2c)
# aria2 seem to assume it's port 81 so the init.d script has a "S81" prefix, but aria2 does not control the port, where you put the WebUI in http. So it's just a cosmetic filename naming convention.
/opt/etc/init.d/S81aria2 start
If the service wouldn’t start (some bad configs might have the service reported as “done” and after you check again in a second with “S81aria2 check“, it’ll report as “dead”. You can debug by looking at what went wrong at /opt/var/log/aria2.log. That’s how I figured I need to turn off “rpc-secure” parameter.
There’s a powerful Gmail web interface replacement for your regular mail hosted anywhere called Mailpile. Think of it as Thunderbird but hosted like a web page. There are a few things I liked about in the process of freeing myself from Gmail:
Free to use any email (storage) services and not tie your client to it
View multiple accounts at the same time (NextCloud won’t do it)
Very clean, concise interface that makes sense (Gmail users will be comfortable with it)
Very security and privacy conscious with attention to details! It even encrypts your local email cache and search index if you want to (performance penalty)
Excellent email setting autodetection. Just type your email account and everything’s set up for you!
The only downside is that the documentation is a little lacking. There are a few concepts that are not explained that’d confuse and scare users away. That’s why I’m explaining it here.
This is a headless service where the interface is webpage you access on a web browser.
It’s originally designed to install and run as a local web server where you access mailpile.
Call mailpile (can create a shortcut) and it’ll try to launch the correct page for the mailpile client.
Mailpile does not maintain a separate user registry: it uses the hosting computer’s native user manager
Log into your mailpile using the user account name of the computer where mailpile is installed!
Advanced concepts
Install multipile instead if you want other computer to access the headless service
You’ll need login to the computer that hosts the headless mailpile and run mailpile AS the user you want to setup once to establish the account before use.
# Currently there's only Debian-like distributions (because it uses apt-get)
# These instructions do not assume direct root account. Use sudo instead

# Install pre-requisite packages: curl apt-transport-https gnupg
sudo apt-get update && sudo apt-get install curl apt-transport-https gnupg

# apt-key add {contents of the package signing key provided by mailpile.is)
curl -s https://packages.mailpile.is/deb/key.asc |sudo apt-key add -

# Register mailpile.is's package server with Debian apt package manager
echo "deb https://packages.mailpile.is/deb release main" |sudo tee /etc/apt/sources.list.d/000-mailp.list
# NOTE: Official instruction says 000-mailp instead of 000-mailp.list
#       You need to have some file extension as apt-get checks

# Multipile (mailpile-apache2) = Mailpile + (allowing access from other computers through apache)
sudo apt-get update && sudo apt-get install mailpile-apache2

# You'll need to run mailpile as the user once to establish your account with mailpile before use
mailpile
# If you are on terminal interface instead of web interface, enter 'setup' at mailpile prompt:
> setup
# Follow the instructions on the web interface for setup if you do not use terminal mailpile client interface
My email service provider has recently pulled the plug on TLS 1.0/1.1 support as they reached end-of-life. This means old email clients not written for TLS 1.2 and above will not work when it tries to connect to the server with SSL support!
Google did this in 2014 but offered a compatibility option called “allow less secure clients”. Back then I didn’t know it means TLS 1.0/1.1 until I learned it the hard way when my shared hosting email provider pulled the plug on the old TLS protocols and I scrambled to figure out my email stopped working with cryptic IMAP errors (like suggesting my computer might be lacking memory, which is not true).
One method to continue using the old clients is through tunneling. You use something line sTunnel to act as a non-SSL server to your email client (usually localhost if installed on the same computer as the email client) and the tunnel server will on your behalf talk to the real email server with proper TLS settings (provided by your email service provider).
Stunnel config that needs to be changed from defaults. If stunnel was installed by entware (opkg), the config file is in /opt/etc/stunnel/stunnel.conf.
Disable (comment out) drop privileges
Remove the [dummy] section since we are going to set up sections for each (server, port) pair. stunnel won’t start without any port forwarding sections.
It already has an [imap] section that’s commented out. Change the local port number and the target server url:port to your liking. Do [pop] if you use POP3 email instead of SMTP
Do the same by adding a [smtp] section for outgoing email
You might need to comment out
; You might need to comment out this drop privilege (3rd line in default conf file)
;setgid = nogroup

; Examples of forward sections with a '50' prefix to SSL port numbers to 'convert it to non-SSL' heading to stunnel
[imap]
client = yes
accept = 50993
connect = target_server:993


[smtp]
client = yes
accept = 50465
connect = target_server:465
Can look at the log by just executing stunnel. Use Ctrl+C to quit monitoring the logs.
Of course you want to make sure the stunnel service/server is always started on boot. If you are using entware (or jffs scripts) for your router, add the call to stunnel to /jffs/scripts/post-mount and make sure you set the script to executable so it’ll run:
#!/bin/sh
...
stunnel
Note that it’s post-mount because entware packages are installed on persistent storage (like USB drive or SD card in your router) that needs to be mounted before the files can even be read.
Remember to go to your old email client and change the email server address to computer running stunnel service (can be the same computer as the client, a raspberry pi, or a router). Unless you are managing a company with many old email clients, I recommend installing and configuring stunnel on the same OS which the old mail program runs instead of relying on a centralized router to manage it because it’d be very confusing if the centralized stunnel service is down and you don’t get any warnings that are not cryptic (as mentioned at the beginning of this article).