The firewall rules in MerlinWRT just quit working so the table I entered doesn’t do anything. Seems like other people had the same problem too. So if you just use the WebUI, it’s either turning the firewall all on or all off.
There’s a twist in configuring the firewall with iptables in routers: the instruction you got on the Internet often append the entry to the end of the table in the section (they use the -A switch) and they didn’t explicitly tell you that’s what they are doing and what the implications are.
Turns out when you enable the firewall in the router, it enters a table of DROP ALL lines, which is supposed to be a catch all after all the exceptions you spelled out! You are supposed to enter the exceptions BEFORE the default entries set by the router, not append after, so the packet you want to accept gets fished out before it reaches the catch all (drop all) entries entered by the router automatically when you turn on firewall. So the solution is to replace the -A (append) switch with -I (insert) switch
As for putting SoftEther VPN on MerlinWRT, here’s the commands to type in SSH to add the firewall rules to open the port, which is what the broken WebUI interface was supposed to do:
This line opens SoftEther’s standard ports 443,992,5555,8888, all TCP only.
Don’t even think of using iptables-save as the router do not have persistent storage other than /jffs or USB. I suspect iptables-save merely writes to RAM disk so the changes will be lost on next boot.
You’ll need to put this line in/jffs/scripts/firewall-start script instead. If this is a new file, make sure you chmod +x /jffs/scripts/firewall-start to make the file executable.
Well it’s not too bad of a design after-all since it’s a mess to fish out the iptable lines you want to delete, so keeping your changes in a file to be loaded with the firewall on boot is a smart move.
If all your devices downstream that you forward incoming traffic to (aka servers) has firewalls, the built-in firewall mainly protect the router itself, so if it gets too frustrating, it might not be too big of a deal to turn the router’s firewall off.
There’s also another weird behavior that if the port is firewall blocked, the server admin program intermittently still connect but it connects to a blank state server (blank config). WTF!
DD-WRT came with SoftEther VPN and it looked pretty scary because it shows no user interface and a box for you to enter a config file!
Turns out SoftEther VPN’s Remote Admin interface is basically a tool that takes all user settings, generate a config file and upload it to the server behind the scenes!
Concepts to know
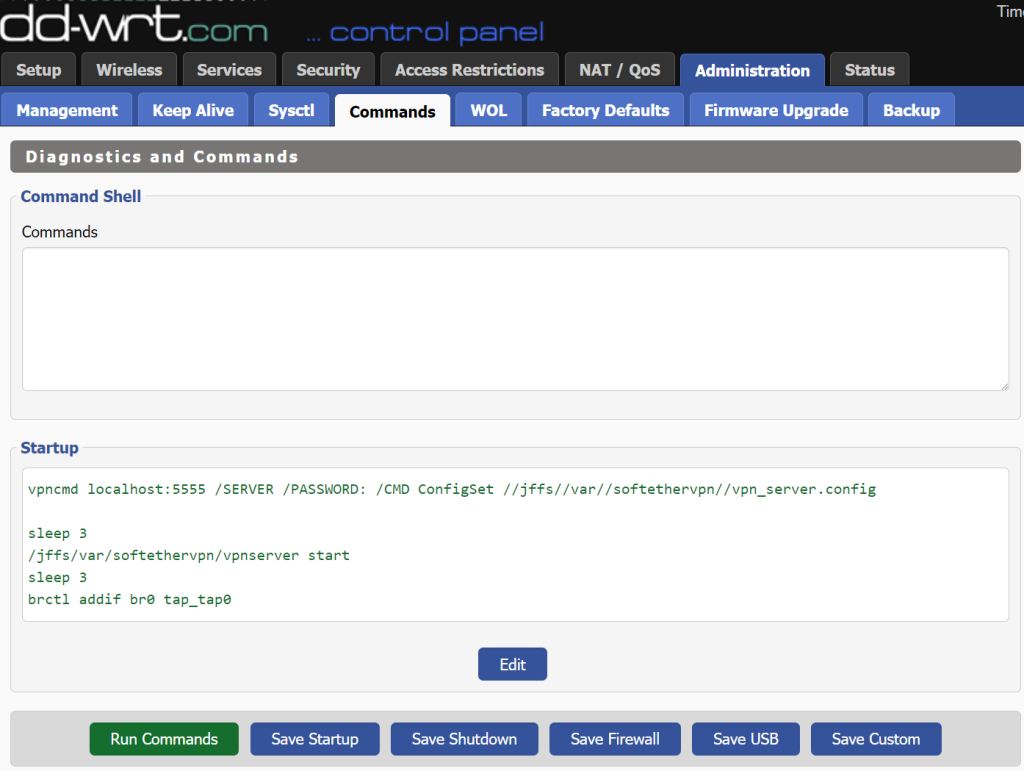
vpn_server.config is the core file the defines the server.
SoftEther VPN Server Manager (The remote admin program) is basically a tool to generate the config text string from the UI and pass it to the server’s memory (not file yet until the server stops and flushes its config state out)
Default location of the config file
SoftEther by default reads and writes the vpn_server.config file which controls everything in a JFFS folder. So you are better off identifying it by doing a path search because they move around from version to version of dd-wrt:
find /jffs -name vpn_server.config
So for my case the core file path is
/jffs/var/softethervpn/vpn_server.config
Config file’s file access/update mechanism
SoftEther’s explicitly stated that their config file (vpn_server.config) handling mechanism does not flush the current state in use to the file until the server stops. So it has the following behavioral implications:
Changes made by the admin program is reflected immediately despite no file is updated
If you change the config file while the server is running, the changes will be lost/overwritten as the server flushes the data on RAM to disk
If you abruptly power off the server, the changes made while the server is running (through the remote admin program) is lost as it doesn’t have a chance to flush the updated state out.
If you read the config file while the server is running, you are not getting the changes that are currently done through the Manager (Remote Admin) program.
In summary the config file is stale while the server is running.
When loading the config file to the server by any means (command or GUI), the server parses the entire file and immediately scan and act on the new state defined by the config file (eager execution), not waiting for the next turn the specific state is accessed (lazy execution).
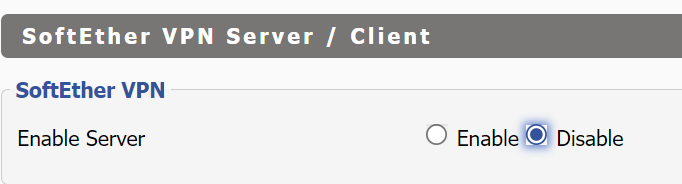
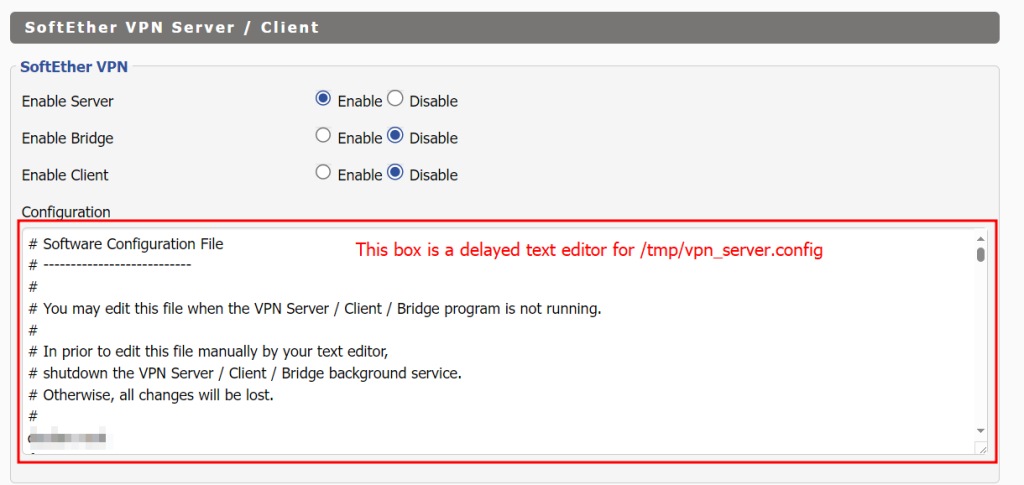
Softether on DD-WRT has no memory out of the box!
Disable this WebUI section entirely and script it yourself!
Out of the box the DD-WRT did not specify which config file to tie to (or open with by default) so the config received from the Server Manager only stays in memory and is not written anywhere! WTF!
So every time I reboot, the settings are totally lost and I have to re-enter it from scratch. Linux mentality again! People did the hardest fun work showing off how smart they are yet their software doesn’t gain the mainstream adoption because nobody ties up the loose ends so the 95% excellent work got sabotaged by the 5% loose ends that are not tied!
Turns out Softether, if enabled in DD-WRT‘s web UI, will always boot with a blank config which makes it useless!
The stuff in the Web UI in general loads BEFORE the startup (user custom) scripts! This means you are opening the router up for a few seconds of confused state before your startup scripts loads your custom config file to Softether on the fly!
This few seconds of sloppy logistics has more sinister effects than the designer expected (I bet he thought loading a config on the fly later is good enough)! When we connect to the Softether server admin tool while it’s on a blank config, it will ask the user to create a new password then write it as a new config! If you finished initializing a blank config (creating a new password) before your startup scripts kick in with the old config file you meant to load, you just nuked your intended config file by overwriting it with a blank you just initialized with your new password!
This means the whole Web UI on Softether is a disastrous TRAP! Disable it!
Softether is pre-installed and you must enable Softether solely from startup scripts to avoid this undesirable behavior that you might accidentally overwrite your config file with a blank!
Luckily by reading the source code, I realized that the pre-installed Softether won’t be neutered if we don’t enable it in the Web UI. The Web UI primiarly calls vpnserver start to start the Softether service, which we can do it ourselves LATER in our custom startup scripts. This means we can safely just disable the Web UI’s garbage Softether section.
Script it yourself
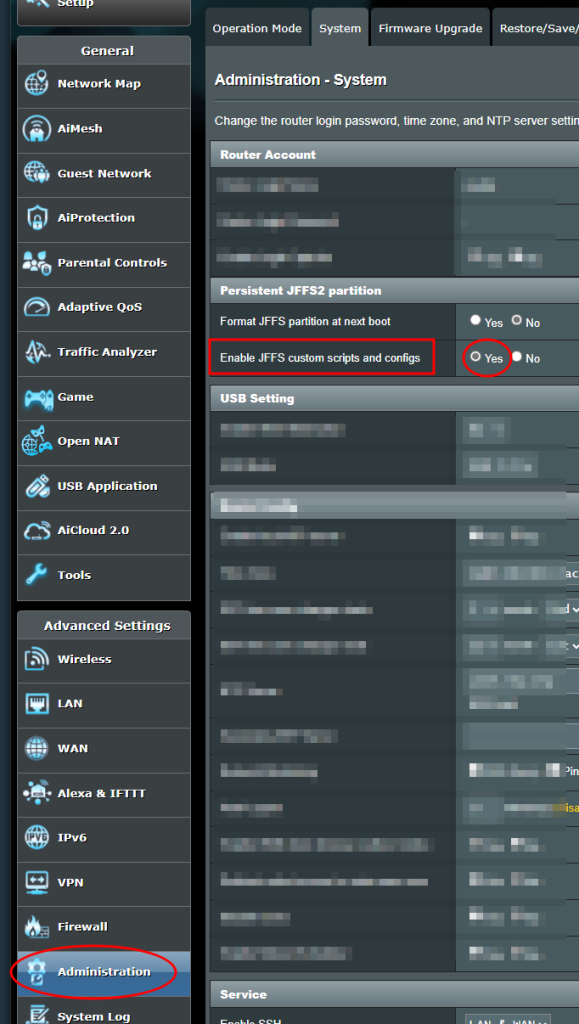
You need to start by enabling JFFS (if not already done so) so you can put in your own startup scripts and saved config file.
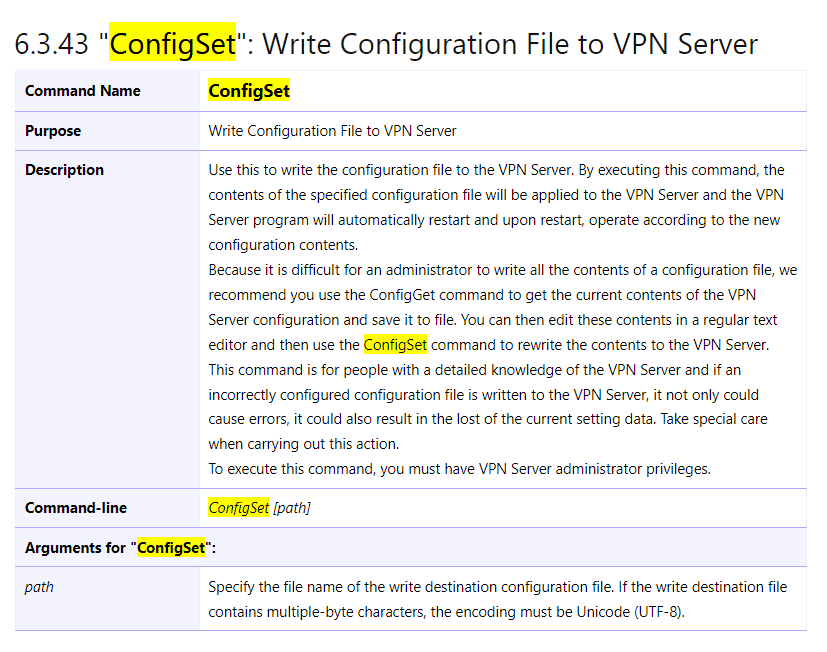
Step 1: Load the config file into the running server’s memory on start
vpncmd is a prompt based command line user interface like diskpart, but there’s a shortcut to log into the server and execute a command like ConfigSet in one line instead of starting vpncmd first then type the syntax, which is the /CMD switch:
Note that the program uses ‘//’ for the path names to prevent the ‘/’ symbol from being misinterpreted as a command switch.
Technically you can load any config file anywhere, but if you want to read the config file SoftEther VPN server flushes out (the most updated state after your changes through the Remote Admin interface), stick with loading the default path. This is likely what most people wanted (closes to live edit).
/SERVER merely means the remote admin interface is going to administer a SoftEther VPN Server/Bridge, not Client, or VPN tools mode. Yes, you can puppeteer the Client setup managing connections from elsewhere with the all-in-one vpncmd tool, so the distinction is necessary.
/PASSWORD: should be left empty as the SoftEther VPN server ALWAYS start in a blank state (with a blank password) until you explicitly tells the server program to load a config file into its memory. The server starts blank is the reason we had to go through this drivel in the first place. If you had a set password, you already had a config file loaded.
Step 2: Enabling the server after the configuration file is loaded
I typically give it around 3 seconds for the changes to reflect after loading the config file before doing anything else with it. Wait 3 seconds then start the server
sleep 3
/jffs/var/softethervpn/vpnserver start
The server must be started BEFORE briding TAP interface in the next step because Softether programmed it robustly: the TAP inteface has the same lifetime as when the Softether server is active. It doesn’t exist if the Softether service (vpnserver) didn’t start, and the TAP interface is gone after the service stops.
Step 3: Add the TAP adapter to the LAN Bridge
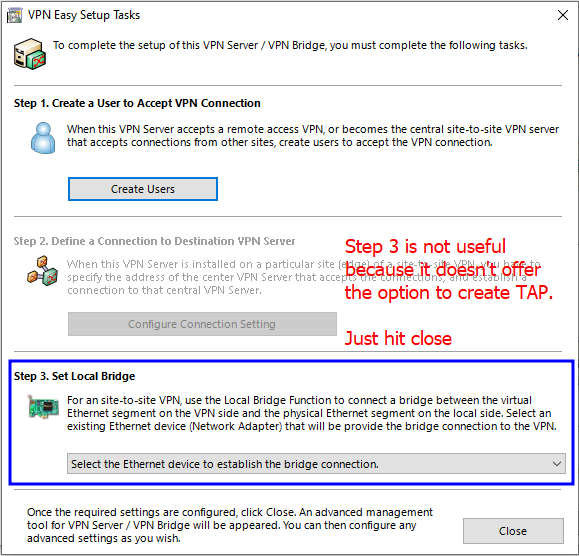
This part is described in my other article for a different router firmware platform (Merlin WRT), but the same idea translates here: you need a TAP adapter to put SoftEther VPN Server on a Router, despite SoftEther UI has the option to create the TAP adapter, it doesn’t have the feature to add that newly created TAP adapter to the LAN bridge and therefore renders the feature useless out of the box the way it came with DD-WRT!
The good part about DD-WRT is that the tun kernel module is already loaded so SoftEther VPN server can freely make the TAP adapter (for Merlin you need to modprobe tun first).
Since the TAP adapter only appears when SoftEther’s VPN is running WITH with config file that defines the TAP adapter, you have to make sure give enough time for the TAP adapter to finish building before attempting to bridge it or it’d fail!
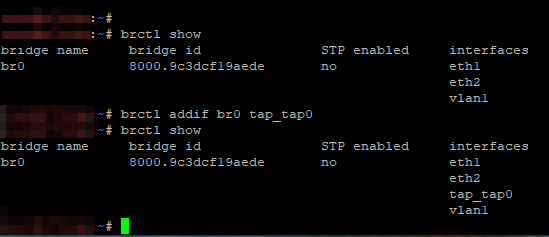
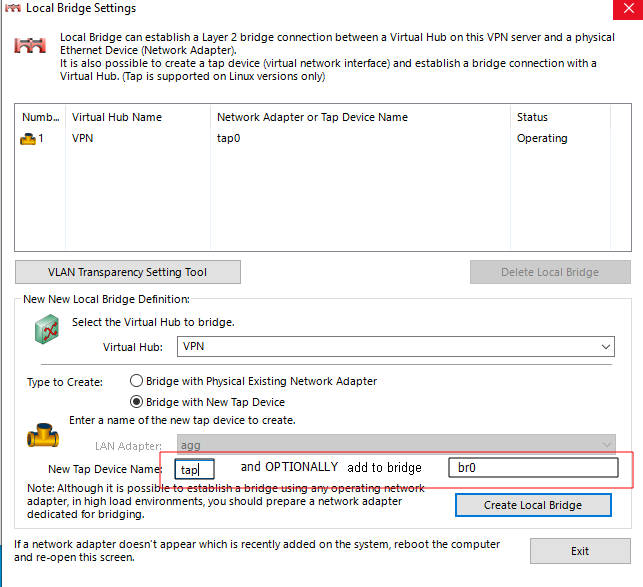
If you call your TAP adapter tap0 in SoftEther’s config, it’s called tap_tap0 in Linux when it exist. Most often the LAN bridge is called br0, so if you have these common default names, the command to add the TAP interface to the LAN bridge is
sleep 3
brctl addif br0 tap_tap0
Of course replace the names accordingly. You can check the names by ifconfig or ip link show, or use whichever tool you know that lists all network device and adapters.
Summary
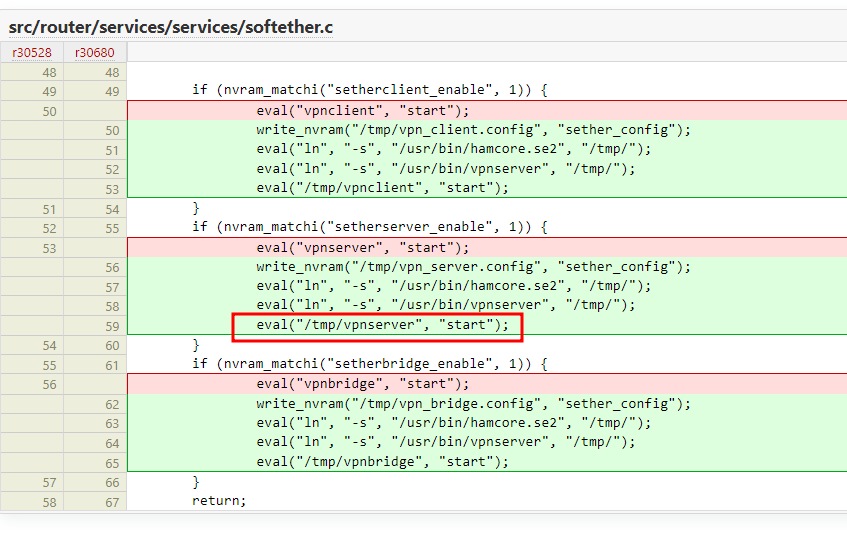
SIDE panel: DD-WRT’s text entry box for config string (useless)
The text box in DD-WRT’s UI for SoftEther VPN is hardwired to /tmp/vpn_server.config (EDIT: it’s broken now as of 2024-05-11. The text box now loads and writes directly onto the nvram variable called sether_config, which doesn’t even interpret a file path anymore.), which is freaking used by nowhere unless the user points to it. WTF?! This is very unpolished and wastes people a lot more time than it saves. At least drop people a hint with a text note saying this is not done yet and the rail connects to nowhere!
As said above, we should disable the entire “SoftEther VPN Server/Client” section in the WebUI anyway so you won’t even get to use this worthless ‘Configuration’ textbox. I’ve wasted so much time on this nonsense and wished this WebUI section didn’t exist in the first place. It’s just irresponsible to leave something this broken out there that ended up being a deadly trap/time-sink.
I’m experimenting with SoftEther as the user experience/interface is a lot more polished than WireGuard and OpenVPN and it has wide platform coverages. The Windows administration interfaces are sensibly designed (organized conceptually), unlike the Linux software culture that basically pretend to have a user interface yet it’s just a step away from editing the raw config file. SoftEther’s documentation also has nice graphical illustrations and it’s use cases oriented. The best part of the docs is that they are short and to the point.
Here I have a use case that’s not as quite as common for SoftEther’s users, so I might as well do a quick write up so if I run into this again in the future, I don’t have to do the research again.
Use case: router doubling as VPN server
I made a diagram based on my current understanding of how ethernet router works, and what needs to be done to have the router dual as SoftEther VPN server.
No guarantee that it’s the correct model and the lingo, and I’d appreciate comments to help me improve as I’m still learning (I was in algorithms and non-networking software development, more on the DSP side + light embedded systems, so this area is new to me).
The part shaded in blue is the new part we are building.
Installing SoftEther from Entware is just the square block.
You need to modprobe tun to let the SoftEther Server Admin software create the TAP port (made up Ethernet card).
At the same time the TAP port is created, say tap0, what SoftEther ‘bridges‘ is NOT the LAN, but the orange link in the diagram that goes to the virtual hub (which belongs to a VPN server instance). This lingo confusion wasted me days.
The ‘bridge’ on SoftEther’s side tells the incoming VPN connection which ‘Ethernet card’ (turns out to the the TAP interface) on the host computer should act on its behalf.
I felt like something is odd that SoftEther did not ask me what local network should the TAP interface go into so I suspect the TAP is just sitting there not talking to anybody, and it turned out to be the reason why my incoming VPN connection succeed but I’m not getting DHCP assignments.
I bit the bullet and understand how a Linux router work as if it were a computer with 5 Ethernet cards and one important piece of the puzzle is that the 4 LAN ports aren’t directly talking to the the WAN, but instead they form a bridge (software switch) which the bridge represents them and talk to the processed WAN traffic.
So the missing link is the double-line on the diagram where I add the TAP interface to the LAN bridge, namely brctl addif br0 tap_tap0. Linux adds a tap_ prefix to tap interfaces so it’s tap_tap0 for tap0 in SoftEther.
One more non-obvious thing here is that you also need to register the brctl a few seconds (using sleep delay) right after the SoftEther VPN Server service starts and nowhere else. The TAP has to exist before you put it on the LAN bridge and the TAP is programmed correctly to be as short-lived as needed, which is very responsible.
What to watch out for this use case
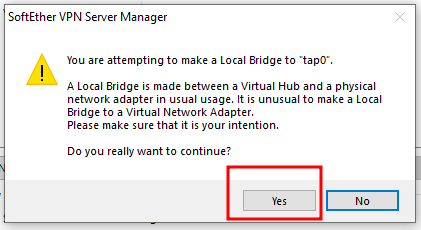
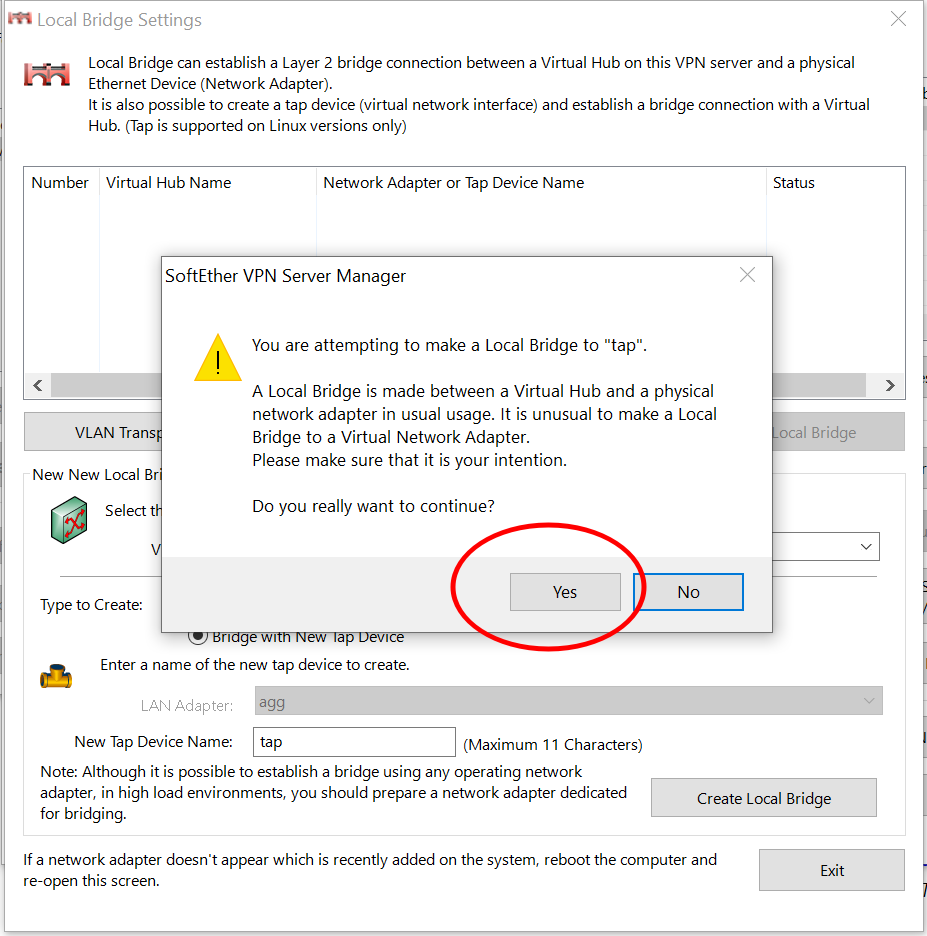
SoftEther’s interface does support creating a TAP adapter, but it provides scary warnings as this is an unusual settings.
TAP depends on the TUN module being loaded first, but Merlin-WRT’s firmware do not load this out of the box.
Some other websites tells you to install packages ip-full (for ip command) and OpenVPN (for the TAP) adapter, but it’s not necessary in some newer releases of Merlin-WRT. It’s all there, just waiting for you to modprobe tun (load TUN/TAP kernel drivers) before you can create TAP adapters.
If you don’t have the TUN module loaded first, the newly created bridge will show ‘Error’ with no explanation, which is confusing.
I figured out this is the missing part that causes the Error status by learning how TAP interface are created on Linux and speculated the Windows remote server admin interface (Server Manager) calls this under the hood:
ip tuntap add dev {YOUR TAP DEVICE NAME GOES HERE} mode tap
and tried to imitate the call and researched the error messages.
The next hard part is that the TAP adapter created by SoftEther’s is not tied to anything in the router when freshly created by “Local Bridge Setting”! It’s like you just freshly added an extra network card into a computer with the drivers set up, it doesn’t interact with anything on your network before you plug a cable in the right port!
As the last step you will need to SSH into the router to put in brctl addif br0 tap_tap0.
Obvious preparations
Prepare USB storage (format it with amtm) to host Entware if not already done
By default TUN/TAP kernel module is by default not loaded, so we somehow need to add modprobe tun to startup scripts.
Out of the box the router is read-only so you cannot get it to remember the startup scripts unless you turn on /jffs, a small (like 64MB) onboard non-volatile memory to store user data such as startup scripts.
If you haven’t installed anything that has written to services-start (the earliest point), you can install spdmerlin (from amtm), a tool that provides a customized router admin page that creates a dashboard with all admin goodies and it will create services-start and make it executable if it’s not already there for you to tap in the modprobe tun line.
If you want to do this yourself, make sure you spell ‘services’ with the plural ‘s’ (the pre-existing ‘service-event’ which the ‘service’ is singular might tempt you to imitate it, which is incorrect) and chmod +x services-start to make the script executable.
I use nano to sneak modprobe tun into /jffs/scripts/services-start (I also tried init-start and it works too since modprobe is very early kernel stuff). Do whatever that’s convenient for you as long as you can sneak modprobe tun in:
I recommend rebooting right away then run lsmod | grep tun to make sure the module is indeed loaded. If you can’t spare a reboot (which is like 5 minutes), you can simply run modprobe tun at the terminal right away and hope the startup script remembers to do it on the next reboot
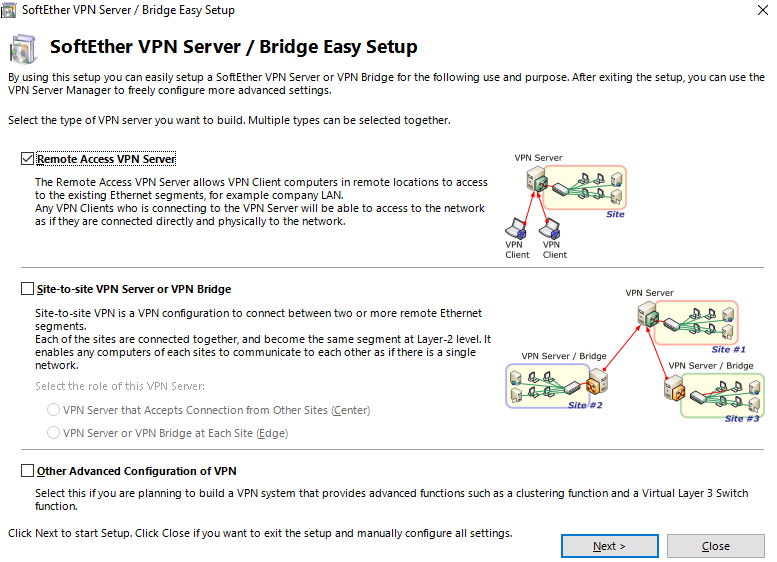
Use SoftEther Server Manager to remotely configure the softethervpn5-server installed on the router
The server program on the router did not ask for a password, yet SoftEther asks for it. This UI design is actually a little confusing. Turns out you enter an empty password on the first access/run and the user interface will ask you to create a proper password (just like some routers’ admin pages do).
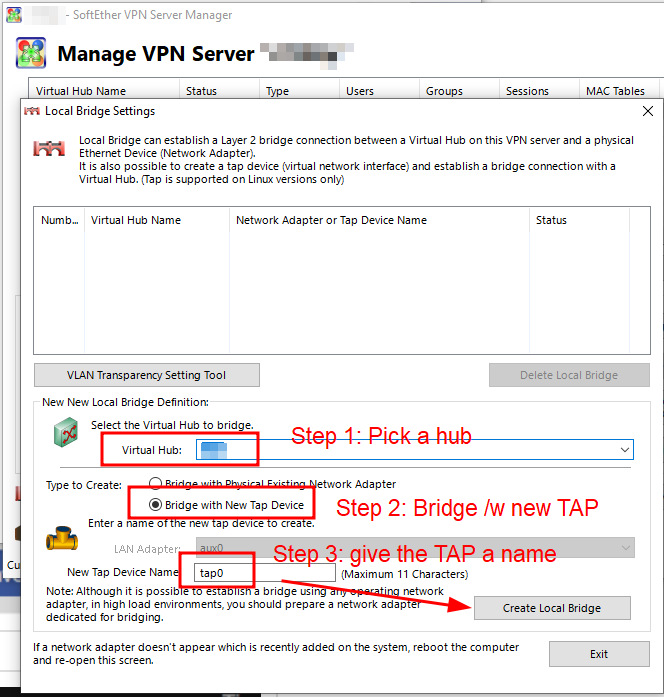
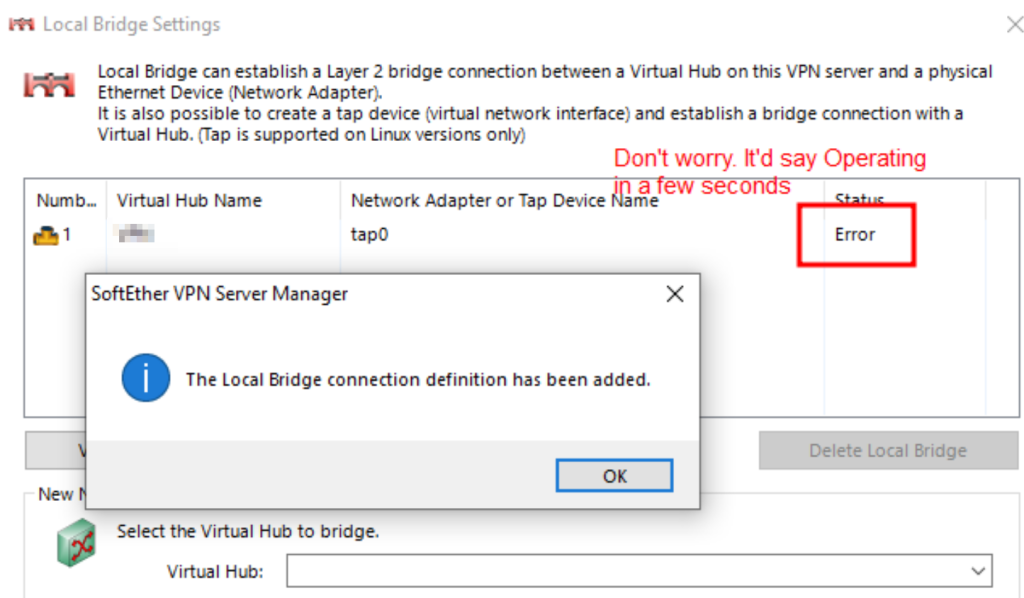
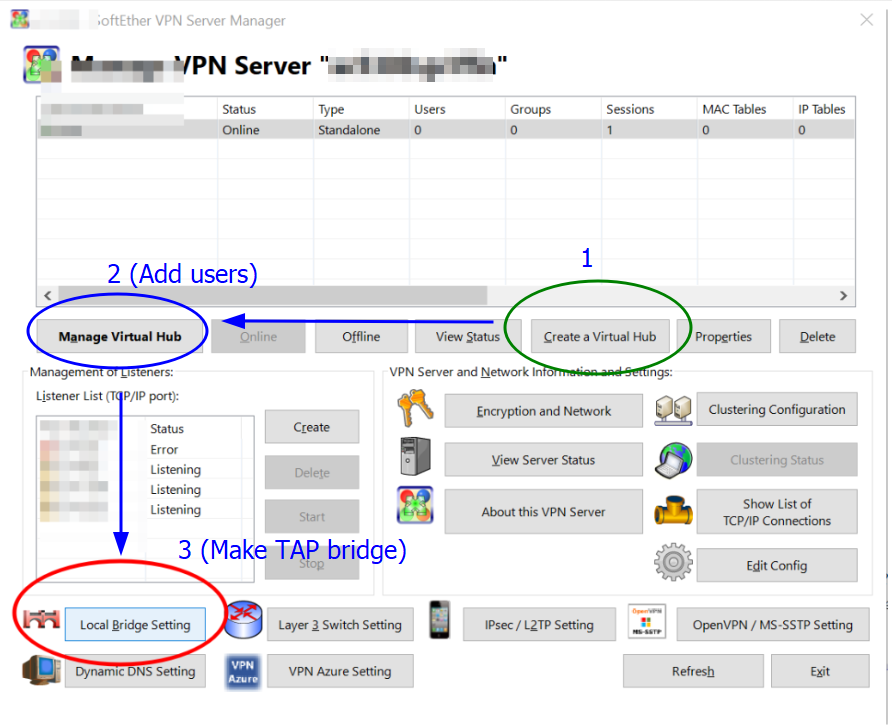
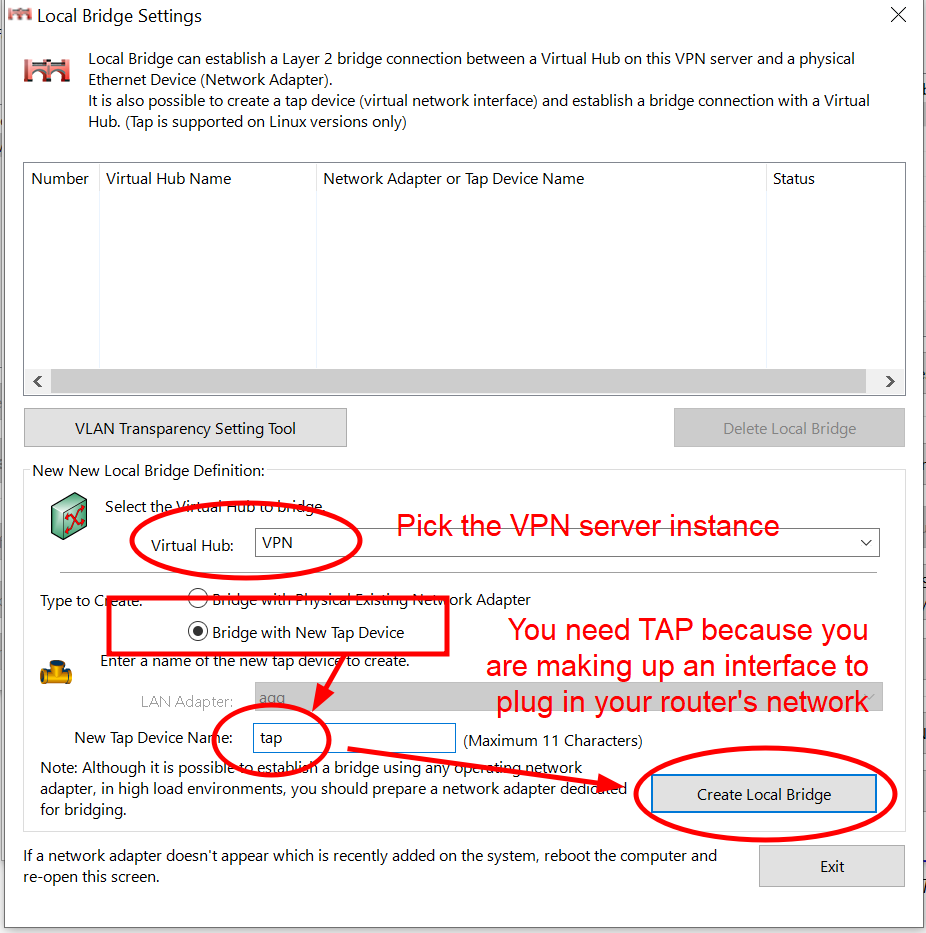
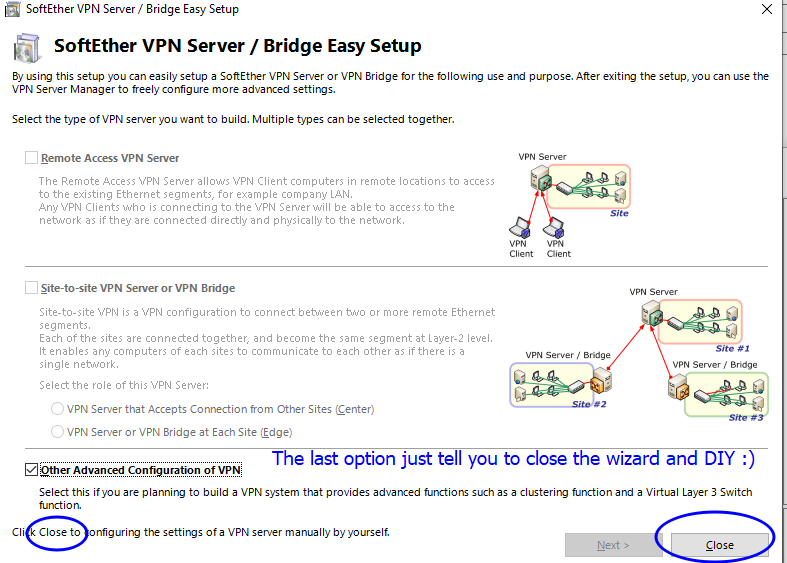
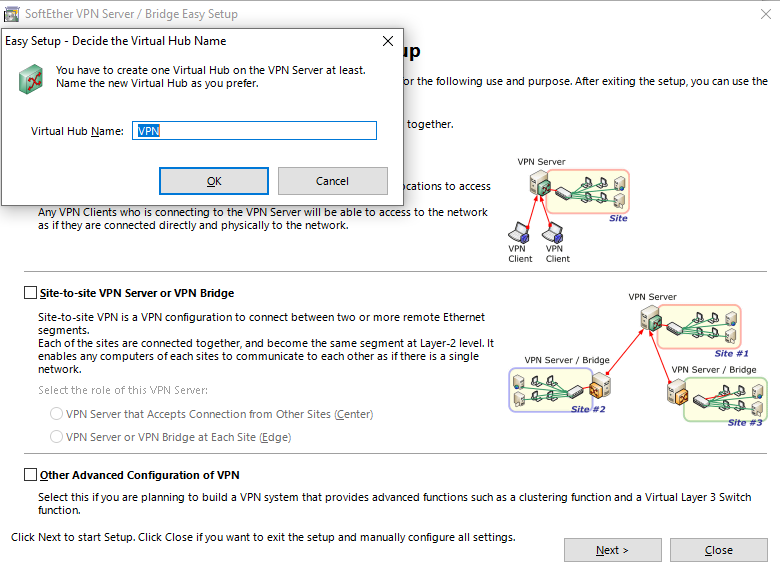
The first time you set it up, you will be greeted by a Wizard which I cannot find again. This wizard is equivalent to ‘Create a Virtual Hub’ -> [‘Manage Virtual Hub’ -> Add Users] -> Local Bridge Setting. However, you want to skip the last step (create bridge) in the wizard because the wizard version caters basic users and they don’t offer the option to make a TAP adapter for the bridge.
By exiting the wizard at the bridge creation step, you’ve created the ‘Virtual Hub’ (which SoftEther sees ‘Virtual Hub’ as an instance of VPN server which you can run in parallel. Confusing lingo for beginners, but it might be sensible with the logic of the architecture). Click on the ‘Local Bridge Setting’ to finish the step that was not done by the Wizard
Bridging is a matter of hardware, so it’s universal across all Virtual Hub (or VPN server instances). This is why it’s at the top level outside your VPN server instance (Virtual Hub) configs.
Softether is trying to be helpful but we know what we doing something unusual here (using the router itself as a computer that plugs into the router). Don’t get scared by the warning and just click Yes to continue
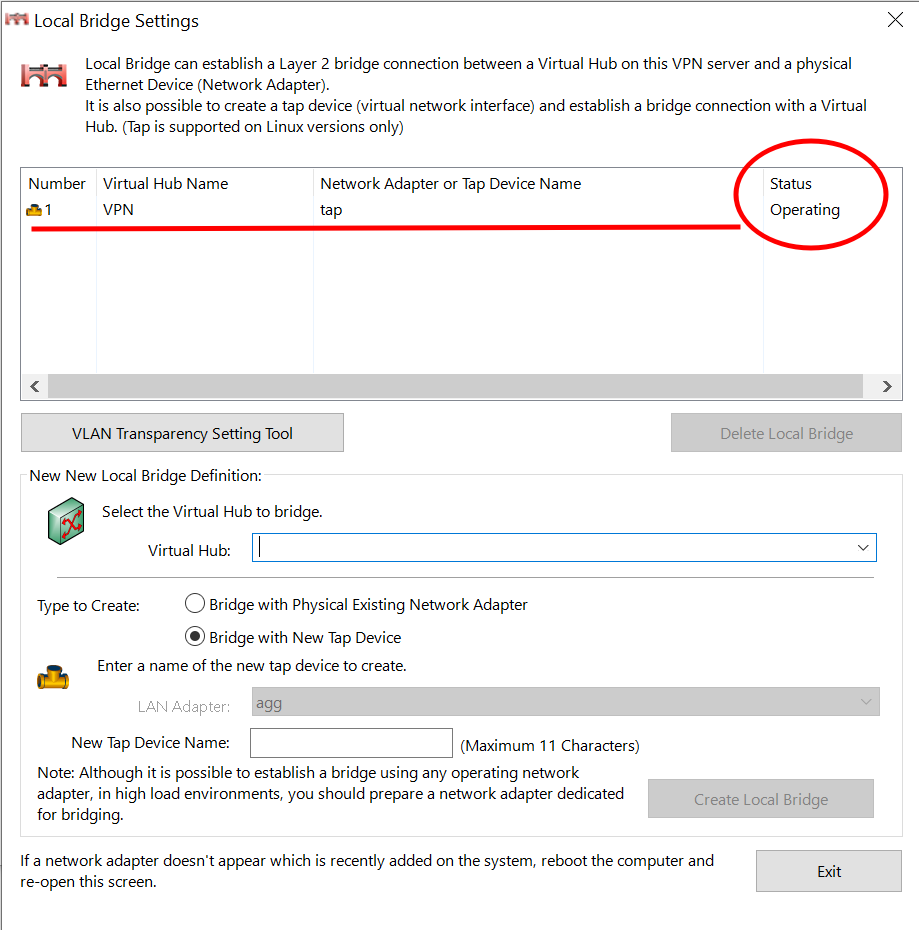
If you remember to start the TUN kernel module, the Status should turn from Error to Operating in a split second. If it stays in the Error, go back and check if you have TUN running properly.
Oversimplified view of LAN bridges
From an end-user perspective, a bridge can be thought of in terms of switches despite the order of evolution is the other way round.
You can think of a bridge as a switch where the computer that hosts it gets a free ride on the switch without the extra physical switch NIC port, physical ethernet cable, and physical device/computer NIC port. I called it ‘implied’ in the diagram on top of this post.
Say for example with 1 ethernet adapter computer A connects to the upstream (say Internet and home network managed by a router above) and let’s call it NIC-A. Then we install an extra network card/interface called NIC-B that’s for serving other devices.
By creating a bridge BR0 formed by NIC-A and NIC-B, you created an illusion of NIC-A behaving as two network cards NIC-A and NIC-B with 2 cables connected to the upstream LAN directly despite only 1 card (NIC-A) is physically there. So what NIC-A did in the bridge BR0 is it act as a software switch which it gets a free ride (implied) and the downstream Computer B rides on the switch that’s served by Computer A.
Add the TAP interface to the existing LAN bridge
brctl is the command line interface for managing bridges
addif adds an interface to the bridge. Here’s the manual page for the syntax:
In this forum post user miscell reversed the order and typed the interface first, which you’ll get a ioctl error complaining that you’re trying to write to an unwritable file.
However, since we are in a router, these changes won’t stick on reboot so we need to put this somewhere. Turns out it’s a colossal pain in the butt to figure this out because the tap0 adapter is correctly programmed to exist only when the SoftEther VPN server service is running and disappear when the service stops. In other words, the TAP adapters created and managed by SoftEther is ephemeral.
Since the TAP does not exist before the SoftEther VPN Server service (S05vpnserver) starts and vanished when the service stops, the ONLY place you should attach the bridging operation is within the start) section of /opt/etc/init.d/S05vpnserver, right after the core service completely finished starting so the TAP is fully created. I monitored the output of ifconfig and realize I need a few seconds of delay before adding the TAP interface to the bridge because the TAP bridge has to exist first. Add the highlighted line to the right place
with the chunk repeated here if your LAN bridge is called br0 and the TAP is called tap0 in SoftEther:
sleep 3
brctl addif br0 tap_tap0
I also tested it and it seems like the bridge association is removed when the TAP adapter was cleaned up when the service is stopped, so I didn’t bother to add the brctl delif in the stop) section.
/opt is actually points to your entware folder (I choose not to show the raw path because it contains my usb partition label which you’ll have to substitute your own) so the data is not volatile and it’s living in your USB entware storage. Basically the SoftEther VPN server registry lives in Entware’s /init.d as S05vpnserver.
Double check the naming on your router with say ifconfig instead of trusting the tap_ prefix which might not be universal across routers. Also check if your router’s LAN bridge is indeed named br0 and replace the interface names accordingly. You can also adapt this to other routers as long as you know where to sneak in the startup scripts
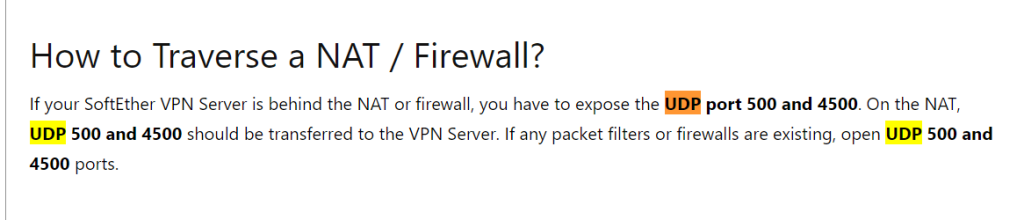
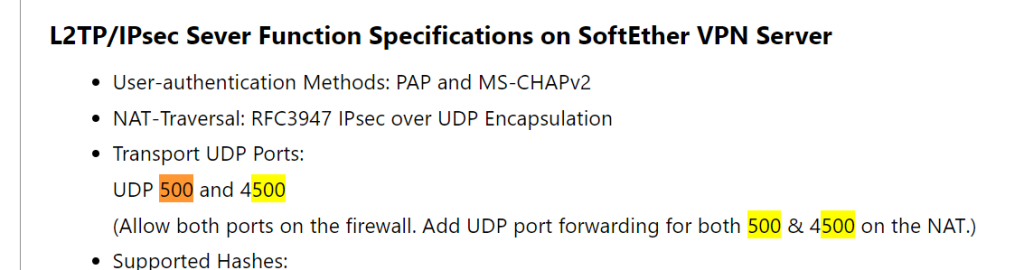
Bonus: Firewall instructions
The firewall rules in MerlinWRT just quit working so the table I entered doesn’t do anything when I turn the firewall on. It doesn’t seem like it’s placing firewall exceptions the way I intended.
There’s also another weird behavior that if the port is firewall blocked, the server admin program intermittently still connect but it connects to a blank state server (blank config). WTF!
Suggestion to SoftEther: Add a LAN bridging UI to the TAP option
Since this is an unusual concept, I copied the diagram from 3.6 Local Bridges – SoftEther VPN Project and overlay it to illustrated the ‘Local (VPN) Bridge’ has nothing to do with your LAN bridge which is necessary for the TAP adapter to do anything useful.
Right now there’s too little help on this topic which SoftEther considers it as advanced. Turns out putting SoftEther on a router isn’t too uncommon of a thing to ask for once people find out that it’s not impossible.
It’d save us who want to put SoftEther on a Linux router a lot of grief if SoftEther has an extra UI section in the dialog with a pulldown menu that states what bridge it can optionally join:
This is better done inside SoftEther instead of outside it because the users do not have to anticipate the names of the TAP adapters administrators create in the UI. Don’t worry about this extra option of adding it to a LAN bridge could confuse new users, as the lack of such option is way more confusing because there’s a TAP adapter created just to not connect to anything and it shoves new users to a dead end!
In the worst case you can throw a dialog box when users choose a non-blank item from the bridge list saying that this is for advanced users and make sure you know what you are doing (it’d be helpful to remind this could be used for installing SoftEther server on a Linux router).
Extras (feel free to skip it): First-time Wizard
Under no circumstance you should pick one of the LAN ports like /eth0 to bridge. This made no sense (btw /eth0 is usually the WAN interface) and I tried it just out of curiosity and it bricked the router by boot loop (luckily there’s self-recovery to fresh state after a few crashes).
The wizard isn’t that useful as soon as you notice the so called ‘VPN server (instance)’ is called ‘Virtual Hub’ and the buttons on the screen make intuitive sense that requires little explanation.
It’s frustrating that there are no simple packages provided by Microsoft or Ubuntu to get something as basic as sound working on Hyper-V. It’s nuts that we still have to deal with these kind of integration bullshit in 2023 when people are claiming that Linux is useable! At the time of writing, there are still way too many rough edges on Linux that are clearly not the users’ fault!
To understand why things are the way they are. We have to first understand that Hyper-V talks to the VM under RDP under the hood which has many advantages that the RDP provides. RDP is way less sluggish for the video and sound quality than the damned X11 server, which people spent little time to provide for Windows. MobaXterm is the only decent free X11 server for Windows in terms of user experience but it’s not the first one that populate search results.
In other words, we’ll need to set up Linux to stream the apps through RDP, not X11 to take advantage of Hyper-V manager’s interface (specifically vmconnect.exe under the hood). In Linux, this area is not maturely developed and the author of xrdp is not keen to make polished packages so most of the time we get pointed to the struggle of compiling the source code.
Given RDP is not native to Linux, xrdp did not rebuild the guts of X11 that maps natively to RDP. Instead it launches a bare minimal RDP session with nothing on it other than a basic client (sesman) that you can use it as a VNC client or X11 client that streams to the bare minimum RDP, so there’s an extra layer of indirection. You are not running RDP natively. That RDP session is for you to call X11.
Since X11 does not natively stream audio, you need to a sound server (over network) system that streams the audio to the bare minimal RDP layer of xrdp, then have the RDP layer stream/relay to RDP with pulseaudio-module-xrdp (which is a kernel package that you need to build from scratch at the time of writing since there’s no packages for it).
By the way, if you get this xrdp+pulseaudio ordeal working, you also get (x)RDP working for the linux even if you don’t use vmconnect to connect to it, because it’s RDP under the hood anyway.
I followed the messy (and often broken) instructions from multiple sources to build and install pulseaudio-module-xrdp, but it turned out this wasn’t enough. There’s no sound and the anticipated sound device didn’t show up in Ubuntu and all I see is a dummy sound driver.
Turns out there are many pieces of the puzzle scattered through different blogs and the blog either has typos, missing a key component, or the URLs changed so it’s broken. Here’s an overview of what you need to do
Replace Pipeware completely with PulseAudio on Ubuntu
RDP Enhanced Session is required for sound. This is true for Windows Guests as well. Linux doesn’t have RDP so you’ll need xrdp first before you even talk about enhanced session. Vsocket is how Enhanced Session talk. On Linux side we configure xrdp to talk on vsocket instead of a raw rdp protocol over Port 3389. On Windows we enable Enhanced Session (if not already) and enable hv-socket (with it the Windows side of vsocket).
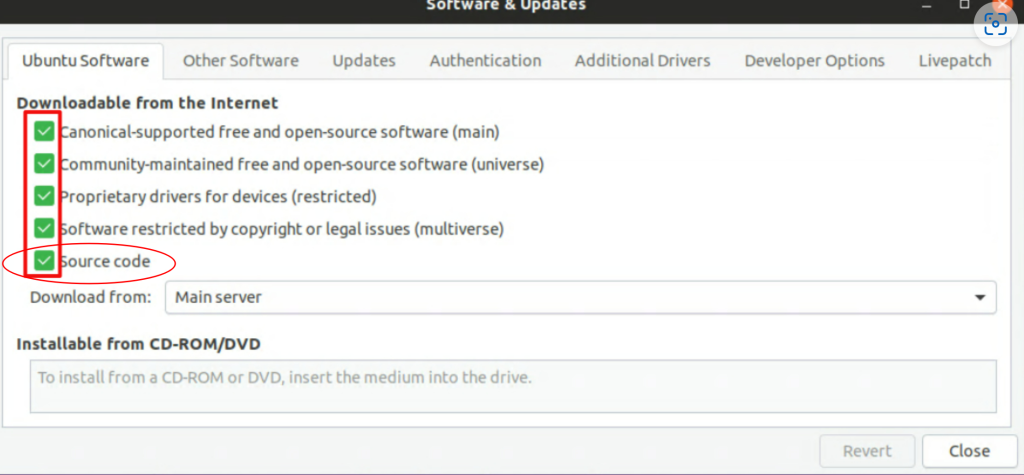
Since xrdp ‘cheats’ by redirecting X11 instead of implementing RDP from the core, you’ll need to relay the pulseaudio from the Ubuntu itself to the RDP layer which is done by pulseaudio-module-xrdp. Unfortunately it’s does not come with xrdp and there’s no package so you have to build it yourself the install your compiled product. Remember by default source code repo is disabled so you need to enable it first before following the any build instructions.
Get rid of Pipeware Completely & Install PulseAudio
Griffon’s IT library provided the insight that we need to take out Pipeware (the competitior of PulseAudio) completely and replace it with PulseAudio. After that I got it working. Here’s a path to his tutorial:
His tutorial included the script he made to install a more recent xrdp he built but the link is now broken. So what I did turned out to be necessary after all.
His tutorial basically stop/disabled/masked the hell out of Pipewire so it’s dead and deader and make sure the users cannot install it later and displace PulseAudio. It’s a lot of gymnastics because systemctl disable and mask do not take wildcards so you have to find out each service/daemon named pipewire. I’ll take this shortcut instead:
sudo apt purge pipewire
A tool to check if there’s audio server running (optional) is
pactl info
House keeping and install both pulseaudio and xrdp if not already done. pavucontrol is for controlling the volume which is often needed:
Part 1 [DONE BY DEFAULT NOW]: Change xrdp to receive vsocket instead of raw RDP
TLDR: No actionable item here. Included here for educational purposes only as it was a required step before.
Enhanced Session uses vsocket instead of raw Port 3389 for connection which xrdp.ini defaults to out of the box. Griffon’s IT library gave the instruction to replace the port=3389 to port=vsock://-1:3389 in xrdp.ini. However it’s already taken care of in the new install.sh script for linux-vm-tools:
Part 2: install linux-vm-tools (think of it as vsocket driver)
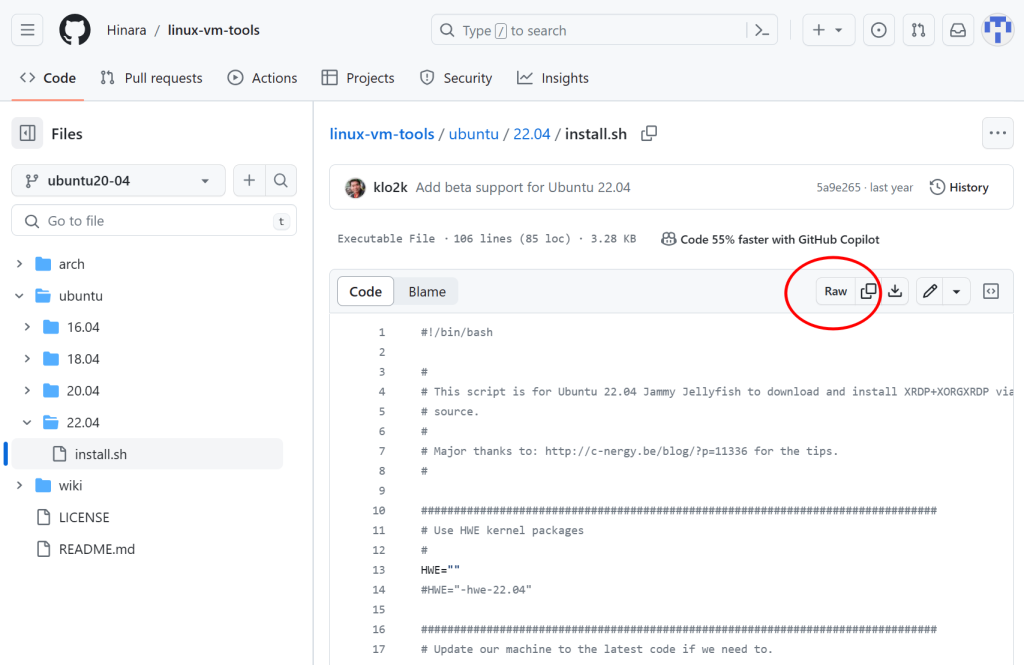
linux-vm-tools is “Hyper-V Linux Guest VM Enhancements” developed by Microsoft which dropped support for it and picked up (forked) by hinara to support Ubuntu 22.04. Hinara’s version is more updated.
So the first thing you do is to download (can use wget, curl, aria whatever you like as the downloader) the install.sh of the latest/appropriate version (right now it’s Ubuntu 22.04):
Note that the folder name at the top level says 20.04 (branch name) but at the lower level says 22.04 (folder name). So be prepared the path might change in the future if the author figured it’s better to use a consistent branch name later. The safest bet is to go to the Github page and discover the latest version then click raw to get the direct link to use with wget (or any file downloader).
Downloads by default are not executable for your safety, so enable the execute attribute with chmod +x:
sudo chmod +x install.sh
and of course execute the install.sh after you checked it’s all kosher:
sudo ./install.sh
The last 2 lines of the script tells you to RUN IT AGAIN AFTER REBOOT. It’s easy to overlook given the text doesn’t stand out after the user got bombarded with lots of verbose info. Make sure you follow it!
Configure Hyper-V for Enhanced Session (Host)
On Windows side, you’ll need to enable the Windows version of vsocket to communicate with the vsocket. There’s no curly braces when you type in {your VM’s name}:
Deploy a Linux VM on Hyper-V with Sound 20.04 Edition – techbloggingfool.com‘s scripts do not use the default folder choices by the build script so the changes in the upstream broke his folder scheme by adding a ‘+dfsg1‘ to the folder name. Instead of fixing it, I followed the official instructions on the github page but take advantage of the one very useful piece he provided: enable source code repo:
He has command line scripts that enables the source code too. Given my confidence about linux developer coordinating with people downstream about the naming schemes changes, I’ll stick with the GUI which gives a consistent interface.
./bootstrap && ./configure PULSE_DIR=$HOME/pulseaudio.src
make
PULSE_DIR=$HOME/pulseaudio.src because this is the default in the wrapper script above if no arguments are specified. Stick with the defaults (working at home folder) as it’s not wise to trust people to coordinate their naming scheme consistently. The defaults are likely tested more thoroughly.
which you can OPTIONALLY check your work to see if the kernel modules are indeed installed:
ls $(pkg-config --variable=modlibexecdir libpulse) | grep xrdp
[Optional Cleanup] If you don’t have anything named pulseaudio that you’d like to keep, you can clean up by removing the files using wildcard and the install.sh
sudo rm -rf ~/pulseaudio*
sudo rm ~/install.sh
Summary
Here’s a consolidated ‘script’ to show the complexity. I do not recommend copying and pasting it as the dependencies might change and it might break.
# Change audio server in Ubuntu
sudo apt -y update
sudo apt -y purge pipewire
sudo apt -y install pulseaudio pavucontrol xrdp
systemctl --user enable --now pulseaudio.service pulseaudio.socket
# [Optional] check if PulseAudio was installed correctly
pactl info
# Build pulseaudio-module-xrdp and install the kernel modules
# Stick with official instructions which assumes home folder
cd ~
sudo apt -y install build-essential dpkg-dev libpulse-dev git autoconf libtool
git clone https://github.com/neutrinolabs/pulseaudio-module-xrdp.git
cd pulseaudio-module-xrdp
./scripts/install_pulseaudio_sources_apt_wrapper.sh
./bootstrap && ./configure PULSE_DIR=$HOME/pulseaudio.src
make
sudo make install
# [Optional] check if pulseaudio-module-xrdp was installed correctly
ls $(pkg-config --variable=modlibexecdir libpulse) | grep xrdp
# Install linux-vm-tools which enables Enhanced Session
# Give linux-vm-tools its own folder to avoid confusion
mkdir -p ~/linux-vm-tools
# Note: "... && cd $_" will
cd ~/linux-vm-tools
wget https://raw.githubusercontent.com/Hinara/linux-vm-tools/ubuntu20-04/ubuntu/22.04/install.sh
sudo chmod +x install.sh
sudo ./install.sh
# The last 2 lines of screen output of install.sh tells you to reboot and run this again
# This is automated below by making a icon in Gnome desktop's autostart folder
# that will self-destruct after first launch
cat > ~/.config/autostart/startonce.desktop <<EOF
[Desktop Entry]
Type=Application
Name=startonce.desktop
Exec=gnome-terminal -- sh -c 'sudo ~/linux-vm-tools/install.sh && rm -rf ~/pulseaudio-module-xrdp ~/pulseaudio.src ~/linux-vm-tools ~/.config/autostart/startonce.desktop && init 0;$SHELL'
EOF
sudo reboot
I also noticed a quirk that the first reboot after everything’s installed might be a little too fast. In this case restart again once more. So instead I just have the desktop shortcut shutdown your VM after it’s done and have you manually start it again so it’d work right the first time.
I’ve created a Github repo for my own convenience, but feel free to use it however way you like, but I’m not responsible for any damages it might cause. Better read through the code with the help of this blog page and understand what it does and decide if you want to try it for your setup. I tried to make it robust, but it’s designed to be installed on freshly install Ubuntu guest VMs.
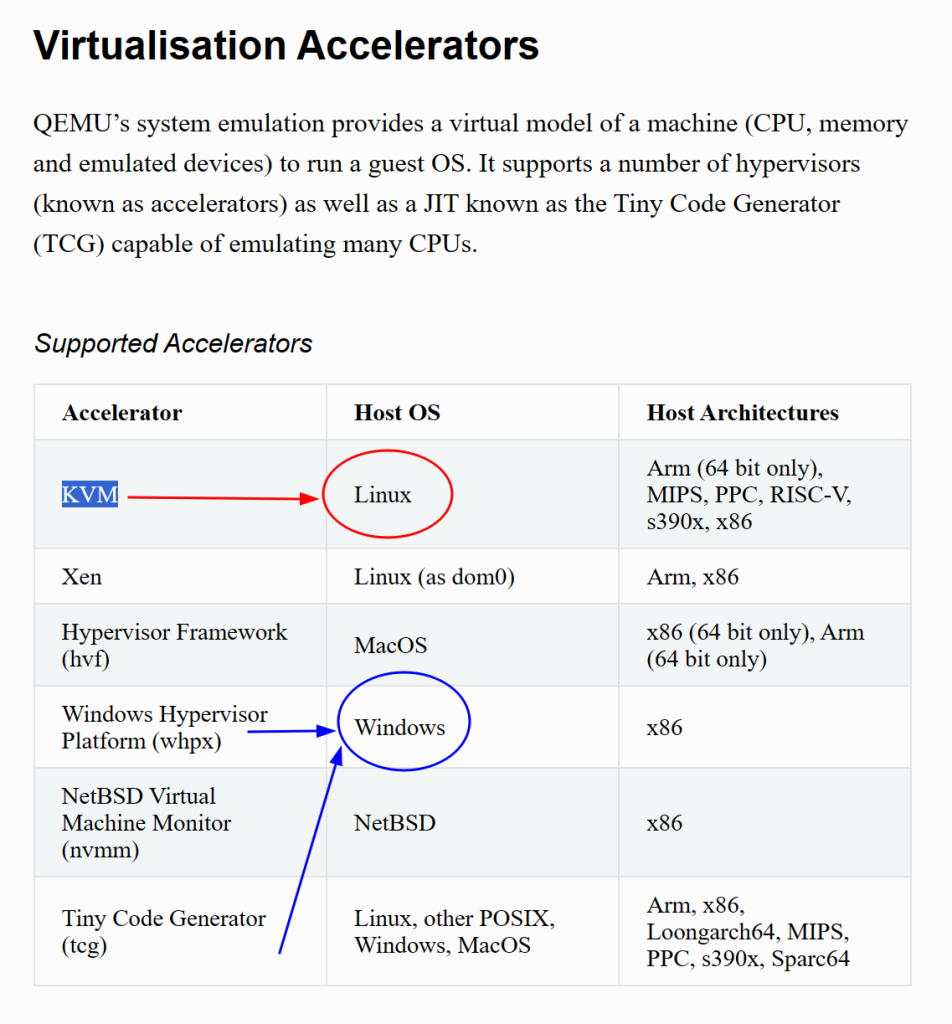
Qemu started off as a software emulator at user space (Type 2 hypervisor like VirtualBox) when there weren’t hardware features specifically supporting VM use cases.
KVM extended Qemu to take advantage of hardware features that accelerates virtualization which requires kernel space (OS low level direct) access, more directly handing off requests to hardware instead of going exclusively through the emulated fabric.
Conceptually I think of KVM as the kernel space (low-level hardware drivers / hardware accelerator) portion of the software while Qemu is the user space (interactive) portion of the software.
What made it confusing is that KVM was a fork of Qemu, so they were seen as one package when people said ‘KVM’ (when they should have said qemu-kvm). The responsibilities are not that clearly separated as far as Linux is concerned but when we get to MacOS/Windows, we start to appreciate the distinction that KVM is the kernel-based hardware accelerator itself while Qemu is the whole idea of virtualization.
KVM made no sense in Windows, as Microsoft is obviously going to implement KVM in its kernel. Straight ports of Qemu to Windows retained the KVM lingo, which confused the hell out of me.
Since KVM does not exist on Windows. Intel use to make HAXM for its processor on Windows, but they discontinued it. Microsoft’s version of real hardware accelerator is WPHX. These are the only 2 available hardware acceleration options for Qemu on Windows.
TCG (Tiny Code Generator) is not real hardware acceleration, but more like an on-the-fly machine code (think of it as assembly for those who don’t know the difference) instruction translator that matches the VM guests’ instruction set with the host hardware’s instruction set.
People usually call ‘KVM’ (qemu-kvm) a Type 1 hypervisor but the line is blurry. Does it still count as Type 1 if you add an FTP server on the linux distro that hosts the KVM? What makes KVM fast was its hardware acceleration through the kernel, but the user-space qemu calls can make these kernel calls by using KVM as a hardware accelerator.
In my opinion, whether it’s Type 1 or Type 2 mostly boils down to intent on whether you are dedicating the computer to serving VMs. Most people nowadays won’t insist on foregoing available hardware acceleration (which is kernel space) to solely run the VM as a purely software emulator. The VM idea is to decouple the hardware from the software, who cares if you let the host computer take a side job (like running a FTP server) as long as virtualiation overhead is the same?