Netgear R7000 supports these major forms of firmware
DD-WRT (Powerful, but very messy web interface that are sometimes non-intuitively organized)
FreshTomato (Powerful. I wouldn’t say easy to use but mortal souls can understand it)
XWRT-Vortex (Easy to use AsusWRT Merlin web interface adapted for non-Asus routers)
There are other forms of Tomato that support R7000 but only FreshTomato is actively maintained as of late 2021.
However updating it from stock firmware to FreshTomato has some model-specific quirks (that you cannot extrapolate from general procedures for other models)
First of all. You cannot update directly to the latest firmware. There’s a bootstrap (intermediate) firmware called INITIAL (usually downloaded from ‘Netgear R-series initial files’ folder) that must be installed (upgraded from stock firmware to) FIRST so the router is ready to accept the latest/full firmware.
Here’s the model specific quirk: the default login/password is non-standard for R7000! It’s not root/admin (unless you press the button to reset the NVRAM)! It’s admin/@newdig!
After logging into the bootstrap/INITIAL freshtomato with the password above, upgrade the firmware to the latest (the one intended) and choose clear NVRAM along the way. The default login/password will be root/admin as standard for freshtomato.
There’s another twist for SSH connections! The username in your web admin interface do NOT matter! The username is ‘root’ for SSH regardless of what you set in the web interface, your password is the one entered in web admin interface! This is super counterintuitive!
The mouse cable for Evoluent Vertical Mouse 4 is extremely long, which creates a lot of clutters especially when my keyboard has a USB hub relay built in (it’s the mouse is less than a feet away from it). Instead of splicing the cable, which creates a hard junction that’s not flexible, I modified the mouse to take a micro-USB cable instead.
Use a UART controller that signals at 3.3V (e.g. FTDI TTL-232R-3V3) to talk to the board. Regular serial RS-232 ports requires a voltage level shifter converting the signal to swing between 0V to 3.3V.
You only need 3 pins: Tx, Rx and Ground. There’s voltage contention if you plug in the Vcc from TTL-232R-3V3 (It’s the USB’s 5V despite the signaling is 3.3V) to the 3.3V supply of the router. You don’t need the Vcc pin. It didn’t harm anything or do anything when I connected the Vcc pin.
Stick with all serial port defaults and only set the baud to 115200 (default is 9600) and turn off flow control (default is xon/xoff). I use Putty for terminal.
The terminal serves as the monitor for the computer on the router that shows a text console. Broadcom uses CFE bootloader (others use U-Boot with busybox).
CFE bootloader defaults to 192.168.1.1 with subnet mask 255.255.255.0 (aka /24). Set up the network interface to have a static IP on the same subnet to talk to the board.
Good habit: nvram erase
The flash program relies on TFTP protocol to receive the firmware file. So get your TFTP client ready. Microsoft included a TFTP client/server since Windows 7 but usually disabled (turn it on in Windows OptionalFeatures.exe).
TFTP is a simple push(put)/pull(get) design. You can either “push a file on your computer” or “get a file as filename”. You’d want to specify -i switch (binary image transfer) with Windows tftp.exe.
So type this command at the command prompt but don not press enter until your router is ready to grab the file: tftp -i 192.168.1.1 put {path to whatever TRX firmware file}
Go back to the serial terminal and tell the router to accept a TFTP push (in a window of a few seconds before it time out) and flash the memory region flash1.trx with this command: flash -ctheader : flash1.trx
Immediately initiate the TFTP push from your computer (Windows command line example in Step #9 above)
Wait for a couple of hours! The terminal might tell you that it has received the file completely, but it won’t show anything when it’s writing to the flash! It’s a painfully slow process with no feedback. Just be patient!
Some observations
FreshTomato firmware absolutely won’t tell you on the screen after it has done flashing (Merlin-WRT does). Just turn the router back on after a couple of hours.
Merlin firmware repeats (exposes) the raw passwords to the serial port!
FreshTomato firmware boots to a linux prompt on the serial port
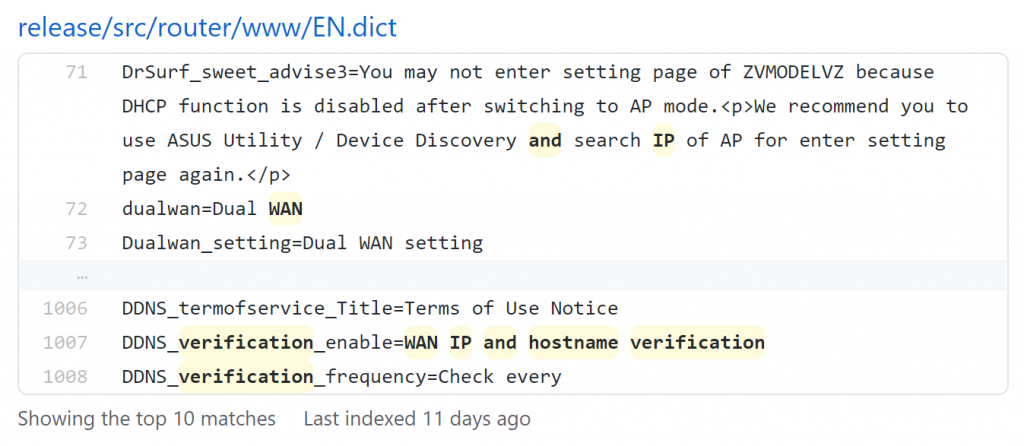
The “WAN – DDNS” page only allows users to set the DDNS updater to check as frequently as every 30 minutes. My DDNS provider does not have an update frequency limit, so I’d like to have the update client check for every 1 minute. The setting is called “Verify every”:
Attempting to set it to every 1 minute gives this error message:
I searched for the “WAN-DDNS” config webpage file (Advanced_ASUSDDNS_Content.asp) in the firmware source code, and found that it’s under /www folder in the router’s linux root.
Since “Verify every” is such generic words, and Github does not support exact phrase match in search (I use “in:file” specifier in the search box), I pick “WAN IP and hostname verification” (the closest setting which I expect the code to be in the proximity of the one corresponding to “Verify every”) so it has more unique keywords. The first jump:
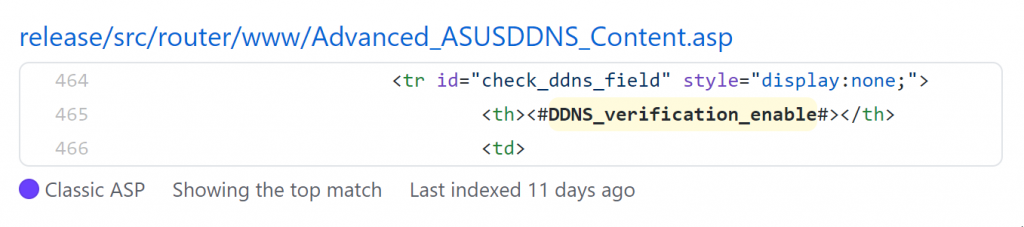
Since it’s just a dictionary files, we search for the associated internal variable name “DDNS_verification_enable” which points to the this line in Advanced_ASUSDDNS_Content.asp:
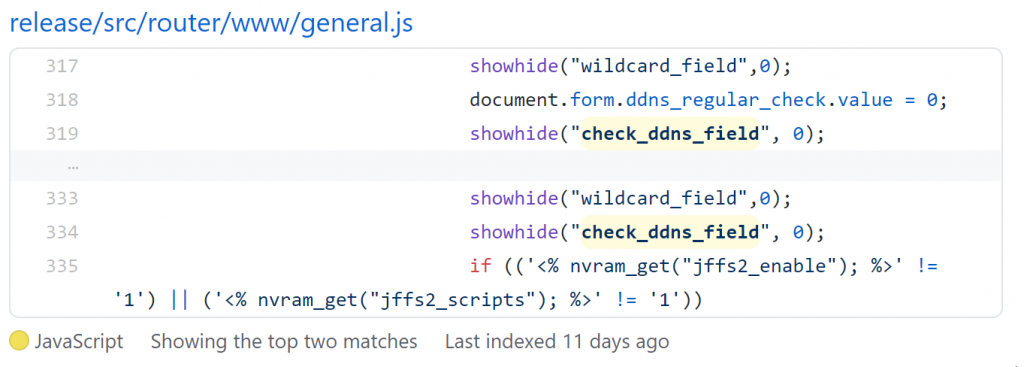
Since this name appeared nowhere else, I traced the “id” attribute above, which is “check_ddns_field” and I see a Javascript (.js) file that process the data from the web page forms:
The variable check_ddns_field appears in the if-else-if branches of change_ddns_settings(), so one of the few next few variables after it is likely to correspond to “Verify with”.
The variable name showed up in 4 branches of if-elseif-else switches (switching DDNS service providers), which ddns_regular_period comes right after
Searching for the class member (or struct field)
Bingo. Here’s the entry value range check code. I’ll change the “30” minutes to “1” minute to enable checking at 1 minute intervals (which I think it’s reasonably responsive for testing and general use).
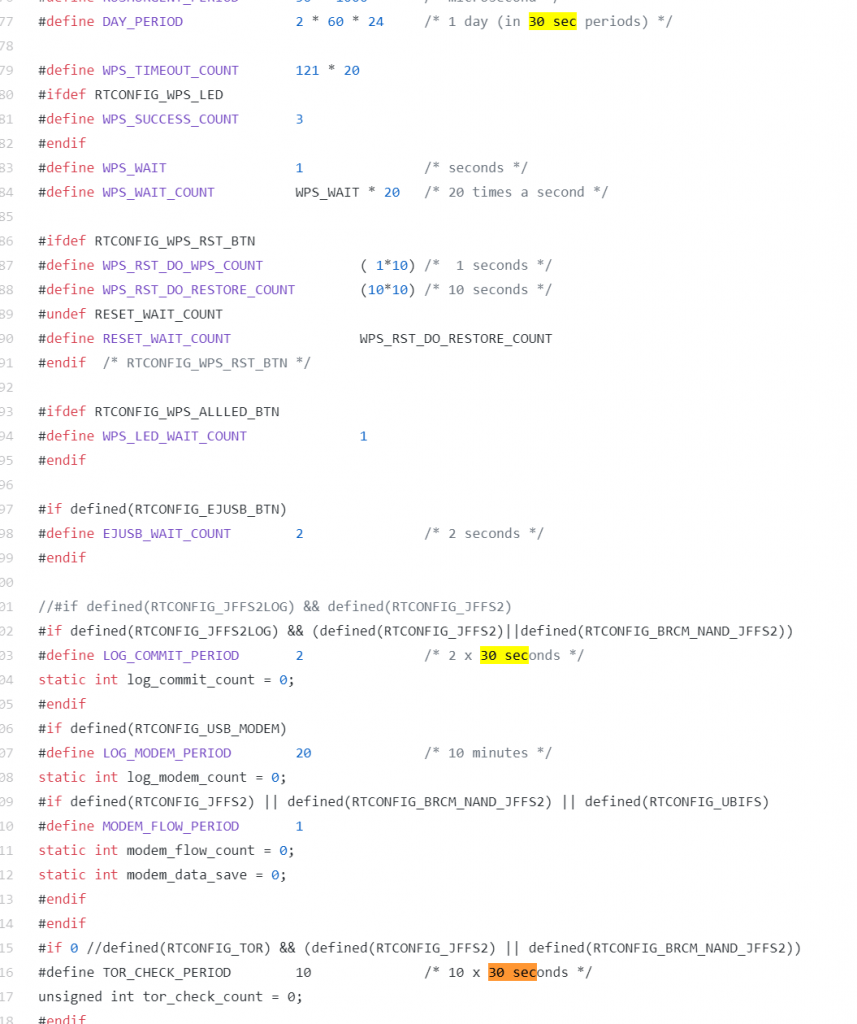
I’d prefer to check if the input range check is there out of feasibility (i.e. what is the smallest increment) or it’s just set to prevent people from getting banned by the DDNS provider for checking too frequently. I looked into the last occurrence of ddns_regular_period and found this:
Which means the web forms is updating NVRAM (environmental) variable of the same name ddns_regular_period, which appears to be called only in watchdog.c:
And Dang! The code enforces if the ddns_regular_period (on NVRAM) is set to be less than the original 30 minute minimum (invalid condition), it’d be set to the default 60 minutes (1 hr).
It’s actually sloppy coding because the defaults are specified in struct fields in defaults.c:
yet that 60 minutes is hard-coded in watchdog.c. That means if I don’t catch it and only changed the default in one place, the behavior will not be what I expected given the right conditions. This is an example of why software feature expansion are likely to break things. If you have solid code, bugs on updates are likely to happen.
I was curious why it says (period*2)
and suspected the ddns_check_count is incremented in 30 second (half-minute) interval. Since it’s watchdog.c, my natural guess is that the watchdog checks every 30 seconds for these event hooks. Turns out the notes (comments) in the code has “30 seconds periods” noted everywhere.
I searched a little bit more about linux watchdogs and found this useful webpage which explained how it works. I didn’t see /dev/watchdog in my router’s rootfs (root file system) so I assumed it’s a hardware watchdog (embedded linux, so duh).
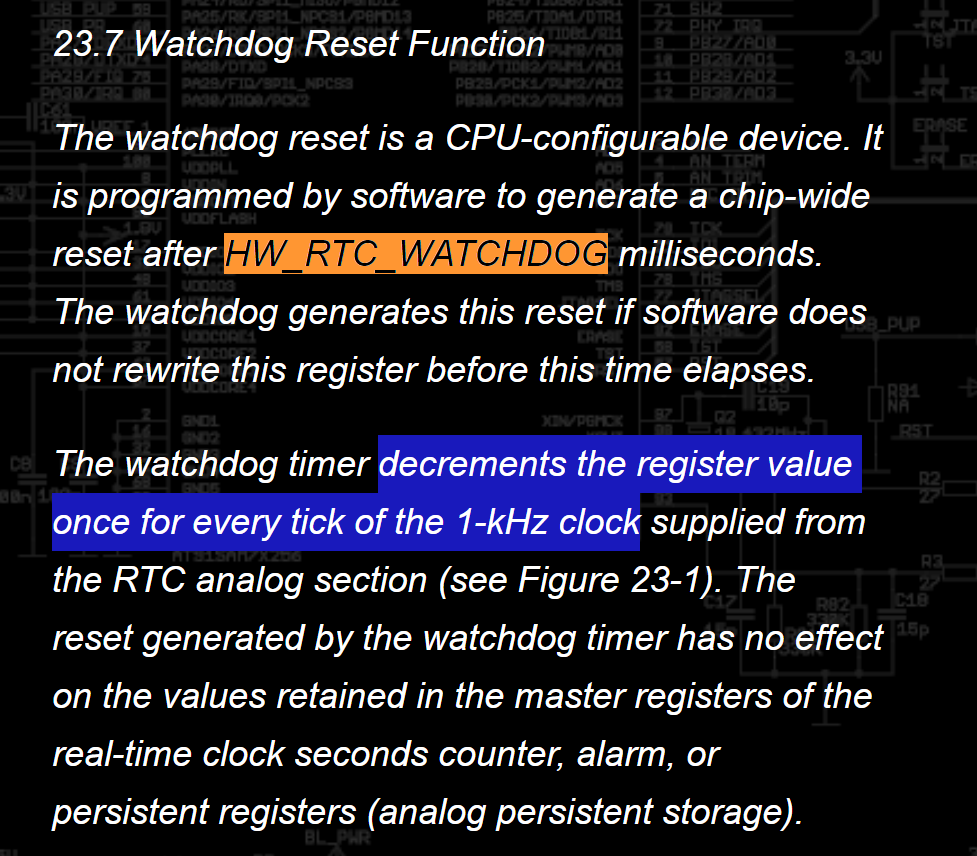
I was about to dig up the hardware manual for the chipset for my router, but I search for they string HW_RTC_WATCHDOG first and it showed up in linux kernel code (duh):
Note that the HW_RTC_WATCHDOG is a register in this code base, not the number of seconds from Christian’s Blog. i.e. they are completely different things, but it provided a good keyword lead for me to start digging.
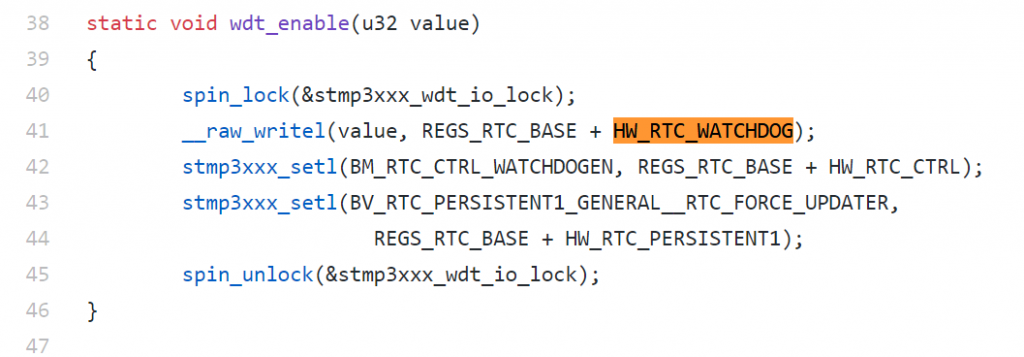
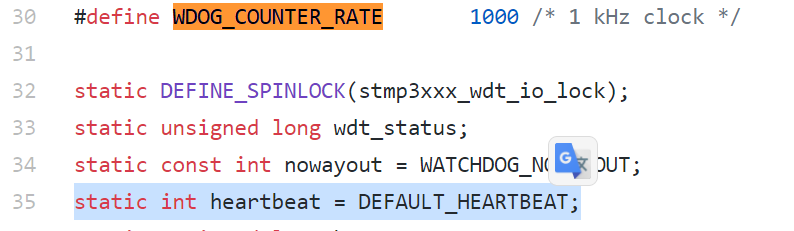
The code seems to be the same for various kernel version so I picked any one of them to understand the behavior. First occurrence is in wdt_enable():
The other places are suspend/resume, so I’ll ignore those for now. Note that wdt_enable() is a static function, so only need to search within the same file. The only active place that calls it is wdt_ping():
So there are only 2 things I’ll need to find out: heartbeat and WDOG_COUNTER_RATE:
While it’s a lot of useful learning about Embedded Linux and hunting down source code, for the meantime, given that namecheap does not care if you blindly update every minute, it’s easier to just set up a cron job that runs at every N minutes using curl/wget.
dd-wrt has a place for you to enter the cron scripts with the web interface, but you might need to log into the router using SSH and register the cron job yourself:
The core command is called ‘cru‘, which typing it in the command prompt will show you the very simple usage:
admin@Router:/tmp/home/root# cru

Cron Utility
add:    cru a <unique id> <"min hour day month week command">
delete: cru d <unique id>
list:   cru l
<unique id> is just a tag that you make up to name your task. Again the one-liner command needs to be direct absolute path. My ‘curl‘ program is located in /usr/sbin, so the command is:
cru a ncddns * * * * * /usr/sbin/curl "https://dynamicdns.park-your-domain.com/update?host={subdomain or @ for root}&domain={registered domain name}&password={DDNS-specific password generated by namecheap's domain administration page under Advanced DNS}"
The “* * * * *” refers to run at every “minute, hour, date of month, month, date of week”, in other words, run at every minute in every waking moment. The wild card * means ALL-OF.
Cron job registration through CRU is not persistent, so to make it survive reboots, add the above cru command as a line to /jffs/scripts/services-start script. It should be executable by default, if not, make sure you set it to be executable or it won’t run.
Namecheap support page explained the process of configuring your dd-wrt router firmware to use Namecheap’s REST (HTTP URL) update interface to dynamically update the IP of your (sub-)domain. The instruction works, but there are few items which doesn’t quite make sense to me as a programmer, and I did a few experiments to figured that it’s bogus and developed a few insights about what’s necessary and why they do it.
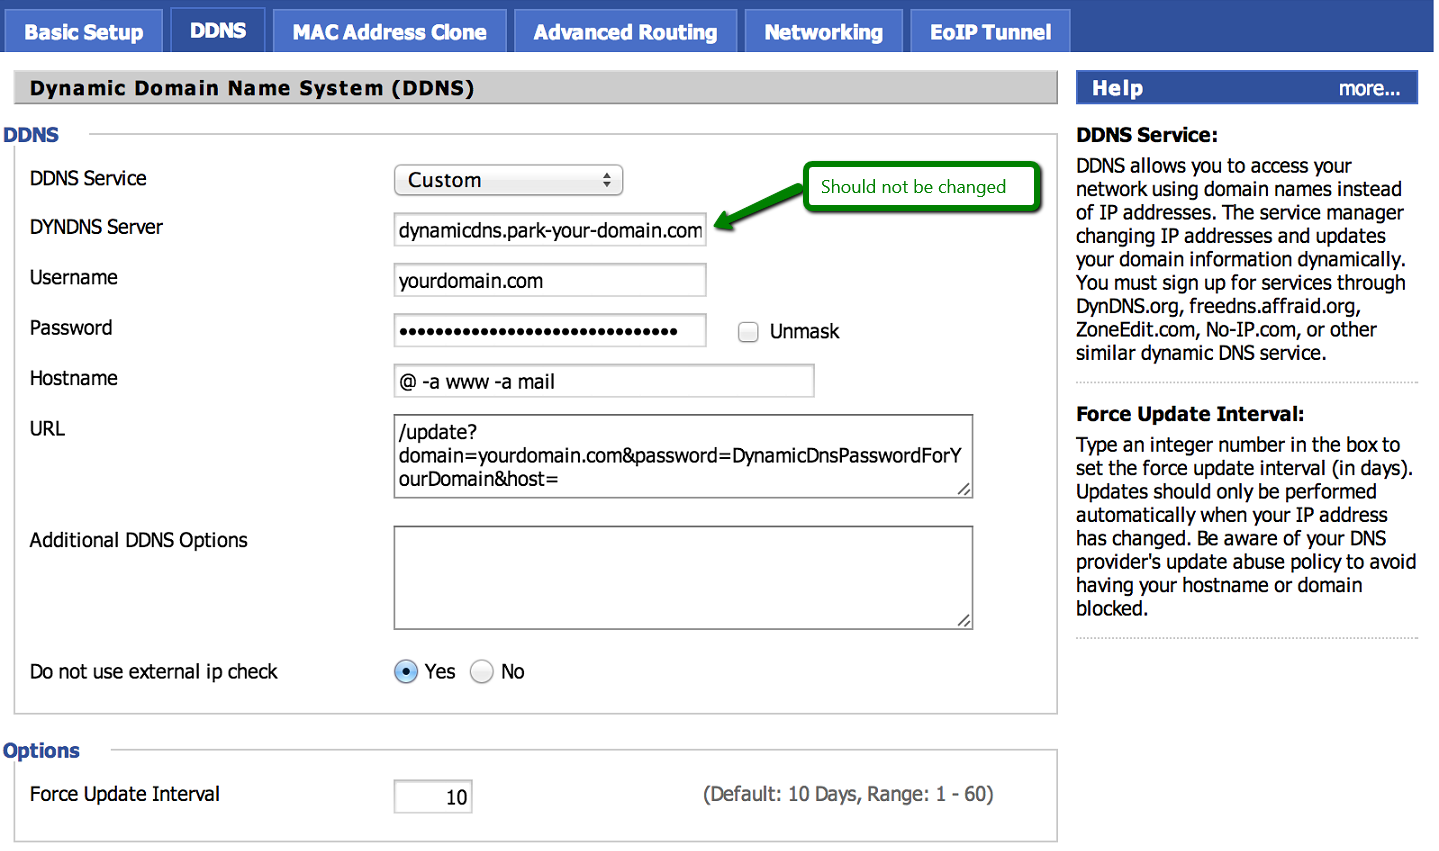
Their instructions looks like this:
and specific verbal instructions are:
DDNS Service: Custom
DYNDNS Server: dynamicdns.park-your-domain.com – the name of the server should not be changed
Username: yourdomain.com – replace it with your domain name
Password: Dynamic DNS password for your domain (Domain List >> click on the Manage button next to the domain >> the Advanced DNS tab >> Dynamic DNS)
Hostname: Your subdomain (@ for yourdomain.com, www for www.yourdomain.com, etc.)
I stroke out Username and Password fields because they are not used!
If you look at the URL, namecheap’s instructions are asking you to re-enter the domain and the password key-value pair AGAIN, which means Username and Password fields are not used.
My programmer instinct immediate screams the updater is assuming certain REST API syntax that are not properly substituted so they need to be entered manually, exposing the password without the benefit of the masks (forget about keeping the password top secret, router firmware guys aren’t top security engineers. Just re-generate one in Namecheap’s admin interface if it gets compromised).
I checked by entering bogus Username and Password fields (the web’s GUI/forms checks if they are blank, so you can’t get away with not entering). It worked as expected. This means the two fields are dummies with Namecheap’s instructions.
Based on the fact that Namecheap’s instructions being unable to substitute Username and Password fields and the host key must be put at the end for Hostname field to substitute correctly, I can safely speculate that the one who wrote this couldn’t find out what the syntax for the variables are, and exploit that the last parameter hostname gets attached at the end in the absence of substitution variables in the URL syntax.
Apparent people are doing something stupid like this because nobody in the chain remember to document the substitution variable names! It’s not in dd-wrt’s user interface (should have that printed the ‘usage’ info next to the URL box) and neither it’s in INADYN’s github readmes!
I decided to dig deeper and go after the dynamic DNS updater package in question. dd-wrt is using inadyn package to do the dynamic DNS update, as “INADYN” is shown in “DDNS status” box gives it away (confirmed by dd-wrt’s docs):
The service itself is called ddns though.
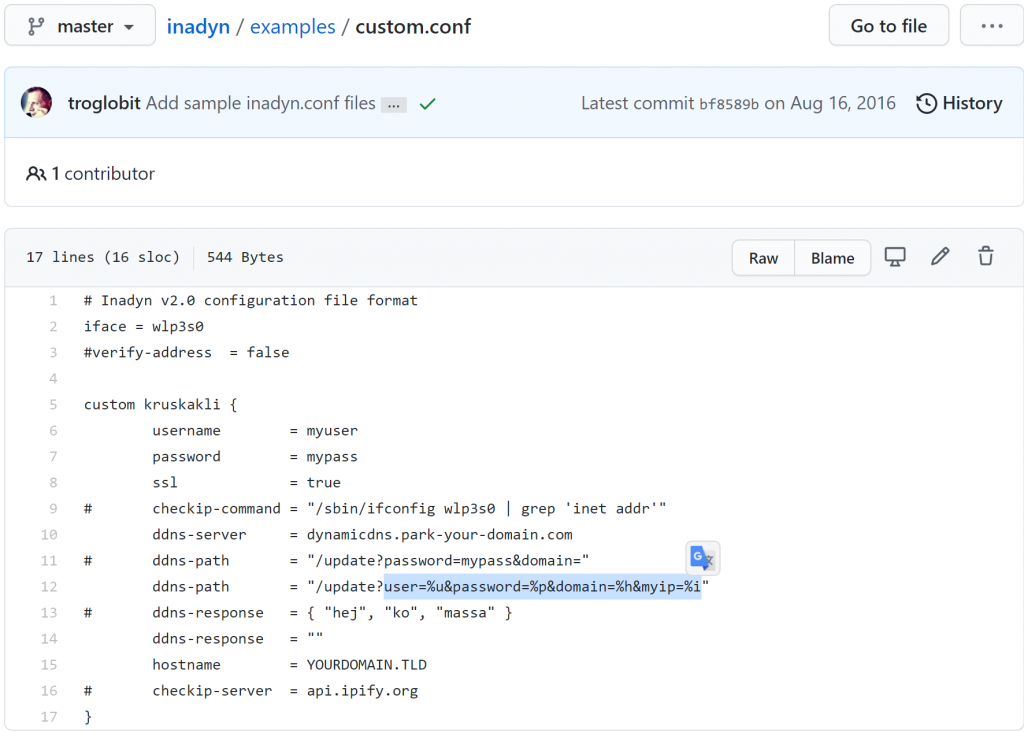
I ended up reading the /examples folder on the repository and found this:
Bingo! Here it is:
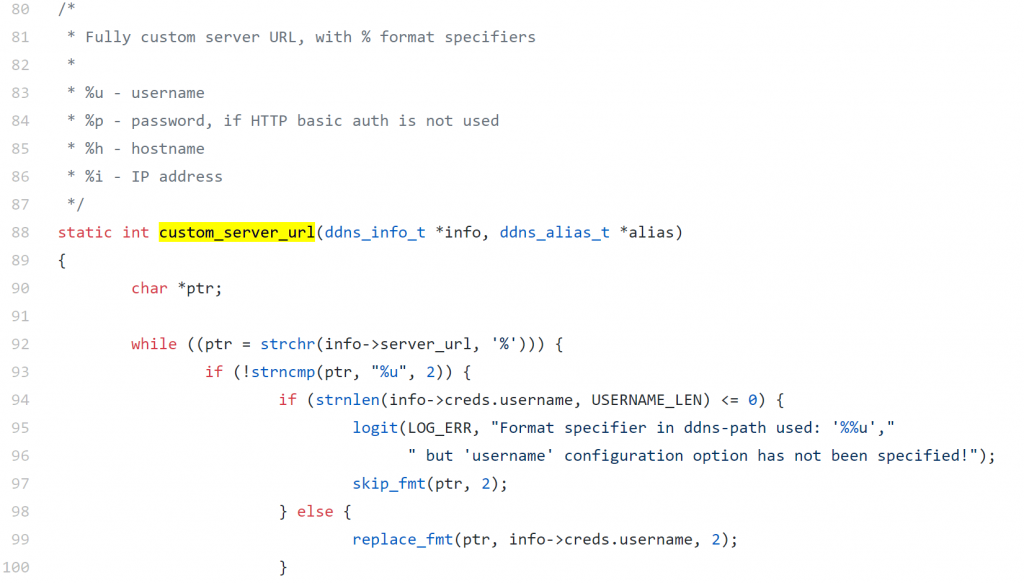
URL substitution string
dd-wrt fields
Namecheap REST key
%u
Username
domain
%p
Password
password
%h
Hostname
host
generic.c is a plugin also shows the above table as well
Since namecheap’s dynamic DNS service do not mandate how frequently you can update nor they charge per update, it’s easiest and most reliable to just blindly update the IP every N minutes instead of checking against a local cache to see if the external IP has really changed before updating at each poll interval
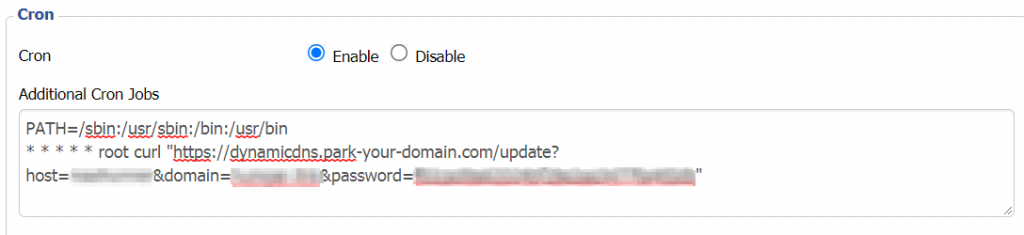
This user interface does not have the option to set the updater to run every 1 minute, so why bother since it’s just a simple program that creates a simple URL and do a curl/wget? At the end of the day, I decided to just do a cron job:
PATH=/sbin:/usr/sbin:/bin:/usr/bin
* * * * * root curl "https://dynamicdns.park-your-domain.com/update?host={subdomain or @}&domain={domain name bought}&password={generated by namecheap's account management page}"
There are 3 things that you will need to know:
Paths is from a clean slate. Need to define it first
* * * * * means every minute. Specify numbers/range for each time unit (minute, hour, day of month, month, day of week) if desired. Asterisk means ON EVERY.
Need to specify the user after the time syntax and before the actual command