Executive Summary: Agilent originally made the current form of E4980A (2Mhz) model and offered downgrade options for lower frequecnies (300kHz to 1Mhz).
Then they spun-off the ‘AL’ series (officially advertised/printed the ‘AL’ naming that was originally only used in ordering) just to identify the low frequency versions (300kHz to 1Mhz).
Later they neutered the ability of these ‘AL’ series (low frequency version) to upgrade to advanced DC bias (Option 001).
Option 002 was sunsetted even for the 2Mhz ‘A’ model so you can only find it in older units.
So the older ‘A’ series low bandwidth units (E4980A-030, E4980A-050, E4980A-100) are actually much better units than the ‘AL’ (unless you got the transition ‘AL’ units where the DC source port says Option 001 instead of “Reserved”) because they are not neutered and follows the same configuration rules as the top 2Mhz model E4980A.
All you get from the old ‘A’ to the current ‘AL’ is an Option 200 (DCR measurement) freebie, but you lost the Option 001 upgradeability if you buy the new ‘AL’s.
In short, with the 2Mhz model, you can always pimp the unit to the max if you are willing to pay extra for options. Anything lower than that, you want the old/grandfathered ‘A’ models if you want to install Option 001 later.
There has been quite a bit of naming confusion for Keysight’s E4980A precision LCR meters. I emailed Keysight and they couldn’t give me a straight answers as it seems like there’s a change in their naming convention. Here’s what I understood from my research and experimentation with these 300kHz units I had:
Currently E4980A refers exclusively to one 2Mhz model. Everything else is called E4980AL-XXX. The first (leftmost) 2 digits of XXX is the max frequency of the unit divided by 100kHz (10X: 1Mhz, 05X: 500kHz, 03X: 300kHz). The lowest (rightmost) digit is the 0 for the older Agilent units that DCR measurement (aka multimeter’s resistance at 0Hz) that doesn’t come with it, 2 for newer Keysight units which this feature comes standard (mandatory option 200), so the default always look like E4980AL-XX2.
Yet my unit is called E4980A-030, no signs of AL. Nowhere this E4908A is mentioned in the manuals on Keysight’s website, but I found the old version that hints the transition that fell through the cracks of history:
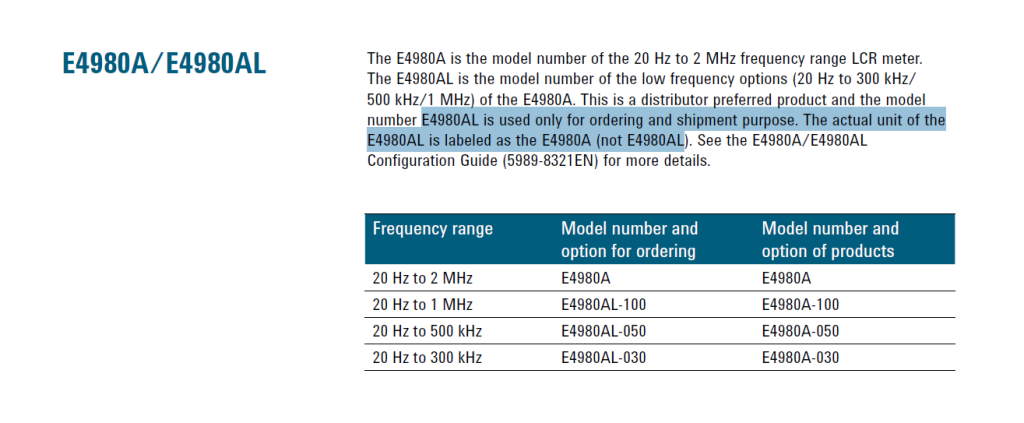
So at some point, Agilent calls everything E4980A at factory level, but they as they were transitioning to rebranding the lower max frequency models to AL series, the AL-series used to be just an alias name for marketing. My unit was branded as ‘A’, specifically E4980AL-030.
Of course later on we saw that Keysight eventually officially put the AL on the physical labels, not just for ordering, and hence the confusion.
I later bought another unit E4980A-CFG012 (also E4980A-030), also no sign of AL either. Turns out Keysight changed the product configuration choices and naming conventions again, but with the new ‘AL’ version (only 300kHz to 1Mhz) introducing a disability that’s not in the traditional ‘A’ versions: they removed the hardware in ‘AL’ (aka 300kHz to 1Mhz models) so the external DC bias options (Option 001/002) cannot be retroactively installed for these neutered ‘AL’ units!

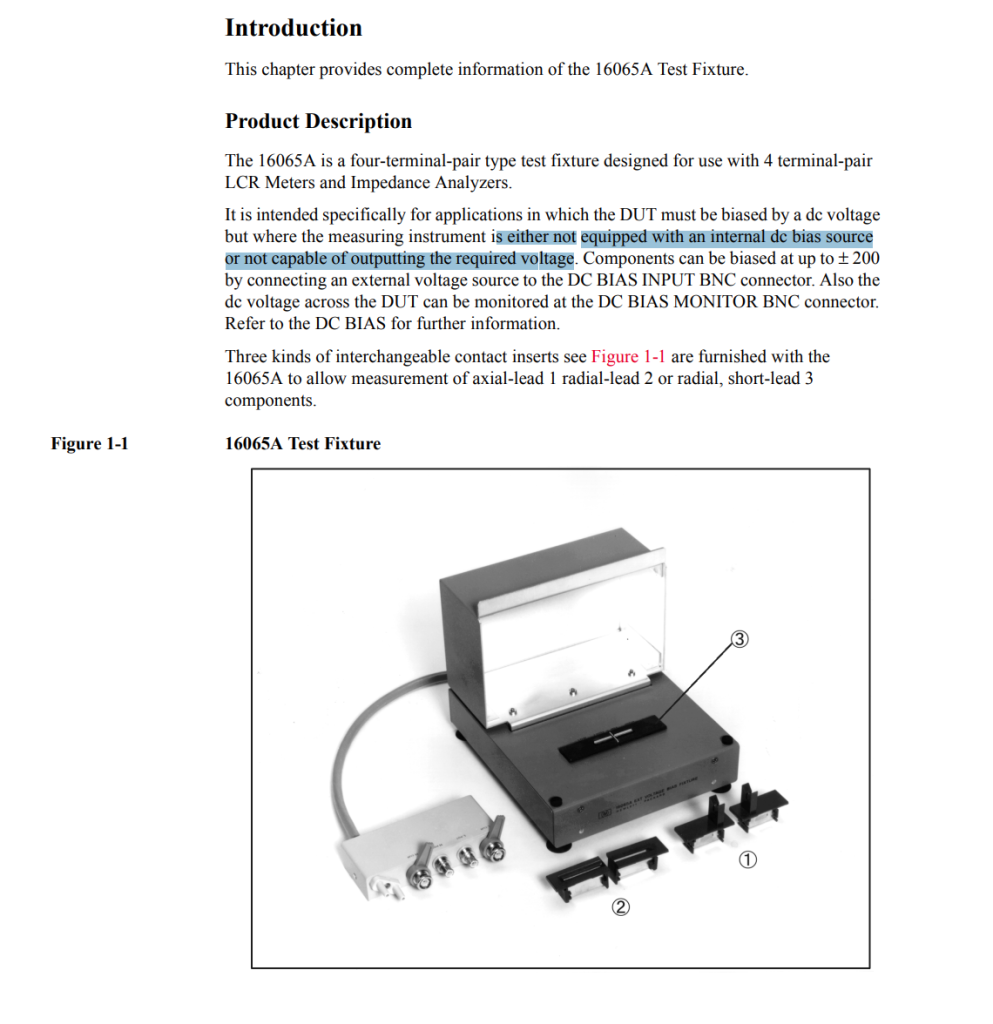
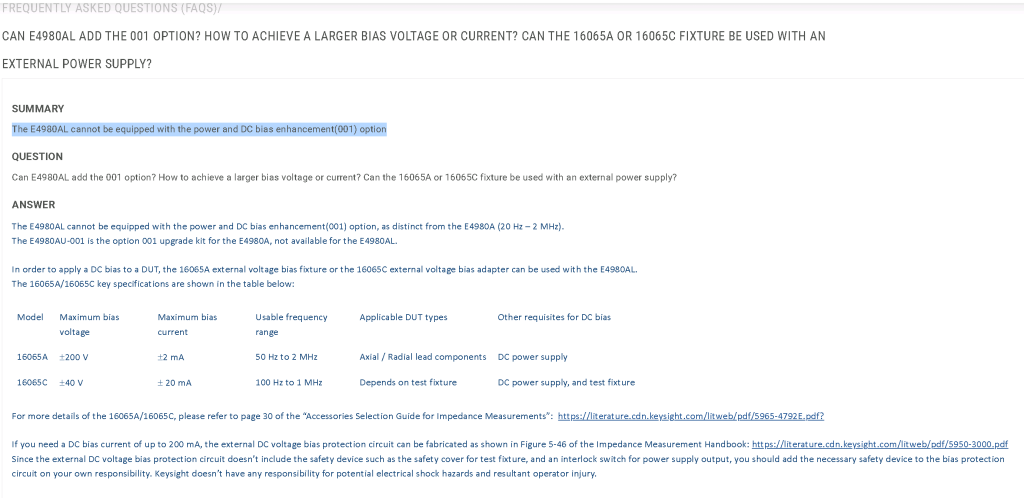
If you have the neutered ‘AL’ models, you are stuck hacking your own external DC bias injectors, but luckily they at least have DC bias fixtures 16065A/C so you only have to worry about managing your external DC bias sources. Specifically you don’t enter the DC bias level through the LCR meter, but you control and monitor the DC bias voltage through the analog input/monitor ports.
Looks like they’re now trying to save manufacturing costs for the 300kHz to 1Mhz models starting with AL. They NOW made the ABILITY to upgrade to external DC bias exclusively to the 2Mhz model customers (which paid $25k). Yes, the ability to have fine control over DC bias other than the 1.5V and 2V set points are exclusive to the top (2Mhz) model now.
As for DCR, the literature is a logic puzzle. Basically it boils down to anything 300kHz to 1kHz (called Option 030, 050 and 100 respectively regardless of A or AL) claiming to have DCR installed by default (whether it’s ‘AL’ or the old ‘A’ bandwidth downgrade editions)
but this is not true for my 300kHz classic ‘A’ model E4980A-030. DCR is not installed, so my unit probably is likely made earlier before when early Agilent’s marketing was still trying to nickel and dime every option.
As for the 2Mhz model (there’s no ‘AL’ version for it. The ‘AL’ version segments the market into 2Mhz and its bandwidth downgrade variants), DCR never come standard so you can either obtain it through buying Option 200 (just the DCR itself) or Option 001 (advanced DC bias, which obviously they should provide DCR measurements given its nature).
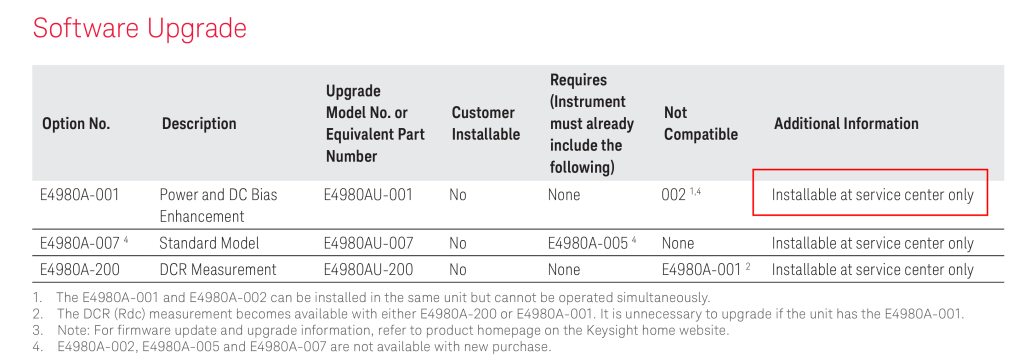
The ‘A’ version used to offer 2Mhz, 1Mhz, 500kHz and 300kHz models (especially during Agilent years), with 1Mhz, 500kHz and 300kHz entered with downgrade options. They all offered the ABILITY to install ‘Power and DC bias enhancement’ Option 001, which the hardware for external bias source was already pre-installed waiting for software activation.
E4980A/AL don’t seem to have a licensing mechanism in the relatively rudimentary firmware, which largely resembles 4284A/4285A, so I guess that’s why they need to activate it from the service center:
Non-neutered ‘A’ models
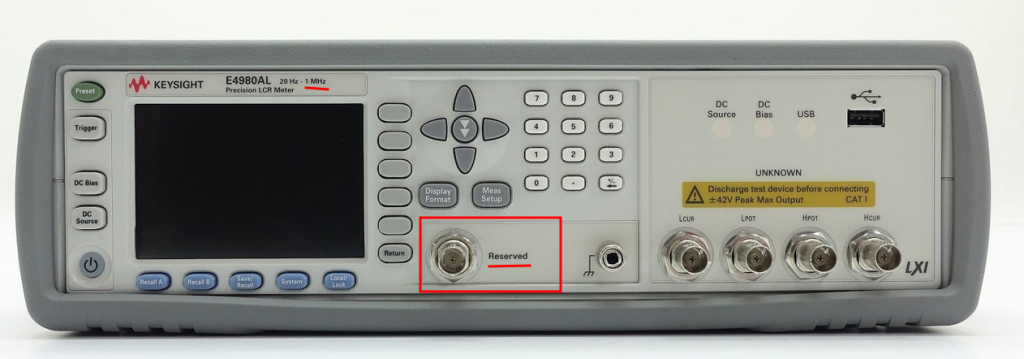
Neutered ‘AL’ models
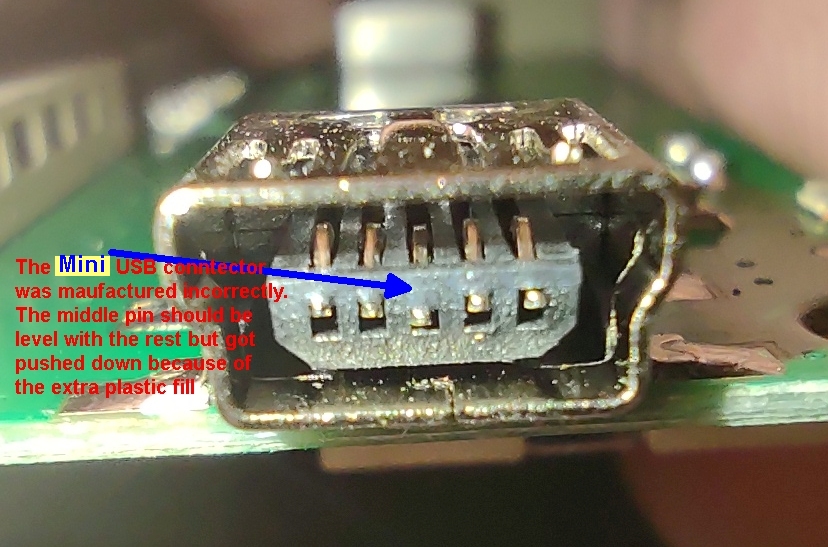
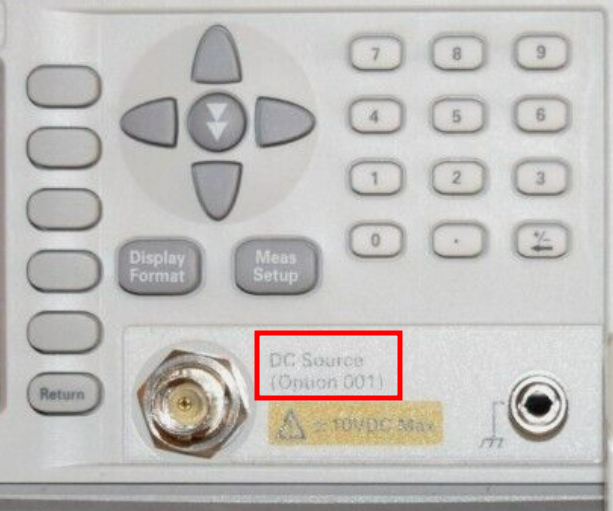
I saw this unit that’s both an ‘AL’ yet it still retains the “DC Source (Option 001)” label. I wonder if it’s at the chaos stage when Agilent haven’t decided what to do with their option offerings:
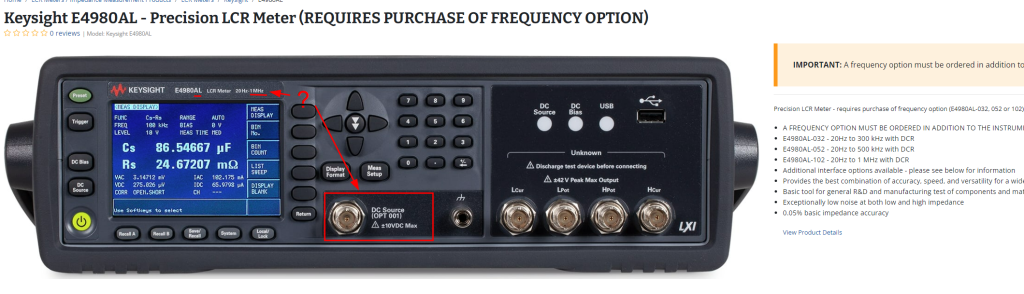
Unless the picture of E4980-AL with a “DC Source” label (not “Reserved” label) was just a manfacturing error, my best guess of the sequence of events is:
- Agilent originally only had the ‘A’ series for all frequency models. All of them has the ability to upgrade to Option 001. DCR are always optional (Option 200) regardless
- Agilent made DCR come standard for lower frequency models (300kHz to 1Mhz), still all ‘A’ series.
- Keysight segmented the market with ‘AL’ representing lower frequency models (300kHz to 1Mhz). DCR still come standard with (300kHz to 1Mhz) units, now named ‘AL’, but the 2Mhz model (now the only available model in ‘A’ series) still does not come installed with DCR (still need to buy Option 200)
- Keysight yanked the ABILITY to do extended DC bias measurements (Option 001/002) from the ‘AL’ series (300kHz to 1Mhz), therefore making the upgrade to Option 001/002 a privilege exclusive to customers of the 2Mhz model (which is the only ‘A’ series). All customers of the ‘AL’ series with a ‘Reserved’ BNC port are shit out of luck and they are stuck injecting and monitor their own DC bias without the help of the LCR meter itself.
By the way Option 002 is ‘mentioned in the newer literature but ‘Bias Current Interface’ which doesn’t say much.
The simpler way to view it is that Option 001 injects a wider range of DC bias into the 4-port BNC DUT ports (Kelvin sensing) and you have the option to source the DC from outside, while Option 002 is the opposite way round, the E4980A controls a big-ass external DC bias box called 42841A which in turn drives a 42842A/B bias current test fixture, which is something common in the 4284A/4285A generation (E4980A series is designed for people to migrate from 4284A/4285A in mind)
Each 42841A box sources 20A and you can stack 2 boxes (42841A) to drive 40A, provided you use a beefier bias current test fixture 42842B (which can handle 40A). The cheaper 42842A fixture can only handle 40A (one 42841A box setup). Stacking the two 20A DC bias sources (42841A) requires a 42843A bias current cable:

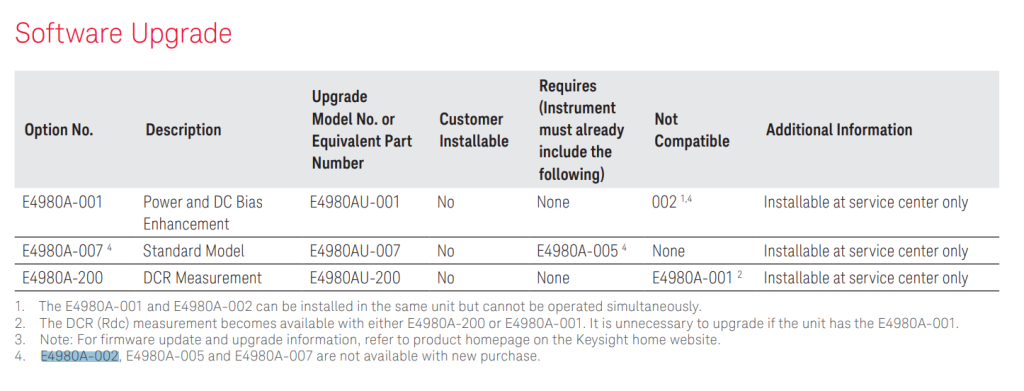
I think Keysight sunsetted Option 002:
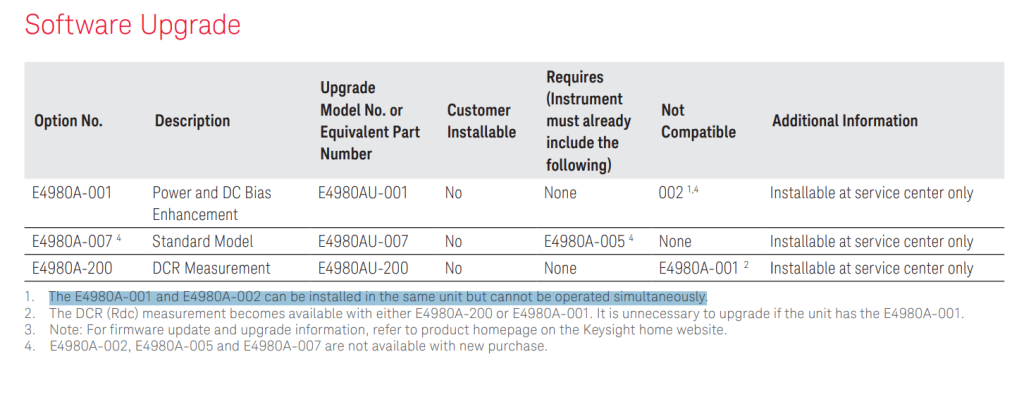
Option 001 and Option 002 are different ways to get bias current into the fixture, so despite you can install both of them, it makes no sense to (and you cannot) use them simultaneously.
With Option 001, you manage/provide your DC current source externally (or use the dinky current source they provide but you’re not stuck with only two discrete 1.5V and 2V bias levels which is in all base models and can go up to 40V) and let the LCR meter inject it into the DUT ports.
With Option 002, you use your LCR meter to command a big DC source box that provides current to a fixture with an additional DC bias source injection port.
References:
[1] E4980A/AL User Guide: https://www.keysight.com/us/en/assets/9018-05655/user-manuals/9018-05655.pdf?success=true
[2] Old E4980A (Agilent days) datasheet: https://www.valuetronics.com/media/vti/datasheets/Agilent%20E4980A,%20E4980AL.pdf
[3] New E4980A/AL (Keysight days) configuration guide:
https://www.keysight.com/us/en/assets/7018-01786/configuration-guides/5989-8321.pdf
![]()