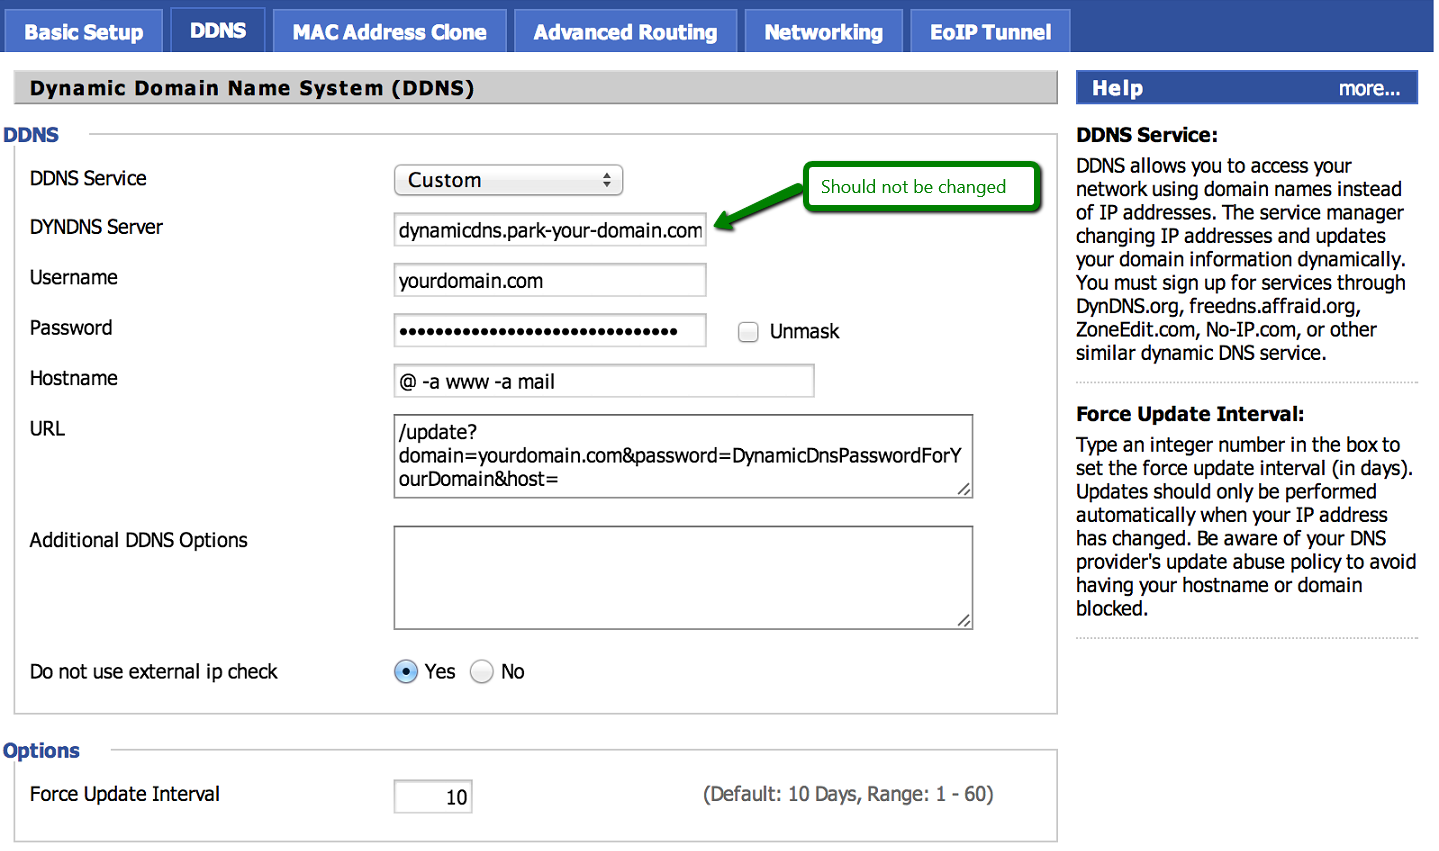
The “WAN – DDNS” page only allows users to set the DDNS updater to check as frequently as every 30 minutes. My DDNS provider does not have an update frequency limit, so I’d like to have the update client check for every 1 minute. The setting is called “Verify every”:

Attempting to set it to every 1 minute gives this error message:

I searched for the “WAN-DDNS” config webpage file (Advanced_ASUSDDNS_Content.asp) in the firmware source code, and found that it’s under /www folder in the router’s linux root.
Since “Verify every” is such generic words, and Github does not support exact phrase match in search (I use “in:file” specifier in the search box), I pick “WAN IP and hostname verification” (the closest setting which I expect the code to be in the proximity of the one corresponding to “Verify every”) so it has more unique keywords. The first jump:
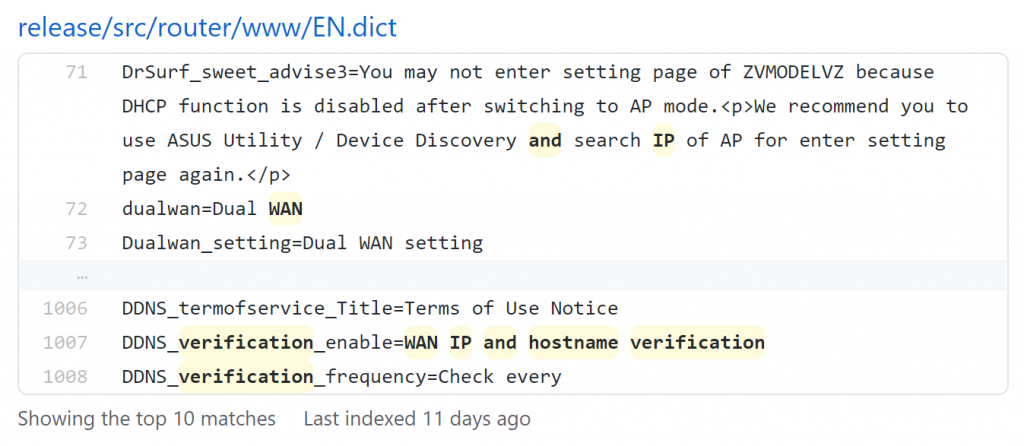
Since it’s just a dictionary files, we search for the associated internal variable name
“DDNS_verification_enable” which points to the this line in Advanced_ASUSDDNS_Content.asp:
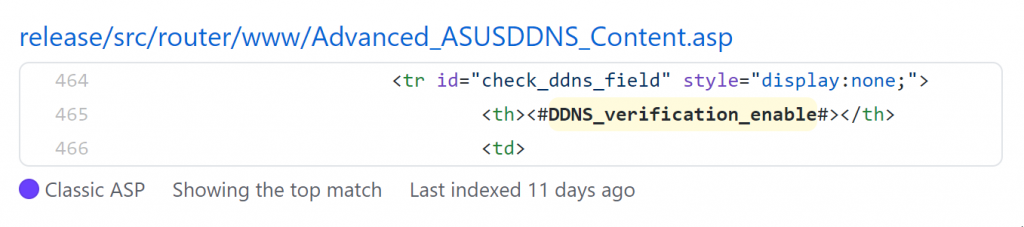
Since this name appeared nowhere else, I traced the “id” attribute above, which is “check_ddns_field” and I see a Javascript (.js) file that process the data from the web page forms:
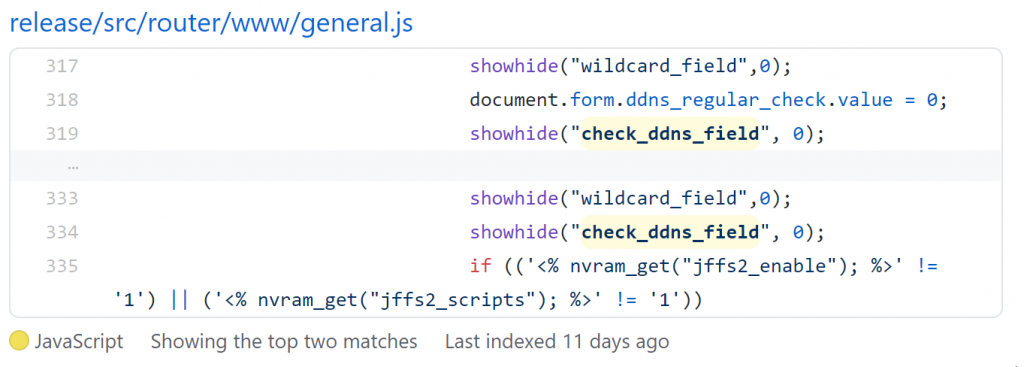
The variable check_ddns_field appears in the if-else-if branches of change_ddns_settings(), so one of the few next few variables after it is likely to correspond to “Verify with”.

The variable name showed up in 4 branches of if-elseif-else switches (switching DDNS service providers), which ddns_regular_period comes right after

Searching for the class member (or struct field)

Bingo. Here’s the entry value range check code. I’ll change the “30” minutes to “1” minute to enable checking at 1 minute intervals (which I think it’s reasonably responsive for testing and general use).
I’d prefer to check if the input range check is there out of feasibility (i.e. what is the smallest increment) or it’s just set to prevent people from getting banned by the DDNS provider for checking too frequently. I looked into the last occurrence of ddns_regular_period and found this:

Which means the web forms is updating NVRAM (environmental) variable of the same name ddns_regular_period, which appears to be called only in watchdog.c:

And Dang! The code enforces if the ddns_regular_period (on NVRAM) is set to be less than the original 30 minute minimum (invalid condition), it’d be set to the default 60 minutes (1 hr).

It’s actually sloppy coding because the defaults are specified in struct fields in defaults.c:

yet that 60 minutes is hard-coded in watchdog.c. That means if I don’t catch it and only changed the default in one place, the behavior will not be what I expected given the right conditions. This is an example of why software feature expansion are likely to break things. If you have solid code, bugs on updates are likely to happen.
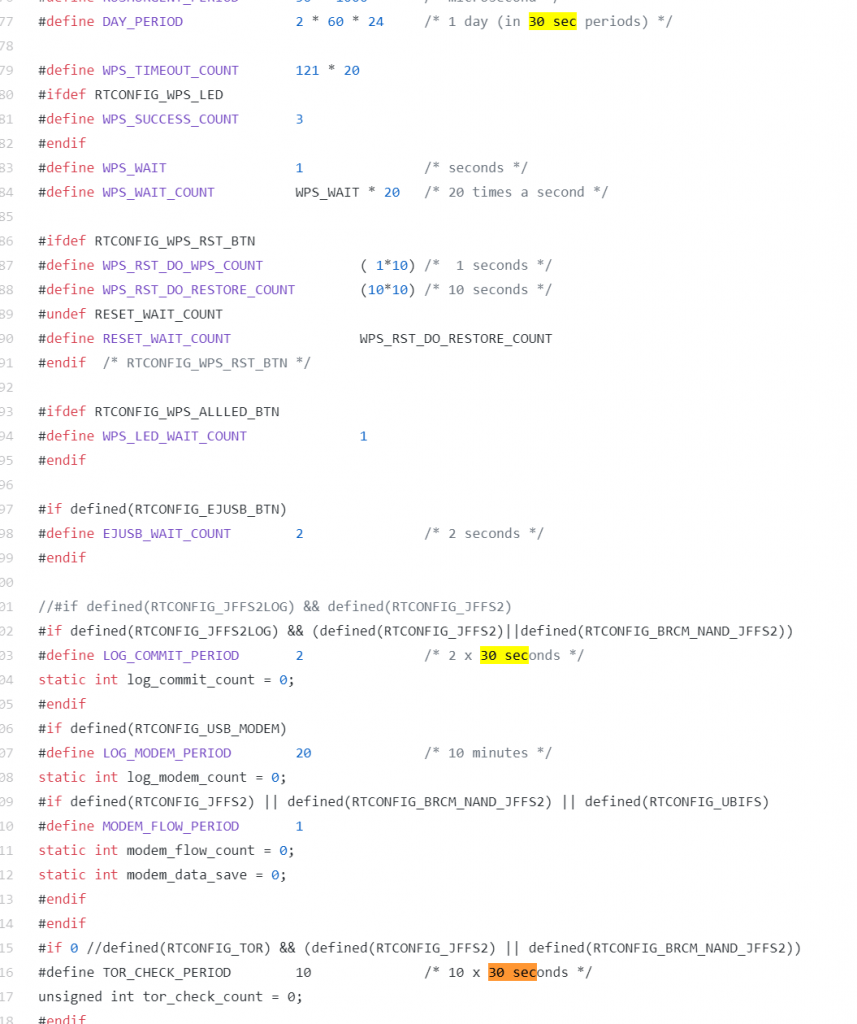
I was curious why it says (period*2)

and suspected the ddns_check_count is incremented in 30 second (half-minute) interval. Since it’s watchdog.c, my natural guess is that the watchdog checks every 30 seconds for these event hooks. Turns out the notes (comments) in the code has “30 seconds periods” noted everywhere.
I searched a little bit more about linux watchdogs and found this useful webpage which explained how it works. I didn’t see /dev/watchdog in my router’s rootfs (root file system) so I assumed it’s a hardware watchdog (embedded linux, so duh).
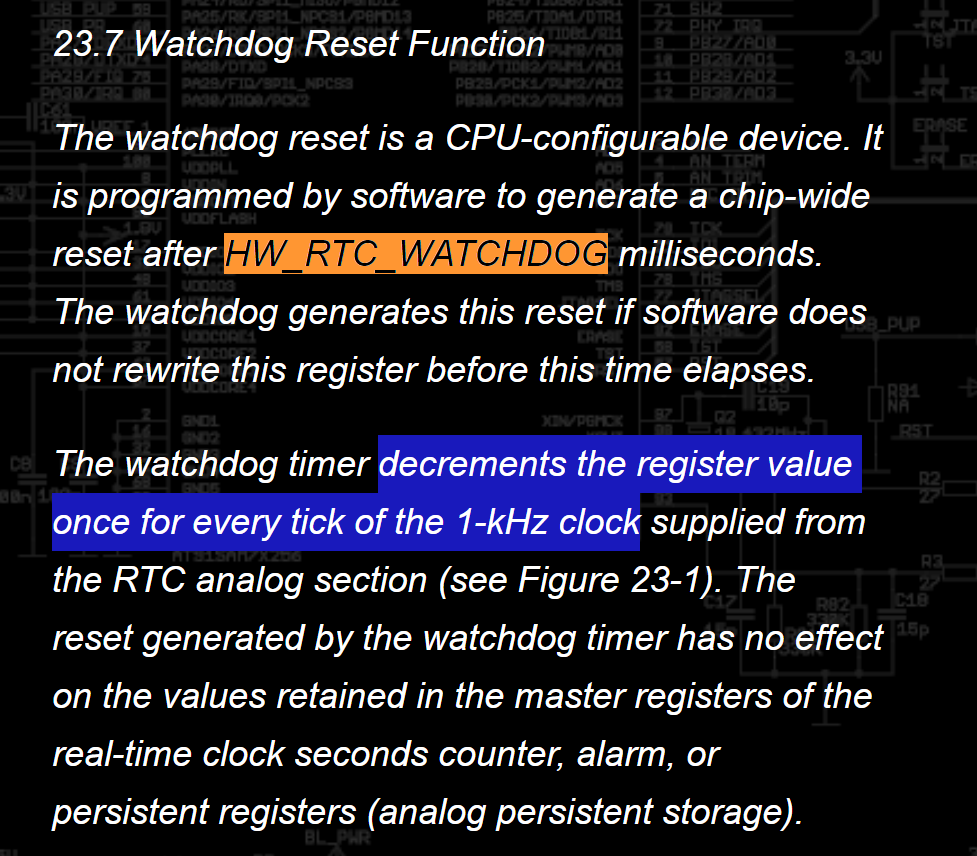
I was about to dig up the hardware manual for the chipset for my router, but I search for they string HW_RTC_WATCHDOG first and it showed up in linux kernel code (duh):

Note that the HW_RTC_WATCHDOG is a register in this code base, not the number of seconds from Christian’s Blog. i.e. they are completely different things, but it provided a good keyword lead for me to start digging.
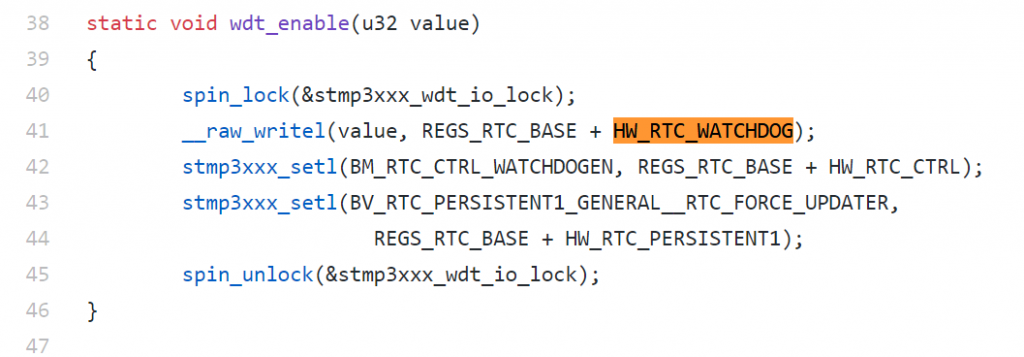
The code seems to be the same for various kernel version so I picked any one of them to understand the behavior. First occurrence is in wdt_enable():
The other places are suspend/resume, so I’ll ignore those for now. Note that wdt_enable() is a static function, so only need to search within the same file. The only active place that calls it is wdt_ping():

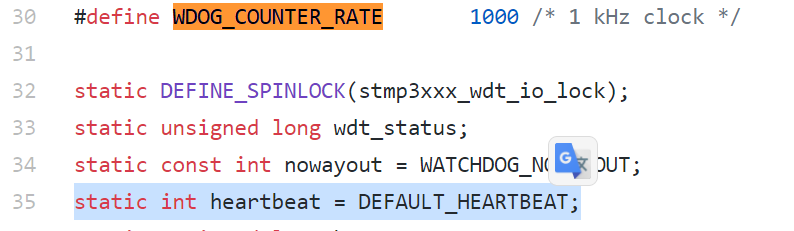
So there are only 2 things I’ll need to find out: heartbeat and WDOG_COUNTER_RATE:
…. unfinished
https://bitsum.com/firmware_mod_kit.htm
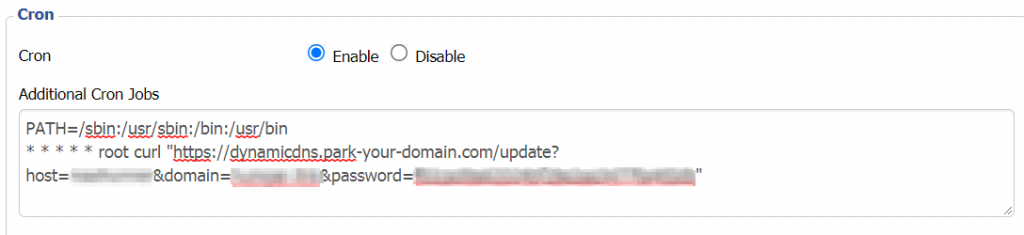
While it’s a lot of useful learning about Embedded Linux and hunting down source code, for the meantime, given that namecheap does not care if you blindly update every minute, it’s easier to just set up a cron job that runs at every N minutes using curl/wget.
dd-wrt has a place for you to enter the cron scripts with the web interface, but you might need to log into the router using SSH and register the cron job yourself:
The core command is called ‘cru‘, which typing it in the command prompt will show you the very simple usage:
admin@Router:/tmp/home/root# cru

Cron Utility
add:    cru a <unique id> <"min hour day month week command">
delete: cru d <unique id>
list:   cru l
<unique id> is just a tag that you make up to name your task. Again the one-liner command needs to be direct absolute path. My ‘curl‘ program is located in /usr/sbin, so the command is:
cru a ncddns * * * * * /usr/sbin/curl "https://dynamicdns.park-your-domain.com/update?host={subdomain or @ for root}&domain={registered domain name}&password={DDNS-specific password generated by namecheap's domain administration page under Advanced DNS}"The “* * * * *” refers to run at every “minute, hour, date of month, month, date of week”, in other words, run at every minute in every waking moment. The wild card * means ALL-OF.
Cron job registration through CRU is not persistent, so to make it survive reboots, add the above cru command as a line to /jffs/scripts/services-start script. It should be executable by default, if not, make sure you set it to be executable or it won’t run.
![]()