Windows Live Mail (2012) IMAP Folder Setup – Gmail

Many years ago, Gmail changed their folder structure so some of the IMAP settings tutorials are not correct anymore. Since Windows Live Mail (WLM) auto-configures Gmail, the special folders are automatically determined and they cannot be specified. Please leave Root folder path alone like this:

Gmail IMAP folder settings are automatically configured when established automatically in Windows Live Mail
Do NOT change the settings. If you do manual configuration, make sure you mirror these settings.

Basically Gmail decided with the exception of Inbox, which stays at root, all “System labels” goes under the subfolder [Gmail]. However user-created labels (simply called “Labels“) stay at root folder level. For example, I have a user folder called Save enabled for IMAP, the folder tree with the Gmail account looks like this:

Example of Gmail IMAP folder structure. Inbox and user-created labels stays on top.
ALL system labels go under the subfolder [Gmail]

Because you cannot specify where the Trash folder is, delete button really mean delete (to a recycle bin that’s purged in 30 days), not archive to a folder.

Also because Gmail is smart enough to save a copy in your [Gmail]/Sent Mail folder if you use their SMTP (out-going mail) server, the “Save copy of sent message in ‘Sent Items’ folder” setting on Windows Live Mail is irrelevant: you cannot choose not to save it.

And yes, I tried it checking this (for other non-Gmail accounts), and confirmed that Gmail is smart enough to save one copy (not one from the SMTP and one executed by the client).

So here’s a summary:

  • Gmail automatically configures and dictates IMAP’s special folders. You have no choice
  • No special folder choice means you cannot reroute ‘delete’ to mean archive/move
  • If you use Gmail’s SMTP server (likely), it will save a copy of outgoing mail to [Gmail]/Sent Mail folder. You cannot turn this off.
  • Save copy of sent message in the ‘Sent Items’ folder‘ is irrelevant if you use Gmail’s SMTP server. It will correctly save only one copy of the sent mail.

Loading

Namecheap Dynamic DNS Update Client for Windows

Namecheap provides a free Dynamic DNS client for Windows but unfortunately the client cannot be run as a service. To manage remote computers, the dynamic DNS update should at least run before any user is logged or we’ll run into a chick-and-egg problem: you want to log in remotely but the IP of the remote computer is not known (mapped/updated) until you logged in.

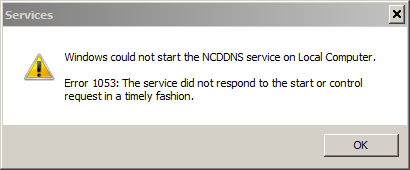
I initially tried to use sc.exe to create a Windows service but the program lacks a ServiceMain() implementation so the service won’t start:

Turns out there is a way to wrap a Windows executable not designed to be used as a service (without ServiceMain() implementation) and make it run as a service. Use a tool called NSSM – the Non-Sucking Service Manager!

Note that the default setting for “Log on as” is “Local System Account”, which will not work with this free Namecheap Dynamic DNS client. You must set it to “Log on as” an Administrator account.

To start the newly created service without rebooting, do nssm start <servicename>, where <servicename> is replaced by the name you choose for the service.

Note that the ‘Path to executable’ for the newly created service is nssm.exe itself, not directly the DNS update client program (like what it’d be if you create the service through sc.exe instead of nssm.exe). The reason is that nssm.exe is the wrapper that calls the underlying executable.

Loading

termdd.sys BSOD because of remote hack attempts

Recently my computer keeps ‘randomly’ getting BSOD over “termdd.sys” and “IRQL_NOT_LESS_OR_EQUAL”. Upon some research on “termdd.sys”, I noticed there’s a RDP heap corruption attack (https://securitynews.sonicwall.com/xmlpost/rdp-vulnerability-cve-2019-0708/) for RDP services.

In the past, I opened up my computer’s RDP service to the wild (bad practice) by routing the traffic to the right computer. The attempts did not successfully break into my computer, but in the process, these villains are corrupting my computer memory (heap) thus causing the BSOD.

Instead, I plugged the bad practice of opening up web services that are only for me to use. Instead connect to my home network using VPN when I need to access my computers. Since then the BSOD disappeared.

Lesson learned: Your computer is not hacked by a remote exploit (probably patched enough) doesn’t mean the exploit won’t trash your computer memory till it crashes. Better use a VPN than directly opening up RDP to the wild internet.

Loading

Windows path length limit

Windows has a path length limit that are typically at the order of 250 (260 for Windows 10) that’s a pain in the butt when moving files. Despite you can override it, it’s no fun when you copy a jillion files just to find out a few can’t make it because the path is too long and you have to find out which ones are not copied!

There’s a short command to check if the path exceed certain number of characters, which I recommend testing for 240 character so you can at least have a 10+ character folder on the root folder to put the files in:

powershell: cmd /c dir /s /b |? {$_.length -gt 240}

Loading

Cantonese IME for Windows 10

There are not many decent Cantonese IME around. The best option for Windows 7 and before are CPIME. It borderline worked for Windows 8/10 (desktop mode only), but I heard recently Windows 10 broke it in its 1903 update.

Dr. Choi kindly wrote another Cantonese IME called CAP, which I came across while looking for Cantonese IME for Linux. This is the only option that works with Windows 10 natively (apps and desktop).


Getting CAP 2018 to install
[Deprecated, please use CAP 2021 instead, see below]

Unfortunately the installer failed on a fresh Windows 10, saying that “CAP.dll” cannot be registered. I looked at the error code and it usually suggest a missing dependency for the DLL. I used Dependency Walker to look at what’s broken and noticed those are Visual C++ 2015 DEBUG runtime DLLs. Since debug builds aren’t suppose to have a redistributable runtime (it’s actually called NonRedist), the only solution is to install the community edition of Visual C++ 2015 to obtain these DLLs.

Note that “Common Tools for Visual C++ 2015must be included (installed) so the IME won’t be broken (grayed):

The cause is the missing UCRTBASED.DLL. The files are located at:

C:\Program Files (x86)\Windows Kits\10\bin

It’s under the (x86) variant of Program Files regardless of whether it’s 32-bit or 64-bit.

The missing link to API-MS-WIN-CORE-PATH-L1-1-0.DLL is not important.

After you installed the IME after installing Visual C++ 2015 (any flavor, minimal is OK), you can remove Visual C++ 2015 without breaking the IME, EXCEPT you need to back up the UCRTBASED.DLL first and put it next to the core CAP.DLL file for the IME:

C:\Program Files\Sixth Happiness\CAP\x64

Getting CAP 2021 to install

CAP 2021 still won’t install on fresh installation of Windows 10, and I ran it through Dependency Walker and noticed it’s missing VCRUNTIME140_1.dll. Based on this post, this is part of the Microsoft Visual C++ 2019 Redistributable:

Microsoft rolled the runtimes for 2015, 2017, 2019 and 2022 into one package, so if you want missing 2019 runtime DLLs, you might as well install it. This time the package didn’t use any debug version of the runtime like in 2018, which makes life much easier.

Loading