Deltacopy is a GUI wrapper around rsync, a feature-packed tool to copy files locally AND remotely, AND differentially (automatically figure out the parts that are different and resend. Excellent for repair) through hash comparisons. For non-programmers, hash is a unique ID computed for a chunk of data that are expected to change wildly even at the slightest data/file change/corruption).
Deltacopy is very useful if you just want to do the basic stuff and not know the rsync syntax and switch combinations off the top of your head. It also provides a windows port of rsync based on Cygwin (a tiny Linux runtime environment for windows). This is the only free alternative to cwRsync, a paid Windows port of rsync.
rsync is a Swiss Army Knife that can also work from one local path to another. Deltacopy is intended for remote file transfer.
Deltacopy server is basically this:
rsync --daemon However in Windows, since it’s cygwin, it’s looking for linux’s /etc/rsyncd.conf by default if you do not specify the config file through --config switch.
Deltacopy client basically help you generate the command to transfer files. Most of the features are done through right-click (context) menu, not toolbar or pull-down menus, which might confuse some people. You set up your tasks as Profile, which can be scheduled (the bottom panel) or executed immediately by right clicking on the profile:
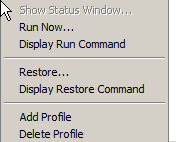
Run is pushing file to the server, Restore is pulling files from the server. Run Now and Restore are for executing the command (aka task) immediately. You can peek into what it generated by right-clicking on the profile and choose “Display Run/Restore Command”. First time users might not be able to find it since the only place to access it is through context menus.
There are some tricky parts (gotchas) for specifying the files/folders to copy. First of all, even though you use Add Folder/Add Files button for entries
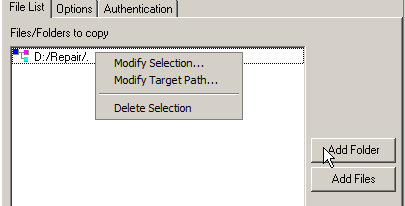
Basically you can make a (source, destination) pair by modifying the selection and target path. It’s just passed onto rsync command verbatim. The target path is relative to the virtual directory set on he server (see Deltacopy Server’s directory)
The destination path which is endowed with the branch folder name (one-level). In other words, if your source is C:/foo/bar, Deltacopy by default set the destination to /bar instead of /. This is probably to avoid the temptation of lumping all contents in the same remote destination root. If you just want to simply lay the files at the root virtual folder at the destination (my most common use case), you’ll have to edit and clear out the (relative) destination path.
As for the source, the author of rsync chose to do it the logical (more conservative) way but not intuitive way: by default it reconstruct the source folder’s FULL path structure at the destination! For example if you intend to copy everything under C:\foo over, the destination will create {destination root}\foo in the process and put everything under it instead of directly at {destination root}. The design choice was supposed to prevent accidental overwrites as multiple source subfolders try to write over each other with the same names at the destination.
Luckily, there’s a way around it! See man pages for -R –relative: Put a dot (.) at the place where the relative path starts! For example, the source is C:\foo\bar\baz and you do not want /foo to be created at the destination and want it to start with /bar instead. You should enter C:\foo\.\bar\baz as source. Everything the left of the dot (refers to self-folder) are stripped from the destination path structure.
ACL support for Windows sucks because rsync lives on cygwin, which has POSIX (unix/linux) type of permissions/ACL.
In my opinion, the best way to go about it is to not transfer ACLs from the source and follow the preexisting ACLs at the destination. I’d also leave the groups and owners alone (inherit at destination) as well I might not be on the same active directory (or workgroup user management) as the destination computer so accounts with the same name might not be actually the same accounts.
--no-p --no-g --no-o–no-{command} is the complement prefix that does the opposite of the -{command}, so the above means skipping -p (perms/permissions), -g (group), -o (owner) and make sure it has full permissions for everybody.
Sometimes a remote path can be mistaken as a relative local path with the hostname/IP address as the folder name if there’s no username. Start it with rsync:// as the URL scheme and the syntax is like ftp:// as far as username is concerned.
Deltacopy protects the source and destination paths with double quotes (“). It’s a good practice that we should do it even with direct rsync calls.
![]()