The common use case starts the program with Run.bat which is just a wrapper for the powershell script Install.ps1.
Unlike conventional designs, there isn’t really a dedicated installer nor the program runs standalone. The launcher starts the WSA if it’s already ‘installed’ and ‘install’ it if it wasn’t. If a WSA was launched, it’d be closed and restarted (yes, it will interrupt the apps opened). So you basically trust the Install.ps1 script to do the right thing managing everything needed to get WSA up and running.
The Hyper-V virtual machine is really in %LOCALAPPDATA%\Packages\MicrosoftCorporationII.WindowsSubsystemForAndroid_8wekyb3d8bbwe\LocalCache\ and everything is in userdata.*.vhdx so there’s only one file to backup and restore.
Direct Android App icons on Windows Start Menu
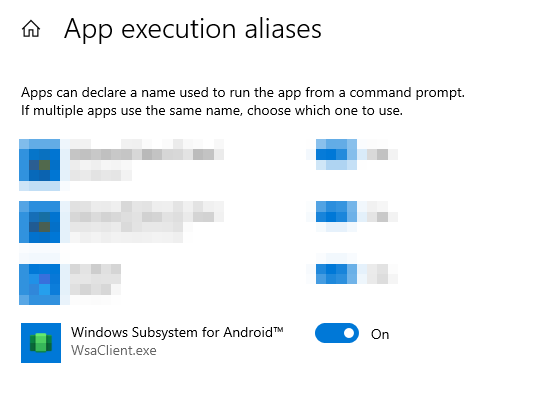
The Windows start menu icons created by installing apps on WSA are launching the stub (App execution alias) to wsaclient.exe located in %localappdata%\Microsoft\WindowsApps\MicrosoftCorporationII.WindowsSubsystemForAndroid_8wekyb3d8bbwe\
Specifically the syntax is wsaclient /launch wsa://{android application ID}.
Annoying windows/apps opened every time WSA (Run.bat) is started
It’d make sense to say if WSA displays nothing after successfully starting in the background, beginners won’t know where to start. It typically starts these
native Windows WSA settings app (Microsoft App, not Android App)
Google Play store (Android app)
Android Settings app (Android app)
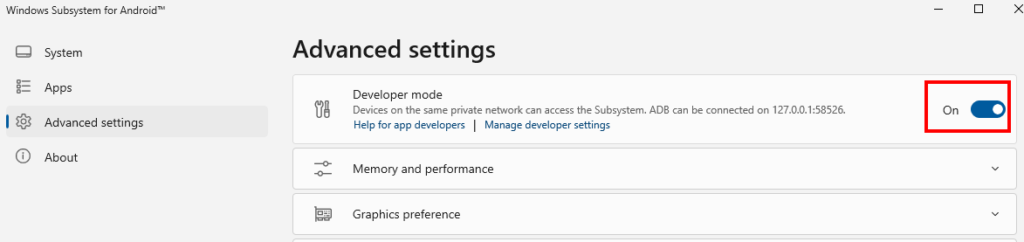
If you installed the WSA with KernelSU, a webpage with the docs about KernelSU pops up every single time you start the WSA, which is ridiculous.
Turns out it’s these lines (the Finish block) in Install.ps1‘s design decisions. I simply commented these nusiances out now that I know where and how to launch them when needed
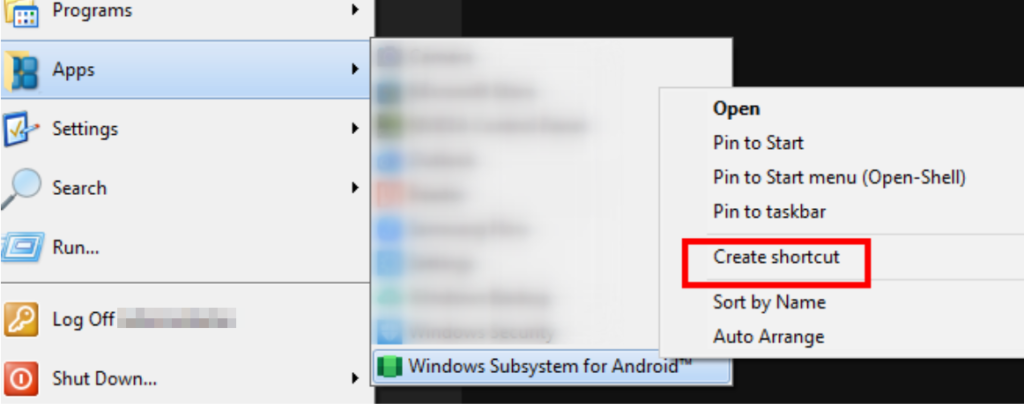
Creating icons to Android apps
Google Play app is usually created by WSA, but not the Android-Settings Android app and WSA-Settings Windows App. Disabling these above means I’ll have to make the icons to them since they are the starting points to managing the emulated Android system.
If you forget Windows Apps are different from Windows programs like I do, you should right click on the WSA-Settings Windows App and make a shortcut icon out of it to be used on the Windows Desktop or Start Menu.
Android-Settings Android app icon can be created from this command:
Since WSA doesn’t come with many apps. If you don’t want to login to your Google account to use Play store, you can download the APKs (say Apkpure) and sideload it with WSA Sideloader. It’s avaiable
There is a conceptual trap in NTLite’s registry and post-setup section: anything user-specific are not handled properly until an account is established (say created by NTLite itself)! You might even run into this dead-end if you attempt to tell NTLite to install user-interactive programs before an account exist.
How can you install software that did not come with Windows without an account in place and Windows will know where to put the user-specific registry settings? Silent installers might get stuck as they don’t know how to handle it gracefully (such as aborting the particular installation and move on). So you might need to hard reset to interrupt the confused silent installers until there are none left.
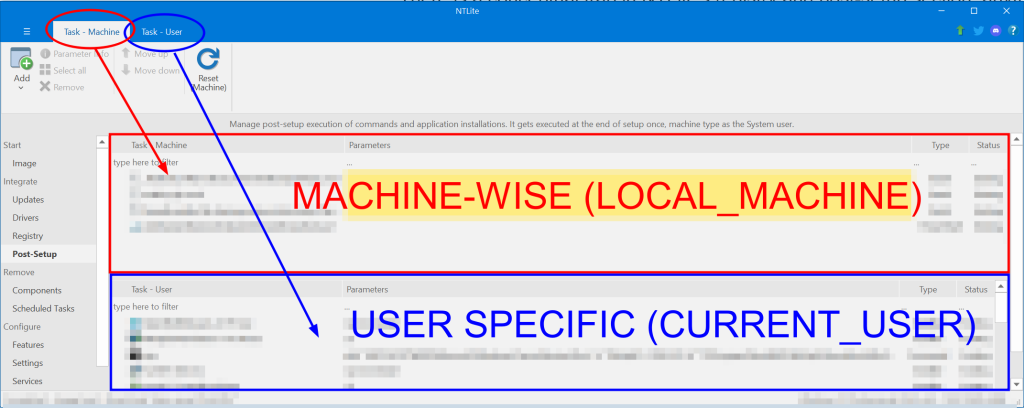
Machine vs User
First of all, NTLite’s UI did not educate the user on the concept of ‘Machine’ vs ‘User’ and what are the implications and bad things that’d happen if conflated the two.
TLDR: ‘Machine’ vs ‘User’ in post-setup section is a matter of WHEN (before or after an *user* account is active), not a matter of WHICH (machine-wide or user-specific)! This is what the UI in NTlite doesn’t tell you and I had to figure it out on my own!
More specifically in the forum, ‘Machine’ refers to a special SYSTEM account (a kind of service account) which you cannot interact like a built-in Administrator (typical user account that’s a member of the interactive user group). When your user-interactive programs/installers try to write as (which settings also go into) a SYSTEM account, it’s hard to predict how the programs/installers will react when the program learned the hard way it shouldn’t/couldn’t/wouldn’t!
Of course if an operation is purely system-wide with no user-specific components, you can eagerly put them in the ‘Machine’ bin if you are 100% on top of it and know the operation has ZERO side effects/dependencies that are user-specific, but this is not necessary nor helpful to do so if it’s not a scenario that you absolutely have to. e.g. enabling an account before you have an active account is a good use of the ‘Machine’ section.
Machine refers to system-wide operations that are not tied to specific accounts, something like adding an account (or enabling built-in administrator account before the NTlite bug was fixed) or enabling Powershell scripts to run in the unattended process (yes, it’s disabled by default which is super-annoying).
You can think of it as if you are booting into Windows Recovery Environment (which is a kind of WinPE) and enter things in the command prompt (before you hook to a specific installation of Windows and log on as a specific user if applicable). Whatever that won’t work in WinPE/RE, you shouldn’t put it in the ‘Machine’ section of post-setup either.
Like you don’t want to install Microsoft Office through that minimal Windows scaffolding (WinPE), the ‘Machine’ section is not where you manage things that interacts with the user.
Keep the ‘Machine‘ section to the minimal and restrict to things that you fully know what are the implications of what you are doing. ‘Machine‘ is a place for you to enter things that you’ll run into a chicken-and-egg problem if you don’t do it before an user account is established/active. Don’t use this section if you don’t have to.
Say, it also doesn’t hurt to move HKLM (Machine-wide) registry operations to the User section (doing it from an user account) as long as that account has administrative privileges. More things can go wrong when you run operations before the system even has an active account.
User refers to what goes on after a *user* account is established. It’s like logging into your account (like Administrator) and start running programs there. If you’d install that program or run that command after you logged in as a user if you were to do this unautomated, this is the section where you should put in such commands.
User interface
The UI of post-setup is easy to miss/misunderstand. It’s very badly organized that it will lead people to do the wrong thing and land in cryptic errors or produce output images that doesn’t behave the way they anticipated. It’s another one of the design choices that’s convenient for the programmer, miserable for the user.
This clumsy UI design encourages the users to randomly dump the commands/programs with no regard to the distinction between ‘Machine’ and ‘User’ sections onto the Post-Setup page. For ages I thought programs go to the top and commands go to the bottom!
This is actually how the UI is structured: you are editing the page like a spreadsheet in Ribbon-enabled Microsoft Excel, not going through an installation wizard!
NTLite subdivide the post-setup screen into two halves (tables).
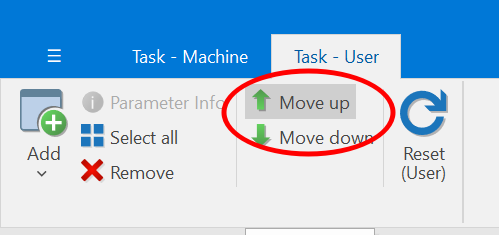
What’s so clumsy about this is that they don’t let you double click and add a new text command entry in the relevant sections (machine vs user) yet they let you drag and drop files into the sections! You also cannot drag-and-drop (move and insert) lines and you have to rely on “Move Up”/”Move Down” button. That’s the shortcut I’d take if I’m in a hurry to rush the program out to meet a hard deadline and there’s only 24 hours in a day, but yuck!
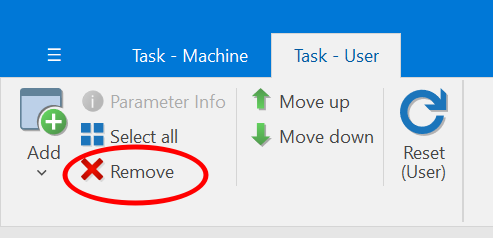
What even made less sense is that you can highlight a like and hit delete, yet you can’t right click on the line for a context menu to remove it. Instead you have to look for the ‘Remove’ button in the ribbon if you wish to delete a line with your mouse:
This goes the same with ‘Select All’, which the shortcut Ctrl+A works so I never paid much attention to the ribbon bar, which caused me to overlook the distinction between the two tabs for ages!
To add text commands, you have to use the ‘Add’ button from the ribbon, but you have to watch out which tab you are in (circled in the screenshot above with the matching color code)! The ‘Add’ in ‘Task – Machine’ tab looks exactly the same as ‘Task – User’ tab except the ‘Reset’ button says ‘(Machine)’ instead of ‘(User)’! WTF. This logically make sense if you are editing an Excel spreadsheet, except that we aren’t! It defies user expectation that it’s a step-by-step wizard, not a config file editor!
This means if you click on the ‘Add’ button from the wrong tab, the entry goes into the wrong section. Guess what? People tend to go with the first thing they see without reading every detail so every text command tend to go to the top half, which is the ‘Machine’ section! WTF.
It’s a terrible design that’d makes structural sense to the designer trying to save the work of ‘double-click and type’ UI by squeezing the clumsy menu-button ‘Add/Reset’ mechanism into the Microsoft Ribbon paradigm! You don’t want the ribbon tabs to look almost identical and use the tab for the ‘state’ information (in this case, the state info is “This command refers to the Machine section or it refers to the User section?”). It’s just setting the user up for failure.
Suggestion
I think it’d make more sense to simply split Post-Setup into two pages: Post-Setup (Machine) and Post-Setup (User), which the timeline accounts for the order of execution. This is the least-effort path from the developer’s perspective and it will promote the discussion about the difference between Machine and User sections which is essential to make sure the output works (or works as intended)!
The UI design in NTlite’s Post-Setup sucked so hard that we might as well be better off just editing a text cmd file where the user can drag and drop a file into the text editor for the full path. Then have a cmd file massager/transfomer/parser that strips the source paths and copies the files into a vault sources\$OEM$\$$\Setup.
If it’s a powershell script, just add a banner that tells user to call powershell.exe (first token) and have the path of the script as a parameter. I learned the hard way that NTlite isn’t doing anything to bypass Microsoft’s new hardening that doesn’t allow powershell scripts to run by default. So the UI adds no value to powershell script handling either, as I had to run this in Post-Setup before anything else to add powershell scripts to Post-Setup to actually get executed:
The present UI design for Post-Setup is simply counterproductive! All it does is to add constraints to pretend to have a structure where the structure adds no benefit to the use case. This would be one of the least effort path for the developer if somebody argue that it’s beneficial to put the ‘Machine’ section and ‘User’ section on the same page. At least people know why there should be two sections and they are not fungible!
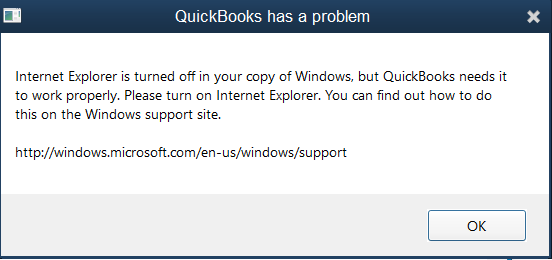
Turns out there’s two hurdles to launching Quickbooks as they used some old Windows dependencies
Internet Explorer needed for DLL/ActiveX/DCOM
XPS Writer needed for PDF libraries
In later versions of Windows 10, IE11 was turned off by default, and 21H2 made it difficult to re-enable it by hiding it from Windows’s (optional) features checkboxes, so it needs to be enabled through command line.
If you do not enable Microsoft’s XPS Writer feature, you’ll get this error message about PDF on start, though XPS is Microsoft challenger to PDF so they are not the same thing
Microsoft has disabled Internet Explorer on later versions of Windows 10 as they really want people to use Microsoft Edge. However, disabling Internet Explorer 11 might break some software such as Quickbooks 2019, which relied on old fashioned DLLs.
Since 21H2, Microsoft went the extra mile preventing users from re-enabling Internet Explorer 11 by hiding it from GUI ways to turn Windows features on or off (whether you use the app mode interface or the classic optionalfeature.exe interface launchable from control panel’s “Programs and Features”). Instead this needs to be enabled from the command line