Mailpile Installation Notes

There’s a powerful Gmail web interface replacement for your regular mail hosted anywhere called Mailpile. Think of it as Thunderbird but hosted like a web page. There are a few things I liked about in the process of freeing myself from Gmail:

  • Free to use any email (storage) services and not tie your client to it
  • View multiple accounts at the same time (NextCloud won’t do it)
  • Very clean, concise interface that makes sense (Gmail users will be comfortable with it)
  • Very security and privacy conscious with attention to details! It even encrypts your local email cache and search index if you want to (performance penalty)
  • Excellent email setting autodetection. Just type your email account and everything’s set up for you!

The only downside is that the documentation is a little lacking. There are a few concepts that are not explained that’d confuse and scare users away. That’s why I’m explaining it here.

  • This is a headless service where the interface is webpage you access on a web browser.
  • It’s originally designed to install and run as a local web server where you access mailpile.
  • Call mailpile (can create a shortcut) and it’ll try to launch the correct page for the mailpile client.
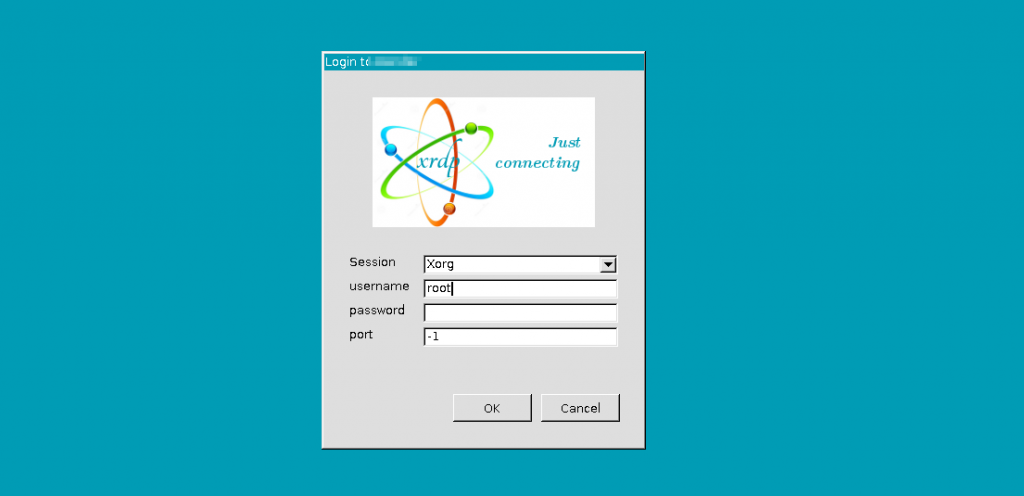
  • Mailpile does not maintain a separate user registry: it uses the hosting computer’s native user manager
  • Log into your mailpile using the user account name of the computer where mailpile is installed!

Advanced concepts

  • Install multipile instead if you want other computer to access the headless service
  • You’ll need login to the computer that hosts the headless mailpile and run mailpile AS the user you want to setup once to establish the account before use.

Download and installation instructions:

# Currently there's only Debian-like distributions (because it uses apt-get)
# These instructions do not assume direct root account. Use sudo instead

# Install pre-requisite packages: curl apt-transport-https gnupg
sudo apt-get update && sudo apt-get install curl apt-transport-https gnupg

# apt-key add {contents of the package signing key provided by mailpile.is)
curl -s https://packages.mailpile.is/deb/key.asc |sudo apt-key add -

# Register mailpile.is's package server with Debian apt package manager
echo "deb https://packages.mailpile.is/deb release main" |sudo tee /etc/apt/sources.list.d/000-mailp.list
# NOTE: Official instruction says 000-mailp instead of 000-mailp.list 
#       You need to have some file extension as apt-get checks

# Multipile (mailpile-apache2) = Mailpile + (allowing access from other computers through apache)
sudo apt-get update && sudo apt-get install mailpile-apache2

# You'll need to run mailpile as the user once to establish your account with mailpile before use
mailpile
# If you are on terminal interface instead of web interface, enter 'setup' at mailpile prompt:
> setup
# Follow the instructions on the web interface for setup if you do not use terminal mailpile client interface

Additional Resources: https://greenpark-code.github.io/Mailpile_tutorial/

Loading

Use old email clients (like outlook express and Windows Live Mail) with SSL email servers after TLS 1.0/1.1 support ended

My email service provider has recently pulled the plug on TLS 1.0/1.1 support as they reached end-of-life. This means old email clients not written for TLS 1.2 and above will not work when it tries to connect to the server with SSL support!

Google did this in 2014 but offered a compatibility option called “allow less secure clients”. Back then I didn’t know it means TLS 1.0/1.1 until I learned it the hard way when my shared hosting email provider pulled the plug on the old TLS protocols and I scrambled to figure out my email stopped working with cryptic IMAP errors (like suggesting my computer might be lacking memory, which is not true).

One method to continue using the old clients is through tunneling. You use something line sTunnel to act as a non-SSL server to your email client (usually localhost if installed on the same computer as the email client) and the tunnel server will on your behalf talk to the real email server with proper TLS settings (provided by your email service provider).


Stunnel config that needs to be changed from defaults. If stunnel was installed by entware (opkg), the config file is in /opt/etc/stunnel/stunnel.conf.

  1. Disable (comment out) drop privileges
  2. Remove the [dummy] section since we are going to set up sections for each (server, port) pair. stunnel won’t start without any port forwarding sections.
  3. It already has an [imap] section that’s commented out. Change the local port number and the target server url:port to your liking. Do [pop] if you use POP3 email instead of SMTP
  4. Do the same by adding a [smtp] section for outgoing email

You might need to comment out

; You might need to comment out this drop privilege (3rd line in default conf file)
;setgid = nogroup

; Examples of forward sections with a '50' prefix to SSL port numbers to 'convert it to non-SSL' heading to stunnel
[imap]
client = yes
accept = 50993
connect = target_server:993


[smtp]
client = yes
accept = 50465
connect = target_server:465

Can look at the log by just executing stunnel. Use Ctrl+C to quit monitoring the logs.

Of course you want to make sure the stunnel service/server is always started on boot. If you are using entware (or jffs scripts) for your router, add the call to stunnel to /jffs/scripts/post-mount and make sure you set the script to executable so it’ll run:

#!/bin/sh
...
stunnel

Note that it’s post-mount because entware packages are installed on persistent storage (like USB drive or SD card in your router) that needs to be mounted before the files can even be read.

Remember to go to your old email client and change the email server address to computer running stunnel service (can be the same computer as the client, a raspberry pi, or a router). Unless you are managing a company with many old email clients, I recommend installing and configuring stunnel on the same OS which the old mail program runs instead of relying on a centralized router to manage it because it’d be very confusing if the centralized stunnel service is down and you don’t get any warnings that are not cryptic (as mentioned at the beginning of this article).

Loading

Namecheap DDNS does not work in Asus Merlin (Tomato) Firmware until 384.7_2

My router only supported Merlin (Tomato) firmware up to 380.70_0 (2018-04-08) and there are no more updated from that branch.

Turns out the Namecheap DDNS client is not working. I searched its source code at Github for “Namecheap” to see if I can fix the HTTP 400 error (seen in router log) using “in:file” hoping to see if I can fix the bug myself (since it’s just a simple REST API, aka URL call) command and found this:

It means Asuswrt-Merlin (Tomato)’s firmware’s Namecheap DDNS service is broken UNTIL 384.7_2, which is for newer routers than what I have.

I compared the “namecheap” keyword search for the two versions and it seems like they are written very differently, so it might not be worth the effort to fix the obsolete Merlin branch. Doing a bit of additional search and discussions about John’s Merlin fork from the early days are still updated until 2019-04-17 :

It took me a while to find John’s forum post to get to the said 2019-04-18 release. The download link he provided has more updates up to Update-44EA (2020-07-12) and it still worked on my old router, so it’s not just the Update-39L3 previously discussed in the forum:

Do not get discouraged when John’s Merlin fork says version 374.43 instead of 380 (a lower number). All updates, even the latest one from John still use 374.43, which I suppose it’s to mark when the two code branches part ways. It’s not an older version.

Loading

Off the Matrix Notes

Namecheap Shared Hosting

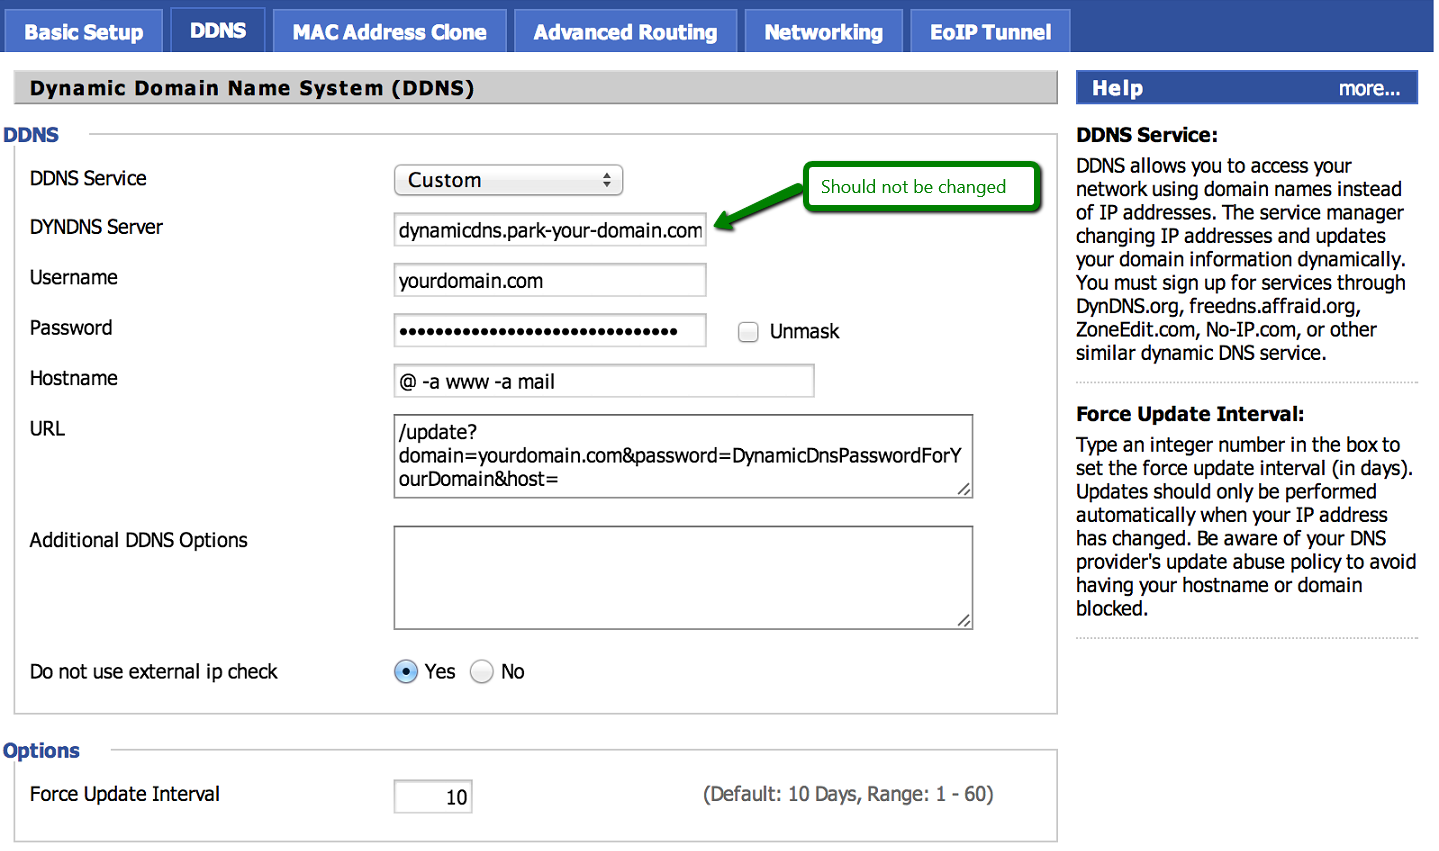
  • Free Dynamic DNS with domain (Namecheap has a free Windows client. Use zoneclient for Linux)
  • Email (IMAP): usese Maildir (for those who need migration)
  • Contacts: CardDav (use DavX5 adapter on Android)
  • Calendar: CalDav (use DavX5 adapter on Android)
  • Notes/Tasks: NextCloud (can sync with NextCloud’s built-in CalDav server)
  • Blog: WordPress
  • And of course, your own website!

VPS Hosting

  • NextCloud has File-On-Demand (like OneDrive) called Virtual File System (VFS)
  • YunoHost: easy to use modular self-hosting
  • UBOS Linux: distro for self-hosting. Even works for Raspberry Pi
  • Awesome-Selfhosted: has many free web services packages

Phone (Android only)

  • De-google your phone with microG Project
  • Play store: F-droid (Bonus: many open source apps that are paid apps on Google store offer the full version for free on F-droid to encourage you to move away from Google Play), Yalp Store

Research

  • restoreprivacy.com
  • Rob Braxman Tech (He knows about the nasty dictators like the Chinese Communist Party. Don’t think you are safe in America. The reach of the Chinese Communist Party Mafia, formerly known as the Chinese SOVIET Republic) is beyond our imagination.

Alternatives to Big Tech respecting privacy (for now)

  • Search (Google): DuckDuckGo
  • Browser (Chrome): Brave
  • Email (Gmail): see above (self-host) or ProtonMail (zero knowledge encryption)
  • Cloud (Google Drive, OneDrive, Dropbox, etc): see above (self-host) or use zero-knowledge encryption
  • Text/Chat (Whatsapp, Line): Signal App
  • Calling: Telegram has better voice quality than signal, but sometimes it has weird behavior on certain phones. Telegram does not have zero-knowledge proof, so it’s up to Pavel Durov (he’s usually good at not bending to totalitarians).

Alternatives to Big Tech that refuses to censor and manipulate users (for now)

  • Video (Youtube): Odysee (LBRY), Rumble
  • Facebook: MeWe
  • Twitter: Gab, Safechat, CloutHub has a crappy search feature, Parler now has PC bots patrolling and misfiring

Zero-knowledge encryption means the server have no access to the info you put in there as they are all encrypted and protected by a password which only you have (preferably use zero-knowledge proof so the owner of the server do not have any master keys to see your data: you lost the key and the data is practically gone forever)

Loading

Updates to Linux on Pogoplug v4

I have an old Pogoplug v4 series hacked to install Debian Linux based on this instruction long ago: http://blog.qnology.com/2014/07/hacking-pogoplug-v4-series-4-and-mobile.html
which boots on an SD card, which I used as a no-ip update client.

I realized some of the URLs to the package servers are broken. So here’s my notes to update it.

First apt-get doesn’t work anymore because the files has been moved to the archive package server. The solution is to replace all the contents (now obsolete) in /etc/apt/sources.list by this line:

deb http://archive.debian.org/debian wheezy main

Then you update the package manager (apt-get) with this command:

apt-get update && apt-get upgrade

Note that it’s still Debian 7 and it will not work with new software that requires later versions

Loading