Ubuntu 25.10: (GNOME 49) remote desktop that’s broken out of the box

I’m using Hyper-V for this. Your mileage will vary. This post assumed Ubuntu 25.10, but these problems could be GNOME 49’s own so you might experience it on other linux distros that uses GNOME 49 as well.

Settings to Remote login / Desktop Sharing (RDP) hangs out of he box

When I entered “System -> Remote Desktop” under Settings app (on Hyper-V) in the first boot right after installation, it will hang

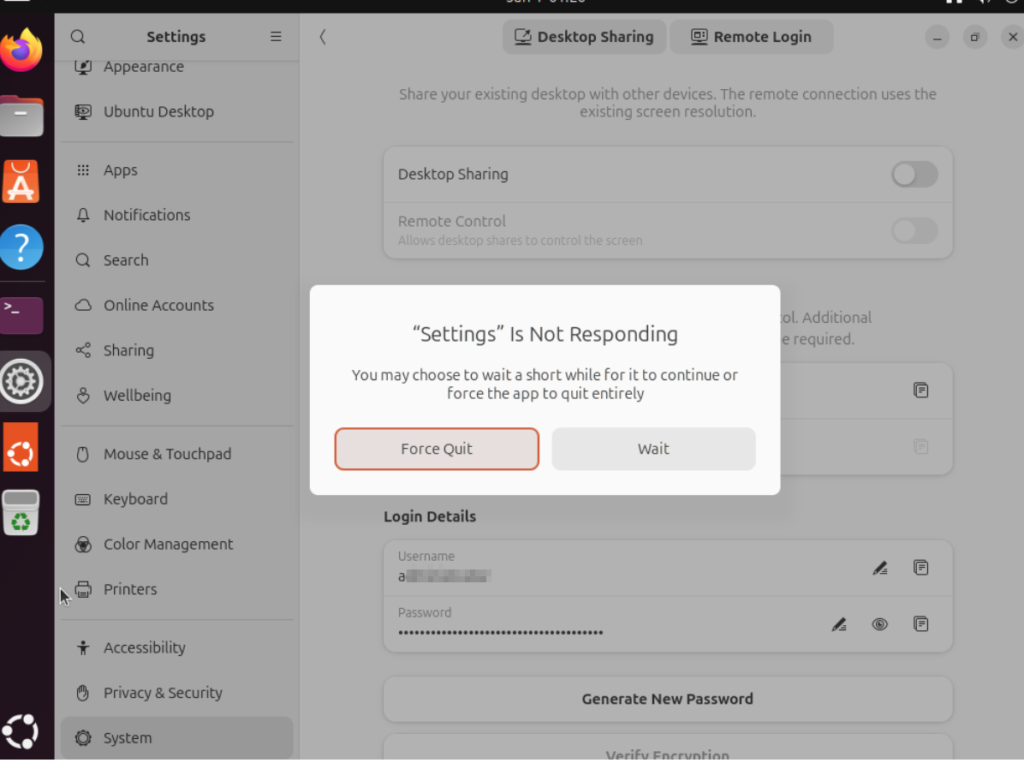
Turns out it works fine after rebooting again. I installed this over and over and realize it’s always the first boot that’d freeze the Remote Desktop settings.

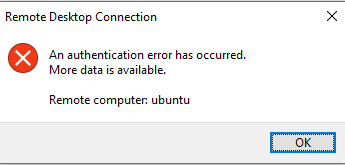
Cryptic error message for failed Remote Login

Even if you entered the wrong username, you’ll be greeted with this confusing message.

Username and Password changes are glitchy

Changing usernames and password in the Remote Login dialog box does not always immediately take effect. I had to disable and re-enable Remote Login at the top of the settings->system->remote login tab for the change to take effect.

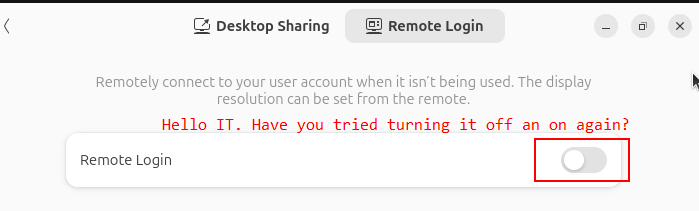
It’s confusing when combined with the cryptic error message above.

Watch out for case sensitive login name for RDP

Windows’ username is not case sensitive but the RDP implementation on GNOME 49 is case sensitive!

If you entered a “User name” in the first tab of the native RDP client (mstsc) that happens to match any of your Windows account (regardless of case since Windows don’t care about capitalization in user names),

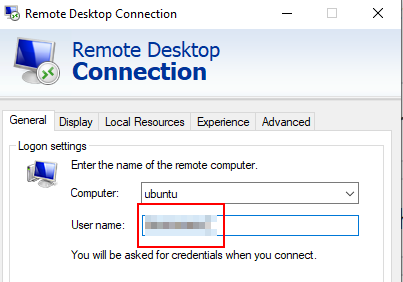
it will pull out your Windows account showing the capitalization stored in Windows

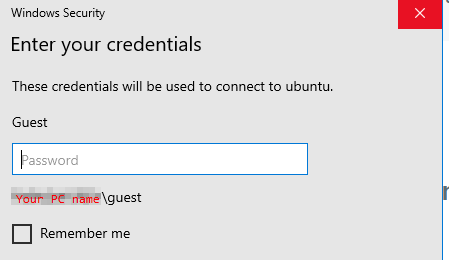
But this is where this gets really fucked up (is so misleading that it’s a user trap): under the hood it’s your “User name” with the exact capitalization typed in the first tab that gets passed to GNOME’s Remote Login, not what the “Windows Security” dialog box showed you when you entered the password!

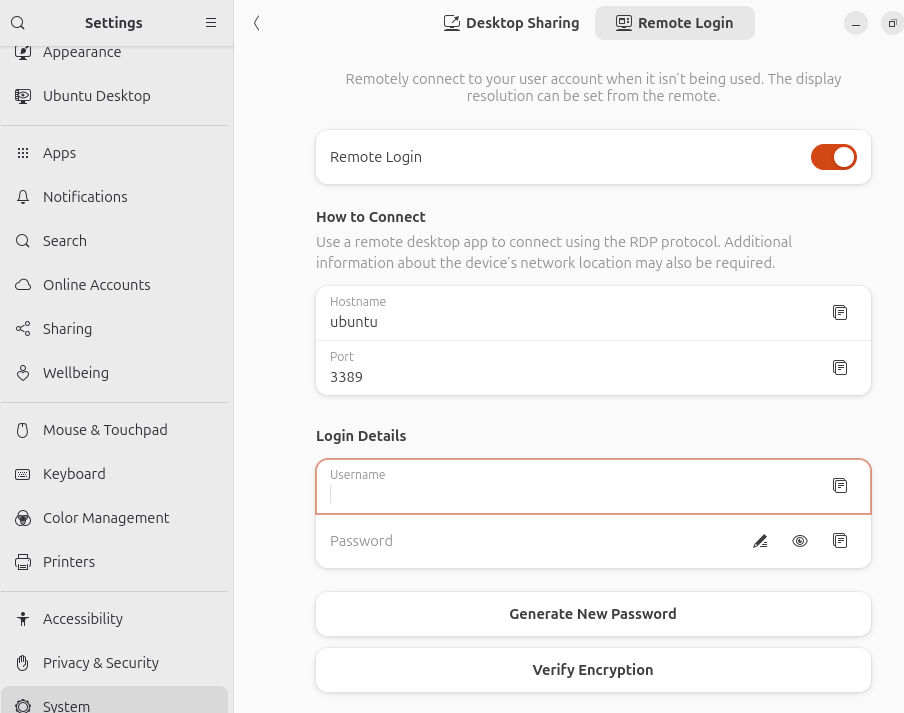
Inconsistent Login Detail defaults between Remote Login and Desktop Sharing

Desktop Sharing and Remote Login are esentially the same thing in terms of users interface, differing only in the port number and whether it reuses an existing screen or start a new graphical login.

Nonetheless the Login Details for Desktop sharing pre-enters the current session’s username and a prefilled password that’s prefilled

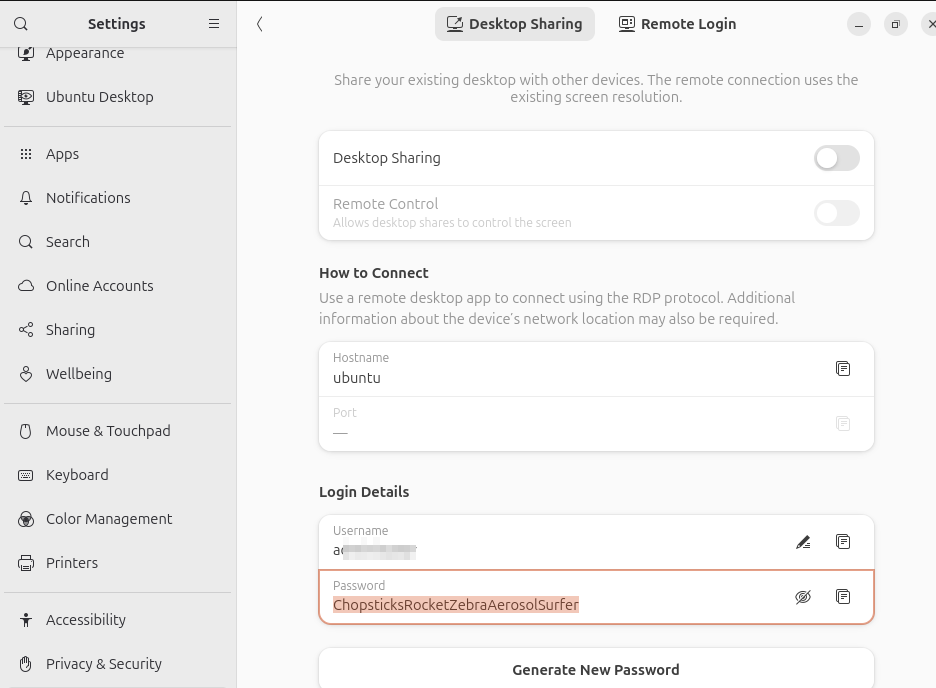
while Remote Login prefills nothing.

It’s not like what’s pre-entered in Desktop Sharing is tied to Linux’s system user account (login and password pair) anyway so why do it for one (Desktop Sharing) but not the other (Remote Login)? This really looked unpolished.

Text RDP file changes needed to securely connect to GNOME’s remote desktop

The native Remote Desktop (mstsc)’s graphical user interface do not contain the option to enable RDSTLS so it has to be written into an .rdp file then either loaded or executed. You will get this warning message if you use the entries from mstsc’s GUI alone to make the connection:

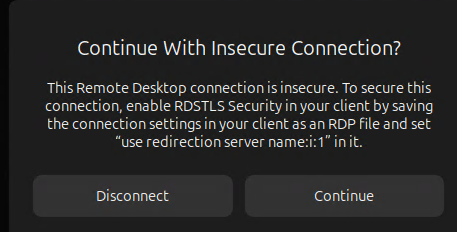
Add this line to the RDP file as instructed

use redirection server name:i:1

Loading

Debian 13 annoyances

There are some stupid shit in Debian 13 (as of to date) that doesn’t work right out of the box by 2026 because of questionable UX judgements:

Freshly minted user from the installer cannot sudo

I understand it’s good security practice to not leave any attack surface for fresh installations, but this one is just cargo-cult. The first thing you need to do out of any installation (not a live disc) is to sudo and update the software. There’s no good reason to make the administrator who just installed the Linux grant sudo rights to the first user he just created unless you want him to switch to the practice of regularly logging in as root user!

So administrators are forced to do this dance:

su - root -c "adduser $USER sudo"

Followed by a logout and relogin, which cannot be easily automated across distributions and installations because each desktop environment have their own logout commands. logout itself is only when you are in text mode.

Debian’s installer should at least have the decency of asking if the first account created by the installer should be granted sudo rights! Good user designs are not supposed to throw obstacles in the most common use cases no matter how justified the developer thinks it is.

apt update does not work out of the box

If you installed Debian from a full DVD (not the minimal version that requires the Internet to download the rest), good luck trying to update the apt package manager:

Who in the right mind would believe an OS installed from the CD should behave differently than it’s downloaded online? WTF?!

You are supposed to edit out the cdrom: source /etc/apt/sources.list:

In most cases you don’t need or want the CD sources after you installed it unless you struggle with Internet bandwidth or don’t want the most updated versions. Here’s a one-liner to do it:

sudo sed -i'.bak' '/cdrom:/d' /etc/apt/sources.list

This wiil create a .bak backup file in case if it deleted more things than you wanted and want to undo it.

Loading

Hyper-V’s trouble with lightdm login display manager

Debian 13’s lightdm does not work out of the box with the default settings when creating a VM in Hyper-V. I got a black screen if I deviated from gdm that only works for GNOME (default), which means no Cinnamon for me.

With the same Hyper-V setup, Cinnamon/Lightdm does not work on Ubuntu 25.10 either.

Turns out lightdm requires the Hyper-V VM created as 2nd Generation, which uses UEFI instead of BIOS. It beats me why gdm is do not need UEFI while lightdm does. Not cool!

Generation 2 VM is another can of worms. The default secure boot uses the Windows Template. Debian/Ubuntu CD boots with “Microsoft UEFI Certificate Authority” or no Secure Boot (but you’ll still have to make the installed Debian run with Secure Boot later). Windows and “Open Source Shielded VM” templates are no go for Debian/Ubuntu.

If you started the Debian installer CD with Secure Boot disabled, Debian installer will ask if you want to install it as a UEFI enabled OS. You should answer yes and enable secure boot after it finished installing and before rebooting.

Loading

Windows Subsystem for Android (Fine-tuning) Notes

There are many forks of WSA. For this blog post, I’ll assume this popular variant that’s the most updated

https://github.com/MustardChef/WSABuilds

The common use case starts the program with Run.bat which is just a wrapper for the powershell script Install.ps1.

Unlike conventional designs, there isn’t really a dedicated installer nor the program runs standalone. The launcher starts the WSA if it’s already ‘installed’ and ‘install’ it if it wasn’t. If a WSA was launched, it’d be closed and restarted (yes, it will interrupt the apps opened). So you basically trust the Install.ps1 script to do the right thing managing everything needed to get WSA up and running.

The Hyper-V virtual machine is really in %LOCALAPPDATA%\Packages\MicrosoftCorporationII.WindowsSubsystemForAndroid_8wekyb3d8bbwe\LocalCache\ and everything is in userdata.*.vhdx so there’s only one file to backup and restore.


Direct Android App icons on Windows Start Menu

The Windows start menu icons created by installing apps on WSA are launching the stub (App execution alias) to wsaclient.exe located in %localappdata%\Microsoft\WindowsApps\MicrosoftCorporationII.WindowsSubsystemForAndroid_8wekyb3d8bbwe\

Specifically the syntax is wsaclient /launch wsa://{android application ID}.

Annoying windows/apps opened every time WSA (Run.bat) is started

It’d make sense to say if WSA displays nothing after successfully starting in the background, beginners won’t know where to start. It typically starts these

  • native Windows WSA settings app (Microsoft App, not Android App)
  • Google Play store (Android app)
  • Android Settings app (Android app)

If you installed the WSA with KernelSU, a webpage with the docs about KernelSU pops up every single time you start the WSA, which is ridiculous.

Turns out it’s these lines (the Finish block) in Install.ps1‘s design decisions. I simply commented these nusiances out now that I know where and how to launch them when needed

Creating icons to Android apps

Google Play app is usually created by WSA, but not the Android-Settings Android app and WSA-Settings Windows App. Disabling these above means I’ll have to make the icons to them since they are the starting points to managing the emulated Android system.

If you forget Windows Apps are different from Windows programs like I do, you should right click on the WSA-Settings Windows App and make a shortcut icon out of it to be used on the Windows Desktop or Start Menu.

Android-Settings Android app icon can be created from this command:

%LocalAppData%\Microsoft\WindowsApps\MicrosoftCorporationII.WindowsSubsystemForAndroid_8wekyb3d8bbwe\WsaClient.exe /launch wsa://com.android.settings

WSA Sideloader

Since WSA doesn’t come with many apps. If you don’t want to login to your Google account to use Play store, you can download the APKs (say Apkpure) and sideload it with WSA Sideloader. It’s avaiable

As Windows App: https://apps.microsoft.com/detail/9nmfsjb25qjr?hl=en-US&gl=US

As Windows Installer: https://github.com/infinitepower18/WSA-Sideloader/releases

You will have to turn on Developer Mode in the WSA-Settings Windows App first

and allow ADB debugging (since this is how sideloading works) when prompted.

Loading

Exploiting Short-Circuit Evaluation for conditional execution

TLDR:

T && X is equivalent to "if( T) then run X"
T || X is equivalent to "if(!T) then run X"

I don’t exploit this too much in C/C++ because it’s hard to read (and therefore hard to keep track of it to make sure it’s bug free) and most often I’m interested in the output value so I have to watch out for the side effects. However this is common in Bash scripts

Domination Property

In languages that expressions evaluates to a value, sometimes if-statements can be replaced by short-circuit evaluation because short-circuit evaluation exploits the domination property of AND and OR logic operations:

\newcommand{\Hquad}{\hspace{0.5em}}
\begin{alignat*}{2}
0 \Hquad & \mathrm{AND} &  \Hquad X  =  0 \\
1 \Hquad & \mathrm{OR} & \Hquad X =  1
\end{alignat*}

When you FIRST run into the dominant value for the binary operation (0 for AND) and (1 for OR), evaluate no further (i.e. skip the rest) because rest won’t change the overall result away from the dominant value.

So in this use case (emulating if-then statements), what the latter expression X evaluates to or what the combined logic value is irrelevant. We are merely tricking the short-circuit mechanism to trip (short) to NOT evaluate based on what the earlier expression turned out. Action is the ‘norm’. Conditional inaction is the essence of this idiom.

The dual of domination property is idempotent, which is easier to reason because if pre-condition (say T) forces overall expression to boil down to the expression we want to conditionally execute (say X), we are stuck evaluating X if condition T is met.

\newcommand{\Hquad}{\hspace{0.5em}}
\begin{alignat*}{2}
1 \Hquad & \mathrm{AND} &  \Hquad X  =  X \\
0 \Hquad & \mathrm{OR} & \Hquad X =  X
\end{alignat*}

These 2 possibilities (domination and idempotency) partitions to space (choices) of possibilities (i.e. cover all possible combinations), in other words there are no other scenarios than described. So the precondition T decides whether you run X or not, which is the equivalent of an if-then statement.

Operator (function) view of logic domination [Functional programming perspective]

By grouping the first value and the binary logic operator with a pair of parenthesis, in dominance view

  • (0 AND) is also called the ‘clear’ operator
  • (1 OR) is also called the ‘set’ operator

but this view is not too interesting for our case because we are not interested in what the conditional expression and the overall expression evaluates to, which is signified by ‘clear’ and ‘set’.

On the other hand, (1 AND) and (0 OR) are pass-through (idempotent) operators which passes the evaluation to the latter expression X.

\newcommand{\Hquad}{\hspace{0.5em}}
\begin{alignat*}{2}
(1 \Hquad & \mathrm{AND}) \Hquad & \circ &  \Hquad X  =  X \\
(0 \Hquad & \mathrm{OR}) \Hquad & \circ & \Hquad X =  X
\end{alignat*}

This reads

  • (1 AND): pass-through (evaluate latter expression) if (earlier expression is) TRUE
  • (0 OR): pass-through (evaluate latter expression) if (earlier expression is) FALSE

Let’s call T the condition to test (the ‘if’-condition). The expression to run remain X.

\newcommand{\Hquad}{\hspace{0.5em}}
\begin{alignat}{2}
(T \Hquad \mathrm{AND}) X & = \overline{f_T}(X) \\
(T \Hquad \mathrm{OR}) X & = f_T(X)
\end{alignat}

where

  • \overline{f_T} reads “Run if T is false”
  • f_T reads “Run if T is true”.

Loading