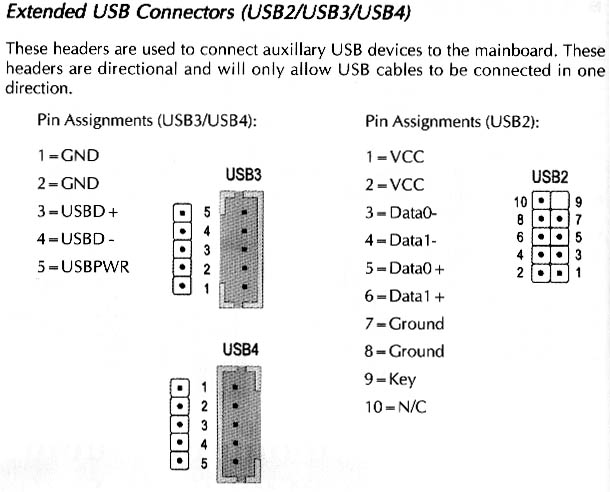
The Motorola VP22 motherboard used in a variety of modern Agilent’s Infiniium series oscilloscope (the ones with Megazoom) and logic analyzers has a 5-pin USB port that’s not quite the same as the standard headers on most motherboards.
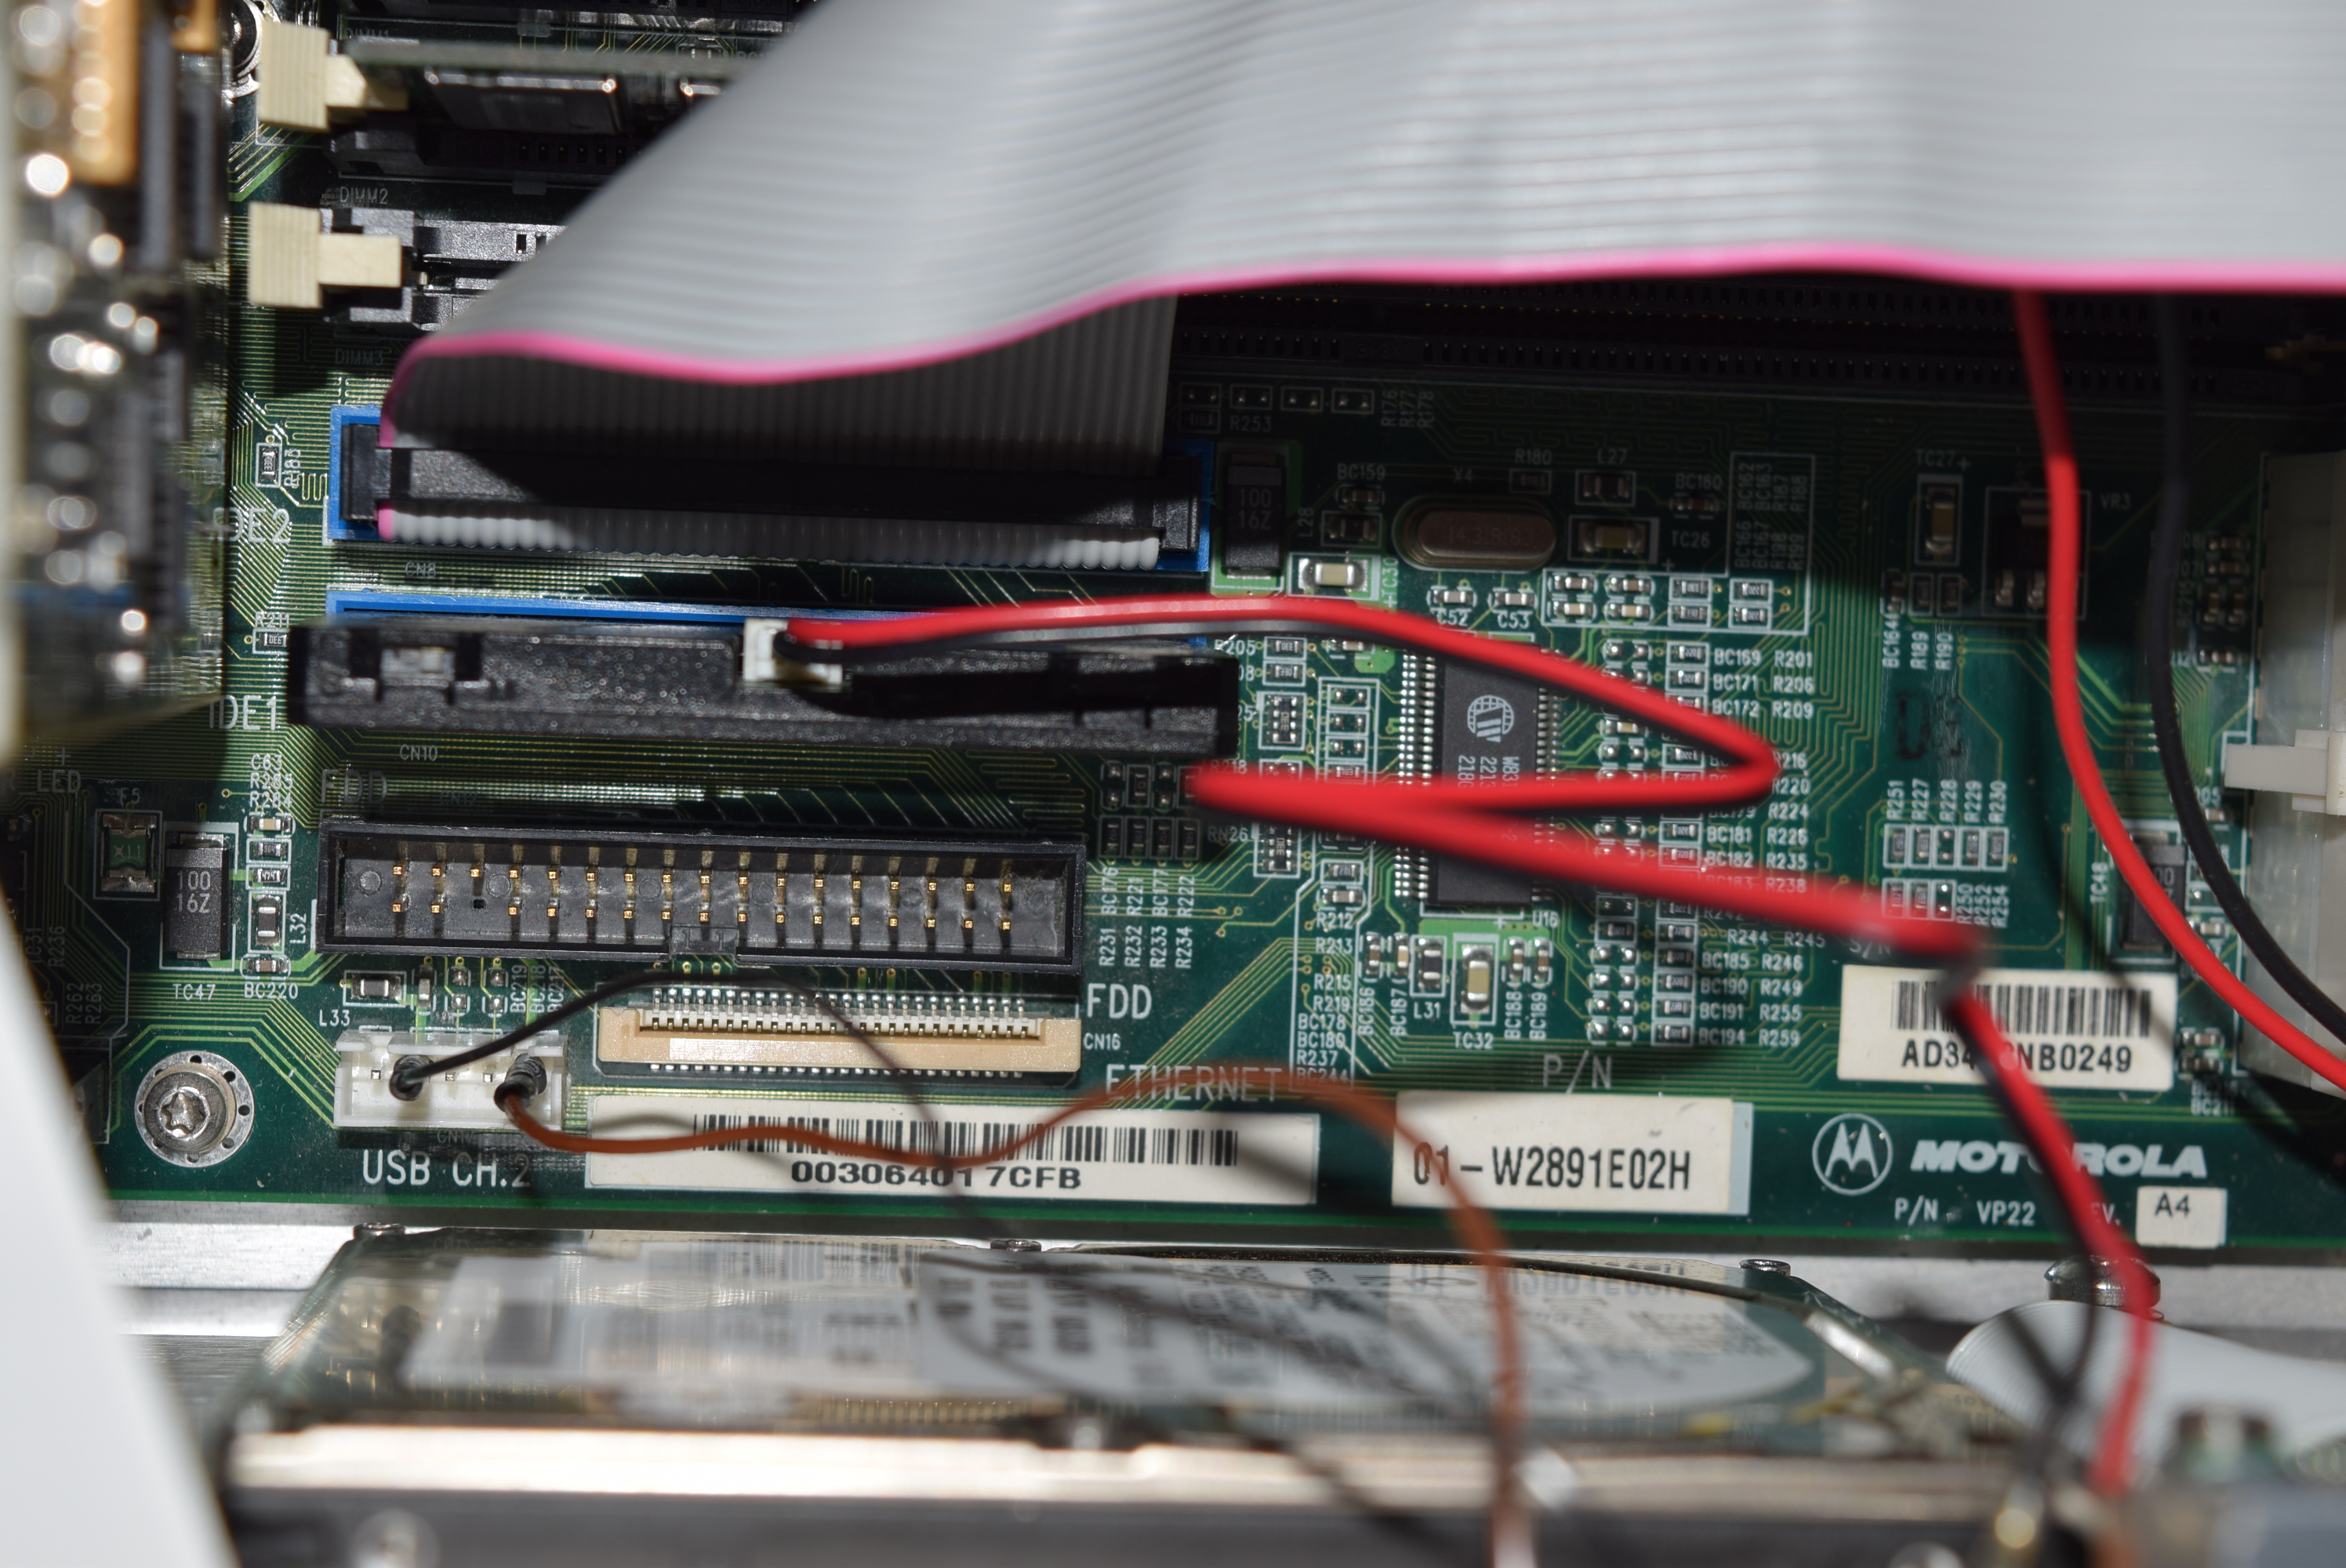
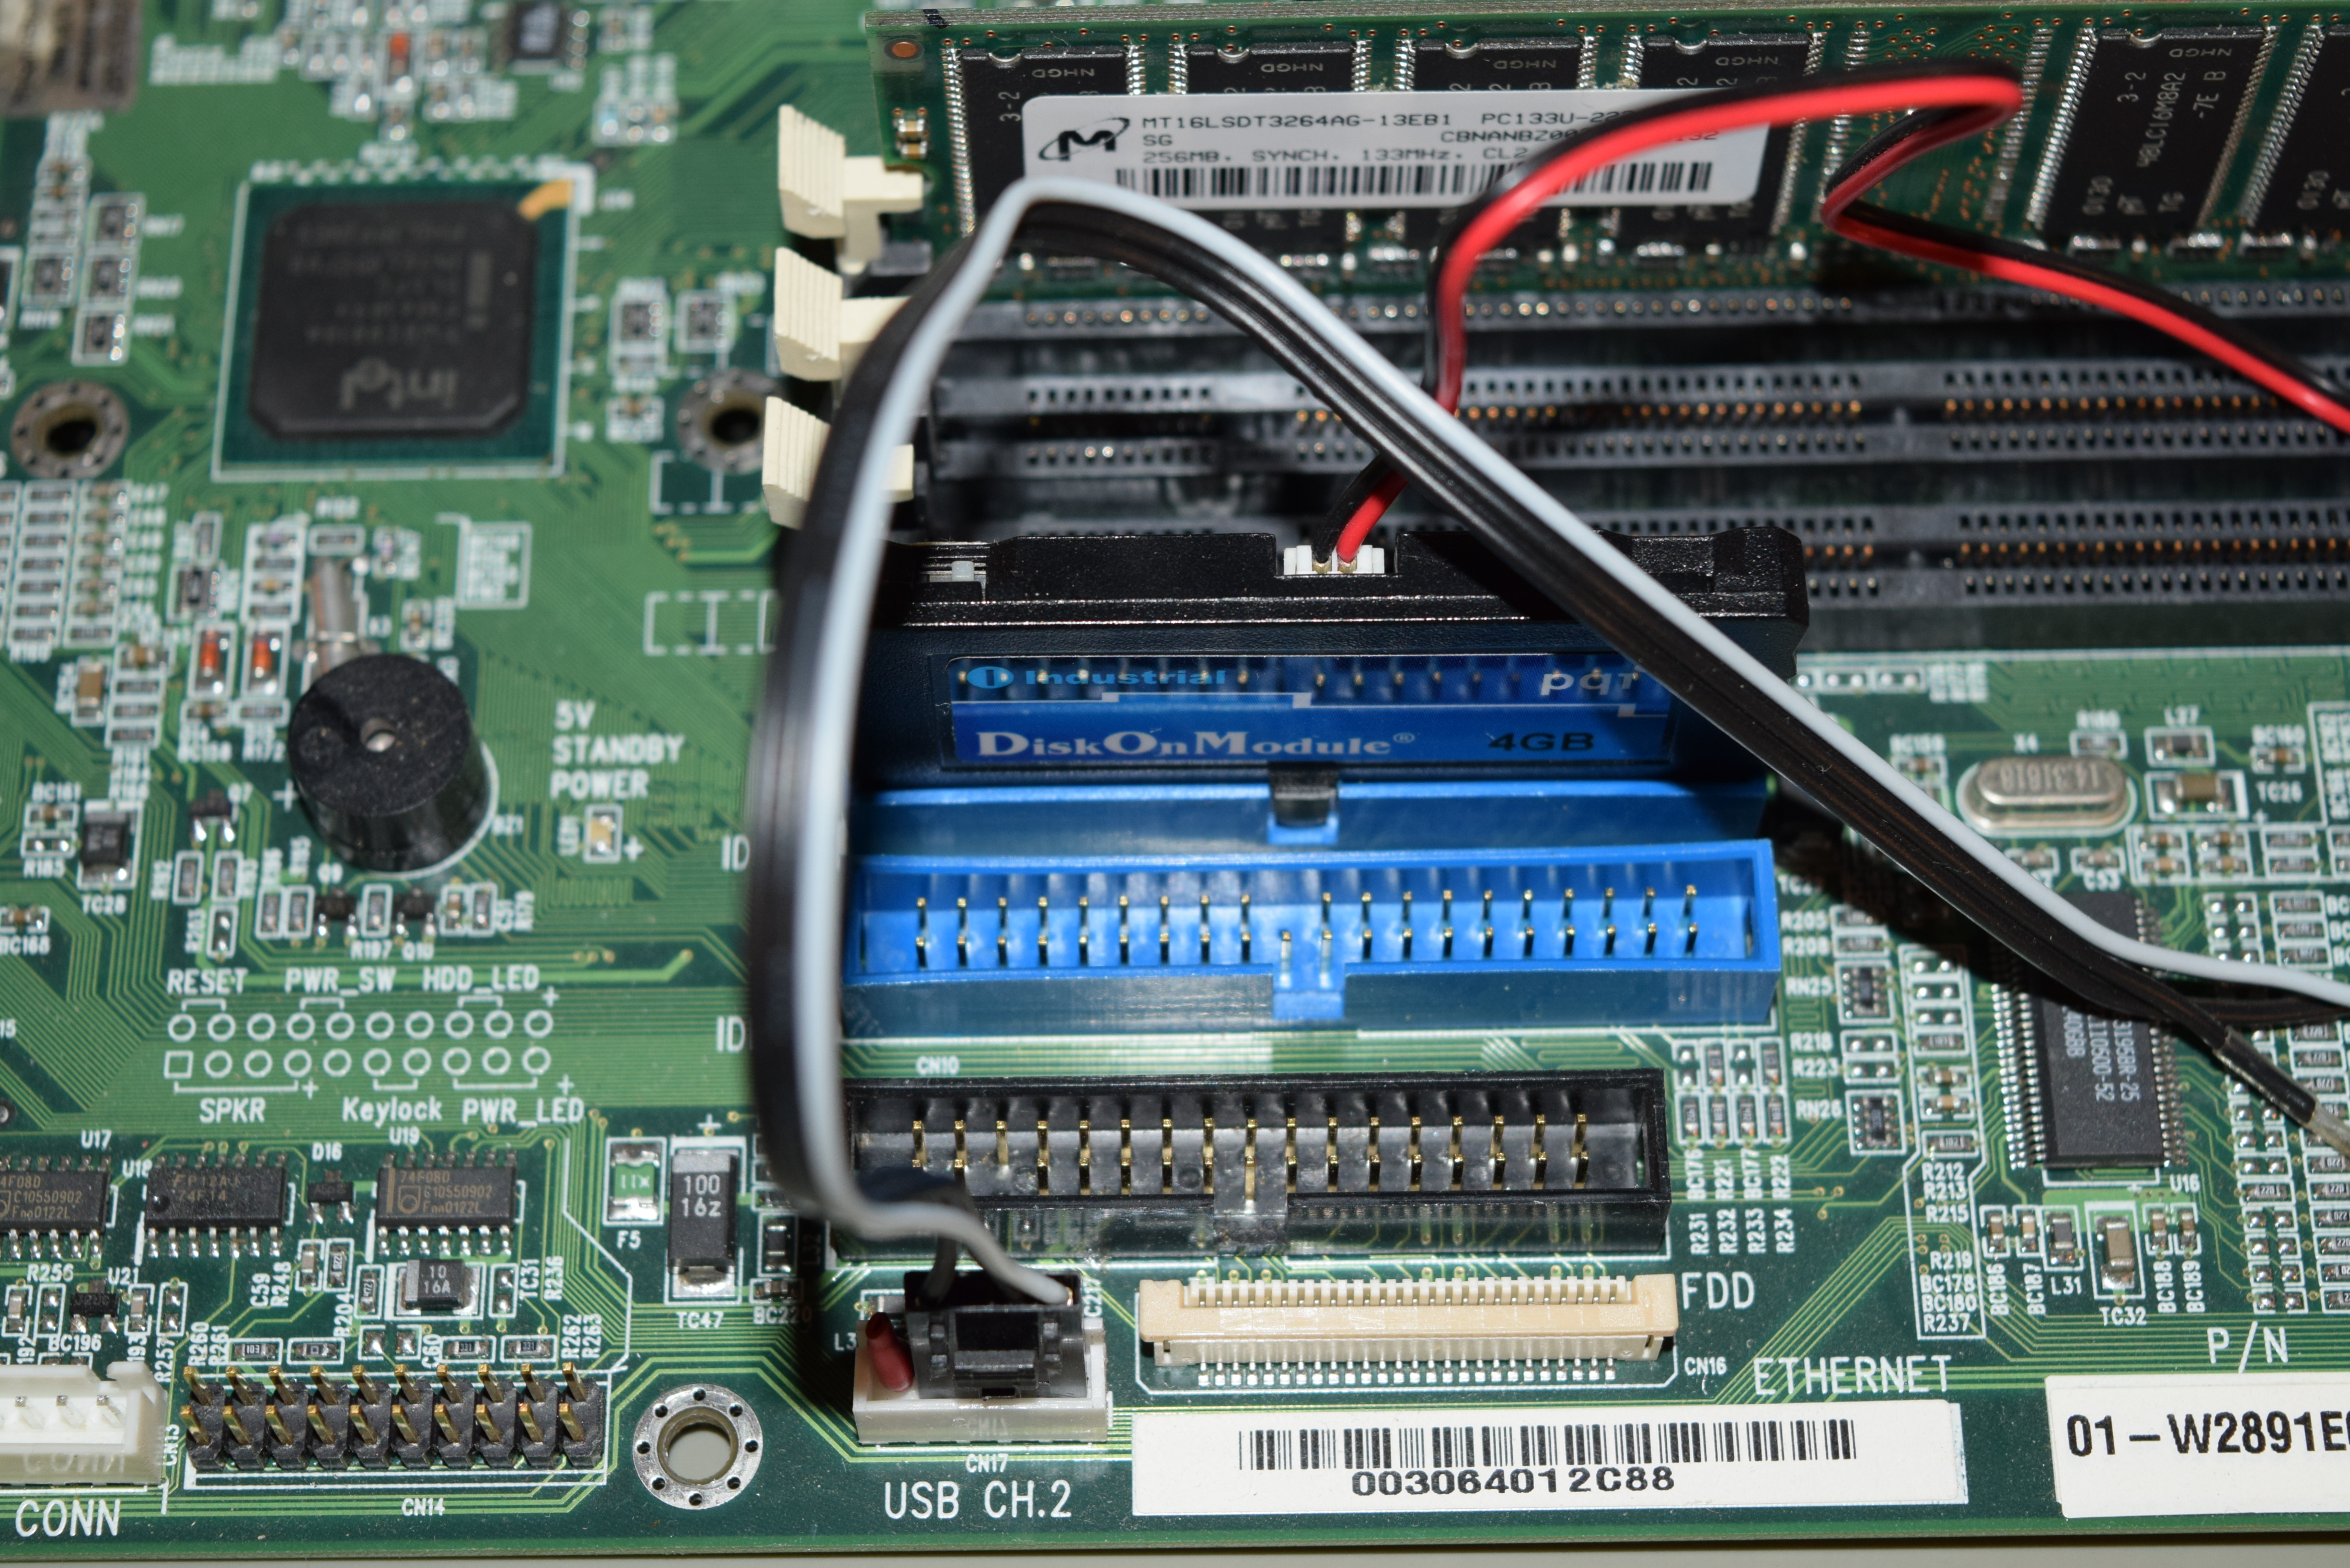
The reason I needed the pinouts of the USB port is because I have a 40-pin DOM SSD to replace the old clunky mechanical hard drive, which needs 5V for power.
I don’t want to modify/resolder the original wire harness (for the LS-120 and CD-ROM drive) nor I have the molex connectors to make a power splitter. Luckily, I found somewhere that I can safely tap a 5V for low power devices: the internal USB header. Here’s a picture with the DOM SSD module wired:
This post serves as a reminder to myself that the ground is the second pin to the left and 5V is the rightmost pin. The pinout diagram as follow:
One day I got a call from a friend saying that he accidentally fed high voltage signal (line voltage) and broke one of the channels.
My hunch is that since he didn’t feed kilo-volts into it, the damage is limited to the (front-end) attenuator (an expensive part). I had an extra unit lying around so I just swapped it for him so he can get it up and running.
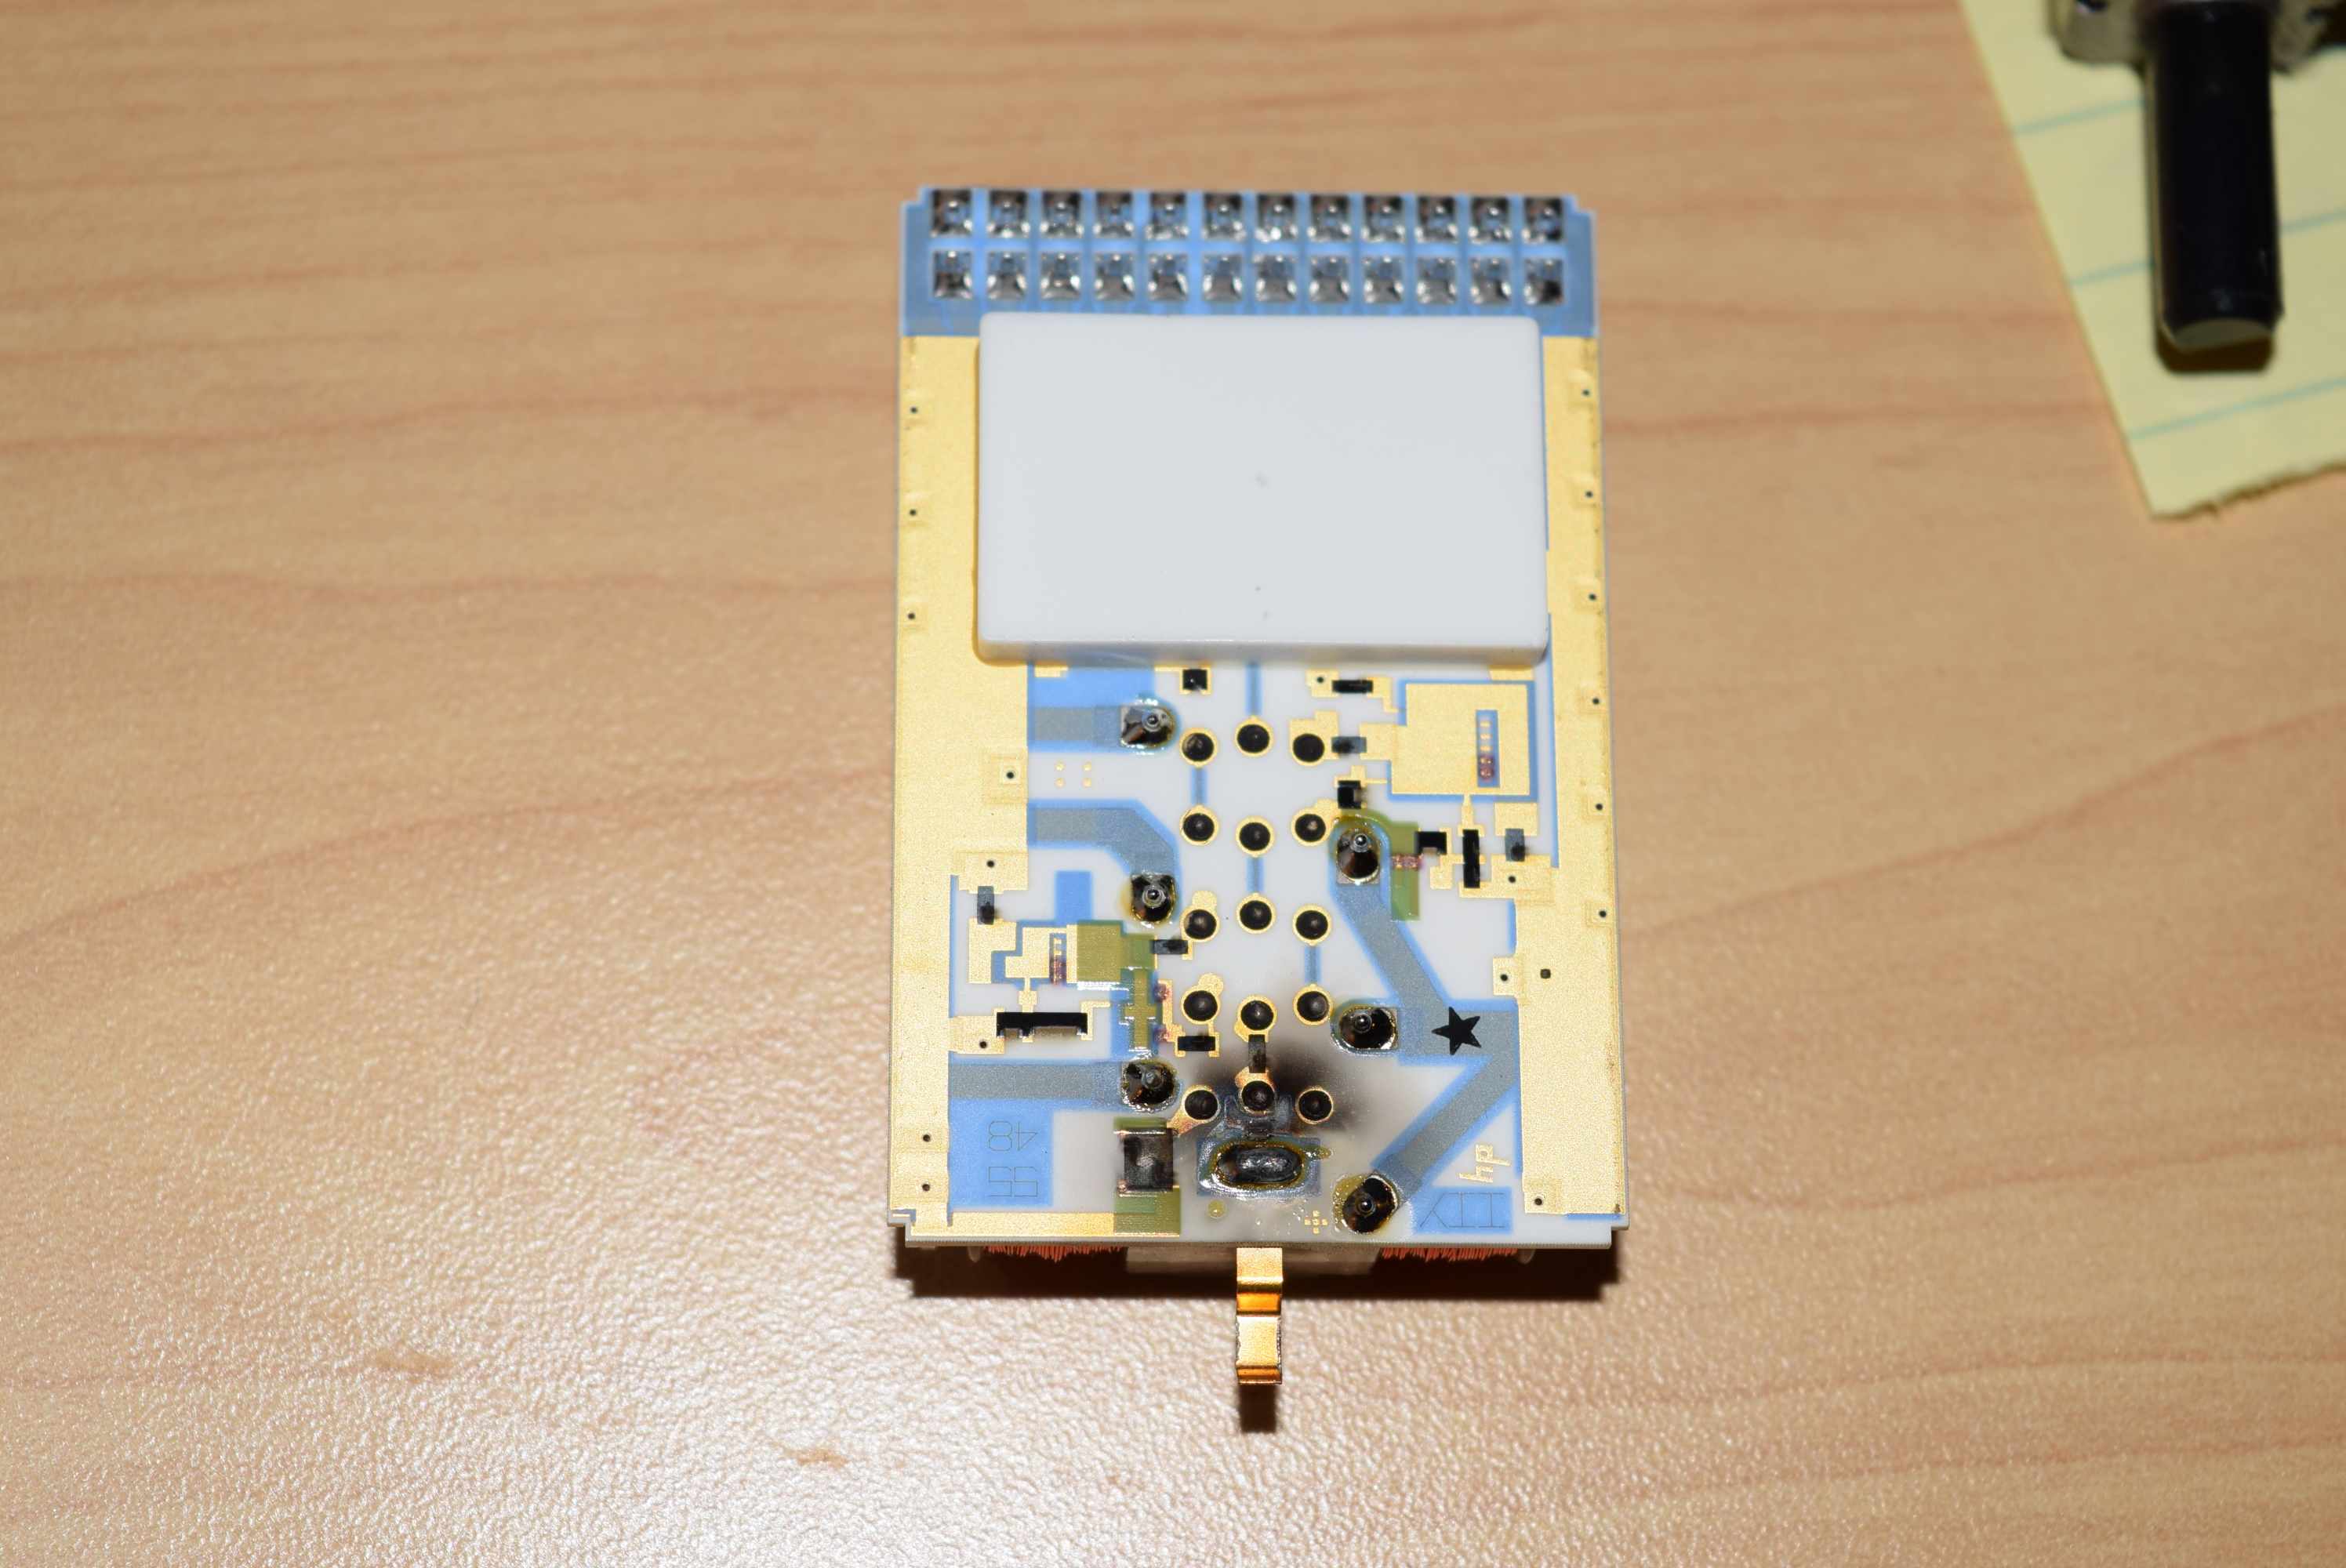
Once I got the time, I opened it up the broken unit to see the damage. My hunch was correct:
The 500Mhz attenuator used in 5461XB, 54505B/54506B/54510B/54512B (has to be version ‘B’), 54520/54540 series, and early Infiniiums 54810 series, E1428A (VXI board), 166XCS/166XES (MSO), 167XG-003, etc. are all the same: 1NB7-8303 (or 1NB7-8458). For 5461XB, it’s tucked inside 54616-68401*, which is a big metal case that covers 2 attenuators and an external trigger PCB (see the picture on the right hand side). Everything else is tucked individually inside 54512-63402 metal shield.
In this autopsy, the resistive trace of 1NB7-8303 was blown open-circuit (charred), so bad that it spot-welded the metal casing.
I took a good attenuator and measured resistance that the blown open ‘trace’ should have been. Turns out it’s a little less than 1Ω so I used 4-lead Kelvin sensing from my Agilent 34401A multimeter. I calibrated that meter using my Data Precision 8200 reference and agreed with my Fluke DMM, so hopefully I wasn’t way off.
I could have put a small SMD resistor matching the resistance of the blown trace, but since I have a few back up attenuators lying around, I’d rather not risk the signal integrity by doing so, since I cannot guarantee the temperature specification if I just replaced it with a resistor. The scope was up and running in perfect condition after replacing the attenuator.
Now you know what happens when you feed line voltage to a scope. The damage is usually limited, but the front-end (attenuator) is the most expensive RF part that makes a scope truly a scope (see Dave’s rant on EEVblog). The ADC hybrid can get just as expensive, but usually the attenuator takes the hit before your input gets to fry the ADC.
* Be very careful about a similar looking block with similar number 54503-63401 or 54503-63402. It has the same metal housing, but inside the attenuator chip 1NB7-8116 or 1NB7-8288, which is NOT compatible with first generation Infiniiums, later 54500 series or 5461XB series. They are used in 54502A, 54503A, 54504A, 54510A.
54501A never showed up in the discussion because 100Mhz scopes does not need the individually shielded metal block. The attenuator was directly soldered to the main assembly.
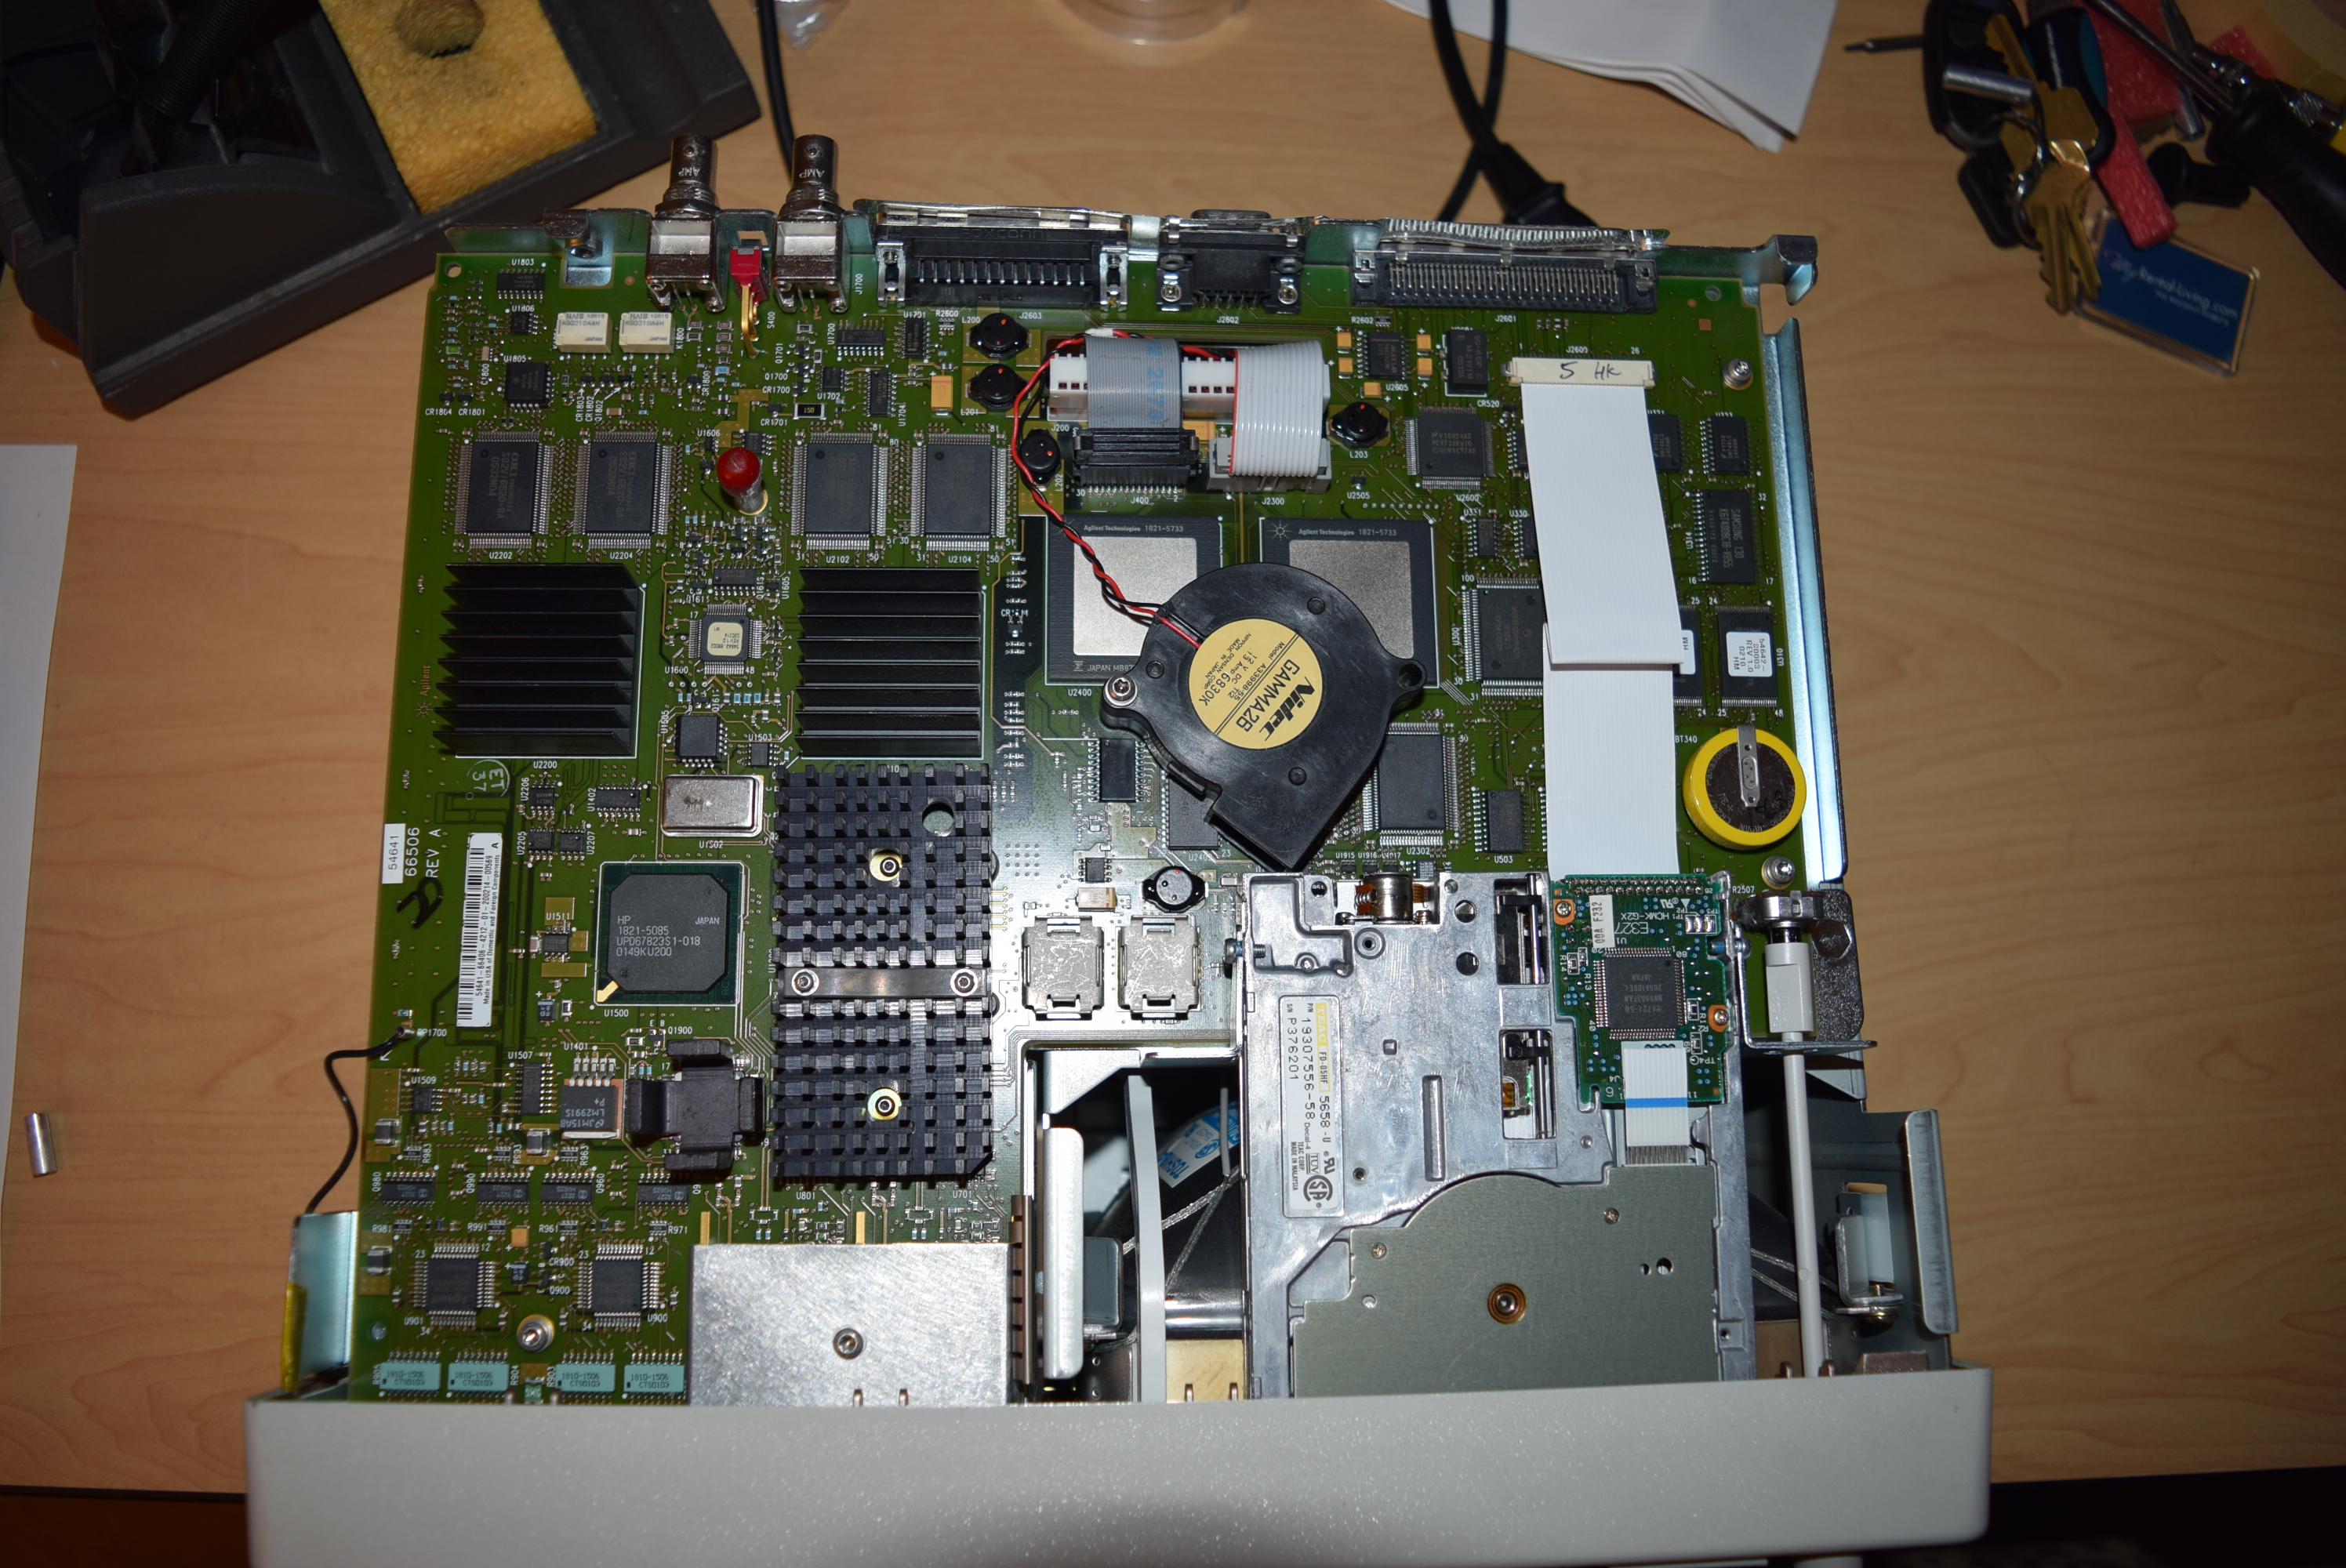
Agilent 54641D has a ADC hybrid (1NB7-8394) converter that runs very hot. The heatsink does a very good job extracting the heat from the chip, but there’s nothing to carry the heat away from the heatsink. The heatsink is actually hand-burning hot when passively cooled. Even with the case, the bottom of the unit gets so hot that it actually warms up the instrument below it.
For longetivity, I decided to give it a tiny fan. But given the tight space at the bottom, how can I squeeze a standard 5mm fan? A squirrel cage fan (preferably 5mm side, 15mm thick) might do the trick, but where am I supposed to secure it? Turns out there’s a screw hole for the fan and there’s only one place I can screw it down:
I padded the fan with 3 plastic washers to create a surface level with the two ASIC chips the fan is sitting on.
Where should I get the power for the fan? It’s not a low-end 100Mhz scope, so I took extra precaution to not have a DC power line flying all over the circuit board to generate noise. I twisted the power wires together just to lower the EMI and follow the same holes Agilent designed to let the power cable go through.
It’s a little risky to steal power from the circuit board directly when I don’t have the schematics, but luckily I found a printer power port which nowadays nobody uses which I can steal the power from.
I could have tapped the 12V fan power from the power module for the power supply fan, but I noticed the printer power port is even better: it’s around 7~9V: I don’t want the noise from running it at full speed (squirrel cage fan are typically noisier).
Finally I made an internal terminal for the printer power so the fan can be easily detached. Weakly wrapped it in a clear heat shrink tube so it won’t get accidentally disconnected yet reminds myself that a connector was built instead of directly soldered on.
At last I tie-wrapped the power wire to the other power wires Agilent already secured so they won’t dangle during transportation.
Self-calibration expects the temperature to be stable, so the oscilloscope needs to be warmed up before a cal would register. That means before the fan, it’d take a long while for the ADC to heat up to a guaranteed temperature.
With the new fan, the calibration needs to be done again because it’s much cooler now. Even better, it takes nearly no time to warm the oscilloscope up for calibration because the steady temperature isn’t high anymore.
Of course this mod works for 54641A, 54641D, 54642A, 54642D as well. Technically you can put it in any 5462X oscilloscope, but since they are 100Mhz, you don’t need to cool the ADC down that much.
I recently tried it on a 54642A, which has only one stream instead of two, so one chip with glued heatsink and one ASIC (1821-5733) is gone. Looks like I can use the screw hole on the top left (the one with a red condom over it). Unfortunately, since the only way to use that screw hole is to flip the fan over, it became an inferior choice because
The suction part came from the bottom of the case instead of the board. That means I’m blocking ventilation for some components.
The fan’s power line is now close to the board, creating potential signal integrity issues (might not be material, but why mess with EMI issues when there’s no real advantage anyway?)
In other words, even if it looks tempting to deviate from my original solution for the non-MSOs, there’s no good reason doing so.
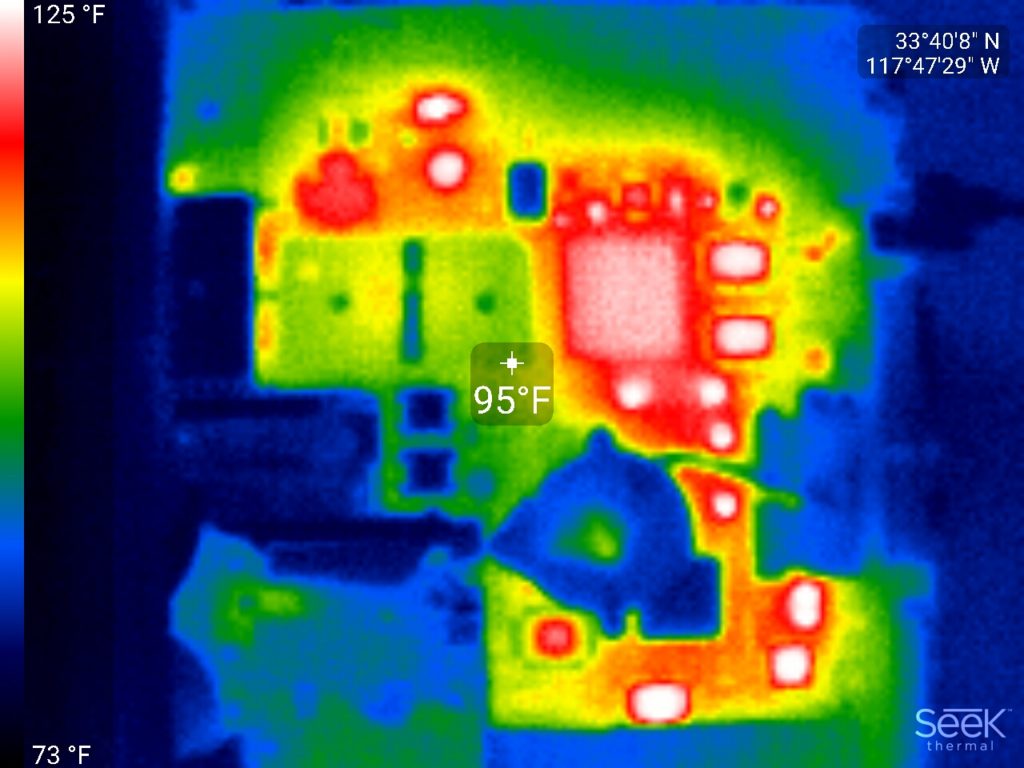
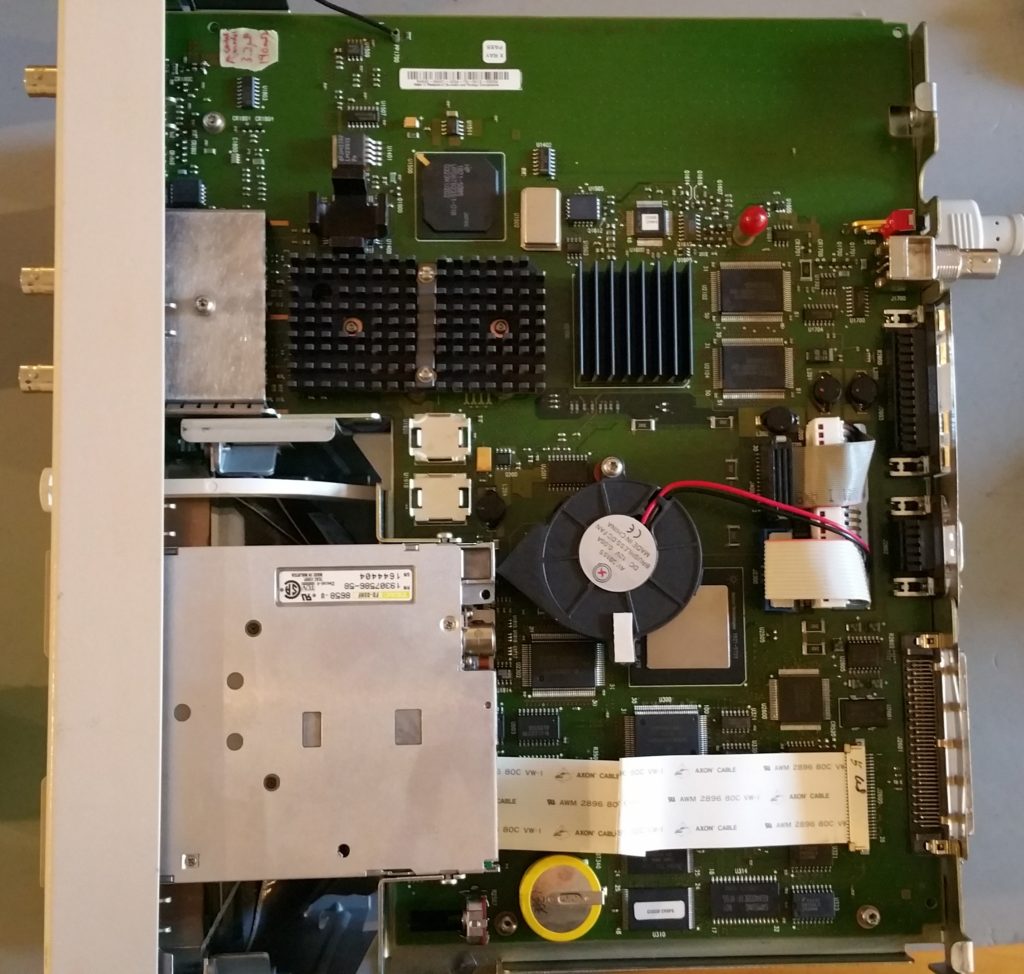
Now that I have a seek thermal camera module, here’s the thermal picture after the fan has been installed (accompanied with the picture of the board):
You can see from the thermal picture how effective the heatsink is. It took only a very weak breeze to carry the majority of the heat away. The 12V squirrel cage fan running at ~7V is pretty quiet, yet it cools the ADC hybrid down to near room temperature.
The real reason why I did this fan mod is because I had some units (like 54641A) bought from the used market that after powering it up for 30 minutes, the signal displayed just went nuts and jumped all over the place. I opened up the ADC and the metal bracket holding it down had a lot of heat stress pattern on it (the golden bracket looked purple-rainbowish). The unit was fixed after swapping the ADC hybrid from a donor unit, but now I know the ADC hybrid really needs to be kept cool to ensure longevity.
By the way, if you need a replacement ADC hybrid (1NB7-8394), I have 2 pcs at $660/ea.
First come first served. Call me at 650-804-5024 if you suspect it’s the ADC hybrid that needs to be replaced. The fan mod is complimentary with any repair/service I do for 54640 series oscilloscope that exceeds $800 after parts and labor.
Since I’m now selling 54640-series oscilloscopes with this as a value-added service, I’d ask my kind readers NOT TO use the technique learned here to offer products and services that might compete with my offerings. Feel free to apply it to units that you’ll keep for yourself. I’ll trust you 🙂
If you have a time-consuming for-loop in a script and you want to terminate it for some reason (like checking partial results, debugging, etc) but you don’t want to start over again. What would you do if you want minimal typing each time you stop?
Here’s how I do it:
if( exist('k', 'var') ) k0=k; else k0=1; end
for k=k0:1000
  % Your code here
end
If you want to restart the loop, simply enter k=1 in the command prompt and you’re good to go. Otherwise it will pick up where you left off.